How to Add Openlitespeed Server to Haproxy – Avoid 503 Haproxy Error

For past one month, Openlitespeed has been my favorite piece of web server. Litespeed has always outperformed all the other webservers including Nginx as well in any of my production environment. But I have recently switched to using OLS which is a Opensource version of Litespeed with some limited features. I get LS kind of performance along with no worry for paying. How better could it be?

OLS comes with some weird problem. As OLS is less used, finding a solution for such cases could be difficult. I faced a very similar kind of issue yesterday.

I added a OLS based server to my HAProxy cluster, but the HAProxy can not find the OLS server working. When I try to access the web app hosted under OLS server using local IP masking, I see the website without a problem. That means, OLS is interpreting the Domain with IP relation well. But failing to respond when Haproxy is requesting through IP address.

The problem is, OLS is not configured to respond to ‘default’ requests on ‘127.0.0.1’, ‘localhost’ or the server’s main IP. To find out this, I enabled ‘High’ Debug mode of OLS. To do this, first visit the OLS Webadmin Console, it can be accessed with https://IP:7080

After login, go to Server Configuration >> Log >> Edit Server Log >> Set ‘Debug Level’ to High and Save
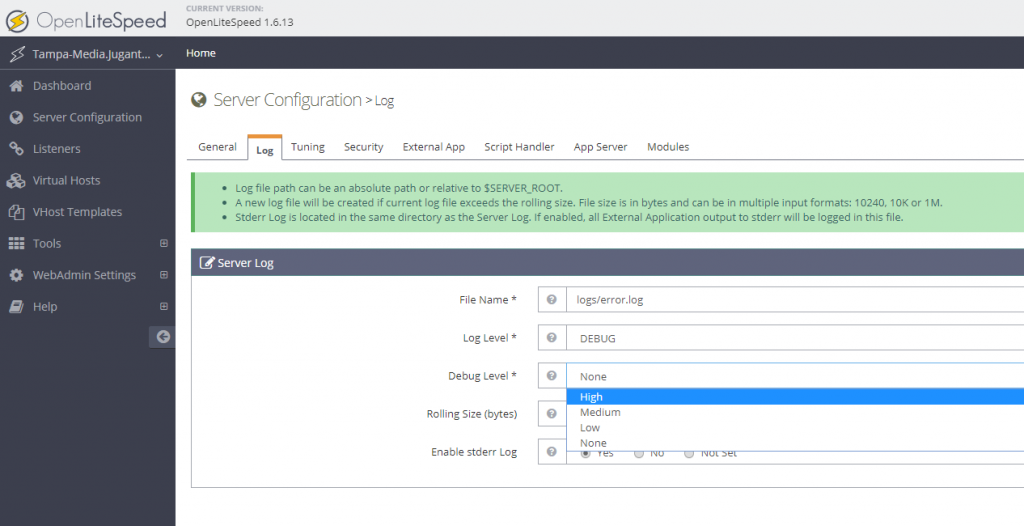
Set high debug level in openlitespeed

Once saving is done, you may gracefully restart the OLS
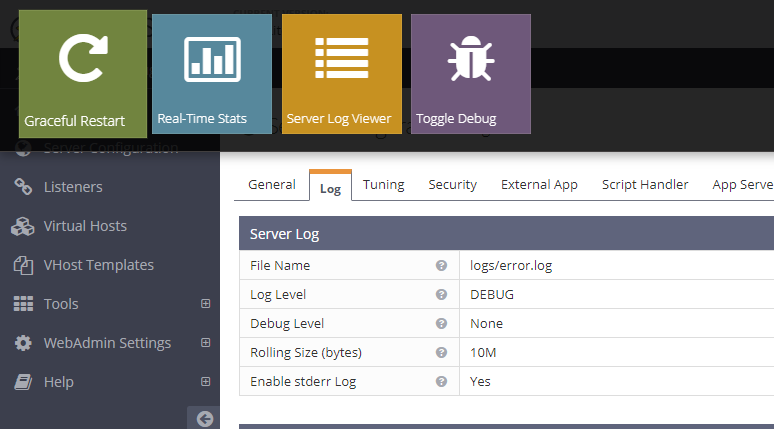
Gracefully restart Openlitespeed

Once this is done, you may now monitor the error.log file located usually under /usr/local/lsws/logs. Now tail the output of error.log while processing requests with Haproxy:

tail -f /usr/local/lsws/logs/error.log

You can see, OLS has returned 404 error for the localhost/ request. That means, Haproxy is requesting the IP with a header ‘localhost/’, and the server should return something with code 200 to make sure the server is in business.

What we need to do, is to make OLS respond to request for basic IP and localhost to 200 with the main site instead of ‘404’ error. To do this, we need to go to Webconsole of OLS again >> Listeners

You will see you have two Listeners, one for Default/Non HTTP and the HTTPS/SSL. In my case, I was using only HAProxy to Origin with no SSL, means 80. I selected the Default.

Open 80 Listener View in Openlitespeed

In the Listener List, you can find your Virtualhost, click on the ‘Edit’ of your Virtualhost

Virtualhost Edit Openlitespeed

Now, you can map the virtualhost. You will see your primary domain as the ‘Virtual Host’, which can’t be changed here. But what you can do is to map this virtualhost to several domains. The trick is to add your server’s IP and the localhost in the ‘domains’ list with comma seperation as following:

localhost mapping to OLS

Once this is saved, restart your OLS and now your HAProxy should be able to read requests and starting forwarding requests to your OLS server.
Lost connection after starttls from Hostname (IP) – Virtualmin – Postfix

Problem Definition:

I have some VPS clients using Virtualmin as their LAMP/LEMP stack. After some recent updates to Virtualmin, they started seeing some Postfix errors. The error is the following:

lost connection after STARTTLS from unknown[0.0.0.0]

Virtualmin used to configure postfix to allow ‘Non TLS’ connections to the port 587, which they recently stopped configuring. Now, if you connect to 587 port, you have to follow the TLS, no matter what. My clients didn’t bother to use TLS/SSL before, which caused the error.

Virtualmin comes with Let’s Encrypt. That’s make it easy to solve the problem TLS problem.

Solution Summary:

Here is the basic to solve the problem, first you make virtualmin to install Let’s encrypt SSL for the domain you want to use for SMTP. Virtualmin primarily going to install this for your Apache. Once done, Copy the same certificate to your Postfix, Virtualmin allows you to do it with single click.

Detailed Steps:

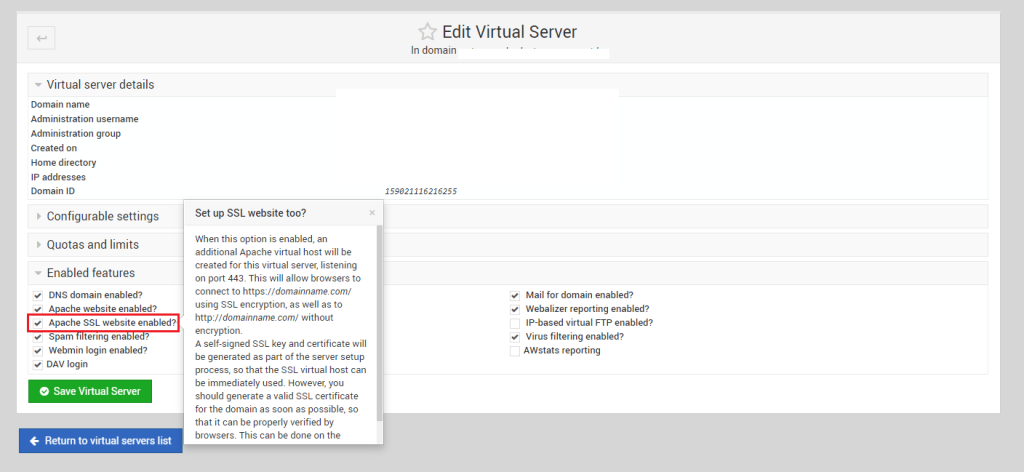
First, login to your Virtualmin at 10000 port, then select the domain you use for the SMTP. Once done, you can go to Edit Virtual Server and expand the option ‘Enabled Features’. From here check the option says ‘Apache SSL Website Enabled?’

Check Apache SSL Website Enabled

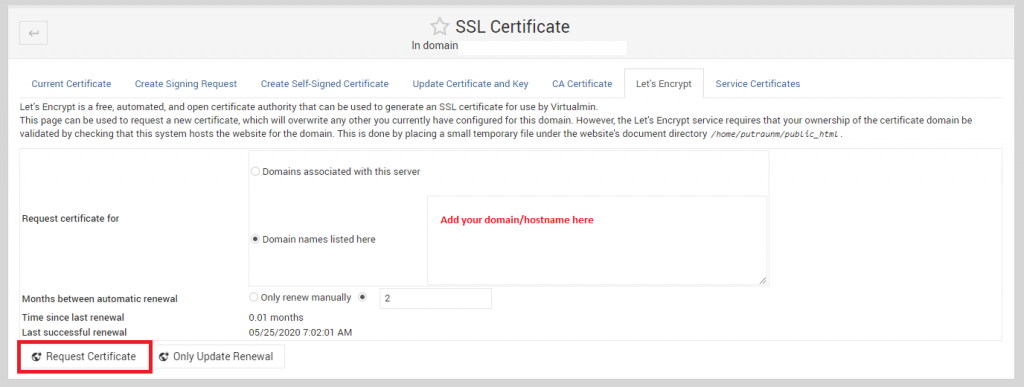
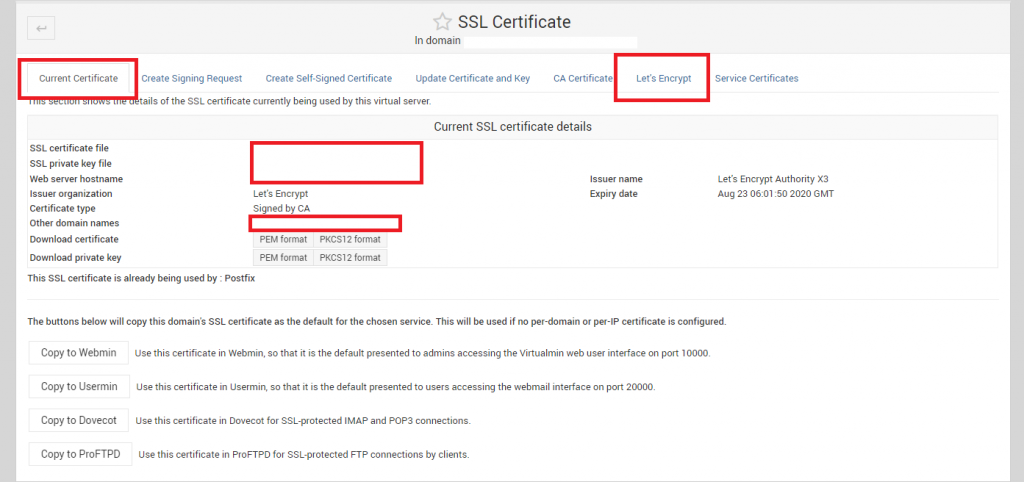
Next, go to Server Configuration >> SSL Certificate, we will get two tabs, ‘Current Certificate’ & ‘Let’s Encrypt’. Both are important. First go to Let’s Encrypt:

Let’s Encrypt Virtualmin

In the Let’s Encrypt tab, select the ‘Domain names listed here‘ and enter the domain that only has valid A Records or loads to the server, otherwise, remember, Let’s Encrypt won’t process for any single exception unlike cpanel or cyberpanel

Let’s Encrypt Virtualmin Add Domains

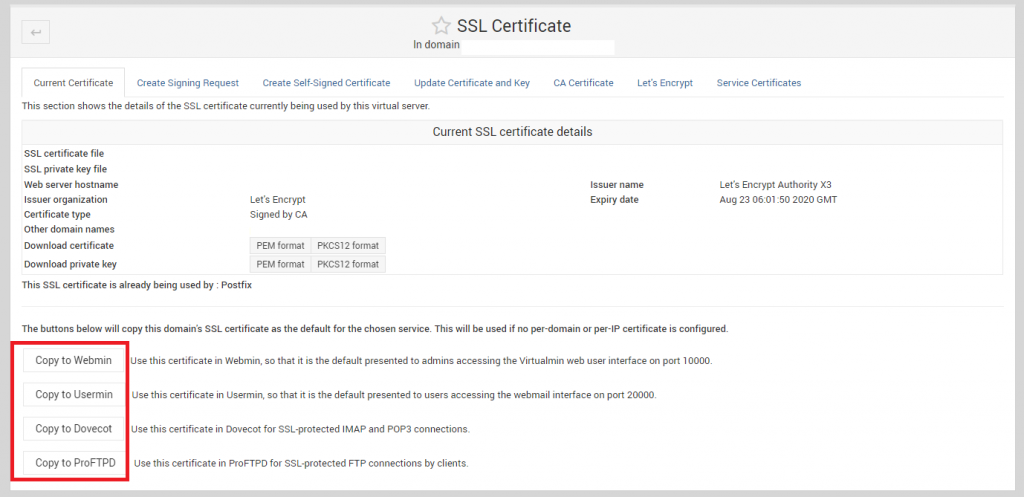
Once done, request the certificate. After the certificate installation is done, go back to ‘Current Certificate’ tab. On the bottom of the tab, there are couple of Copy To ‘Services’ option available. Here you should see the option says ‘Copy to Postfix’. Use that to copy the certificate to Postfix and use it during TLS/SSL transactions.

Copy SSL to Services (Postfix) Virtualmin.

In my case, I have already copied the SSL to Postfix, which is why it is not showing the option ‘Copy To Postfix’. But the option should be above the ProFTPD.

Once done, you may now recheck and the SMTP should work with TLS and 587 port.

How To: Use SSH Password in a Script

You can obviously use RSA public/private keypair to access servers without password, although, sometimes, it may be desirable to use ssh password on a command line and run a remote command on another server. This can be done using a tool called ‘sshpass’. You can create a simple bash script using sshpass, that can help you monitor and control multiple servers from a single location.

How to use ssh password in script

First install sshpass:

# yum install sshpass -y

Once done, you can use sshpass command as following:

# sshpass -p "SSH_Password" ssh -o StrictHostKeyChecking=no SSH_Username@remote-ssh-server "yourcommand"

Just replace, the password, username, remote-ssh-server and your command with your desired setup, and viola!

Note: If yum says, the following:

No package sshpass* available.

then you would need to install epel repository to install sshpass. To install epel, run the following:

# yum install epel* -y

How To: Start a Screen Session and Run a Command at a Time

Sometimes, you may want to run a screen command in a remote server. That makes it necessary to run the command inside the screen session while starting it.

How to start a screen session and run a command in one line

# screen -d -m sh -c "yourcommand"

From the man page of Screen:

-d -m : Start screen in “detached” mode. This creates a new session but doesn’t attach to it. This is useful for system startup scripts.

sh -c: Starts a shell and runs a command for you.


How To: Install AutoSSL for Server Hostname – Cpanel Server

How about install Let’s Encrypt for Cpanel?

Before we start, you may first want to install Let’s Encrypt to use an Immediately Issuing provider for your SSL in Cpanel?

https://mellowhost.com/blog/how-to-install-lets-encrypt-in-cpanel.html

Once done, you may now continue using this tutorial to install Let’s Encrypt for your Service SSL in Cpanel/WHM/Webmail.

How To Install AutoSSL for Server Hostname / Webmail / Cpanel / WHM

Starting from Cpanel 11.58, Cpanel is offering Free SSL, issued by ‘Cpanel INC’ for free of charge to the valid cpanel license owner. If you are using cpanel, login to your WHM >> Providers >> Enable Cpanel & from Options >> Check Allow AutoSSL to replace invalid or expiring non-AutoSSL certificates.

Now, running upcp should automatically install the free SSL for your cpanel server hostname. If it doesn’t, it is probably because your server IP and the hostname IP are resolving to wrong address. To understand and troubleshoot the problem, run the following script from command line:

# /usr/local/cpanel/bin/checkallsslcerts

This script checks and installs certificate for expired, invalid and self signed certificates for the server services. If you are seeing an error like the following:

[WARN] The system failed to acquire a signed certificate from the cPanel Store because of the following error: (XID 62hp6x) The system queried for a temporary file at “http://server91.mellowhost.com/.well-known/pki-validation/D92868E512FB02354F2498B94E67430B.txt”, but the web server responded with the following error: 404 (Not Found). A DNS (Domain Name System) or web server misconfiguration may exist.

It means, your hostname is resolving to the wrong IP. You would need to check if the hostname is resolving to an IP which has first virtualhost pointed to /var/www/html or not under /etc/apache2/conf/httpd.conf

How To: Clear Postfix and Exim Queue

How to clear postfix queue

Postfix queue can be cleared using the postsuper command. The syntax is as following:

# postsuper -d ALL

It will clear all the postfix queue. You can specifically clear the deferred emails for example from the postfix queue as following:

# postsuper -d ALL deferred

If you have a large quantity in postfix queue, there is actually a quicker and easier way to do that. You can simply remove all the folders under /var/spool/postfix and it will clear the queue.

# rm -Rf /var/spool/postfix/*
# mailq | tail -n 1
Mail queue is empty

Note: The folders inside postfix would get created automatically once the queue starts filling up, nothing to worry about.

How to clear Exim Queue

Exim queue can be checked using the following:

# exim -bp

To check the number of mails in queue, you can use:

# exim -bpc

To remove a message from exim queue, you need to use the following:

# exim -Mrm {message-id}

There is no build in command to clear all the mails from exim queue. You can use a pipe command to clear the exim queue as following:

# exim -bp | exiqgrep -i | xargs exim -Mrm

Although, there are even quicker and easier way to clear the exim queue, specially if you have a lot of emails in queue and the server is pretty loaded.

# rm -Rf /var/spool/exim/input

Removing the input directory should clear the exim queue. Note: The directory would automatically create once the exim starts it’s queue again, no need to worry.

How to install ifconfig in CentOS 7

CentOS 7 doesn’t come with ifconfig tools. It encourages users to use ‘ip’ tool for network administration. Although, it is still possible to use ifconfig with CentOS 7. ifconfig is a part of net-tools package. All you have to do is to install the net-tools package using yum.

How to install ifconfig in CentOS 7

Run the following command to install net-tools package in CentOS 7, this will install ifconfig as well:

# yum install net-tools -y
# ifconfig

How to: Change Timezone in CentOS / RHEL 6 & CentOS / RHEL 7

How to change Timezone in CentOS 6 / RHEL 6

In CentOS 6, timezone files are located under /usr/share/zoneinfo. So, if your zone is for example, America/Chicago (UTC -6), it would be /usr/share/zoneinfo/America/Chicago and so on.

CentOS 6, uses a file called ‘localtime’ located under /etc to determine it’s currently set timezone.

# ls -la /etc/localtime

This file, is either the actual time zone file moved to this location or a symlink to the timezone under zoneinfo directory. So if you want to change the timezone, first you need to determine which timezone to use and then symlink it to localtime. You can do that using the following:

# rm -f /etc/localtime
# ln -s /usr/share/zoneinfo/Asia/Dhaka /etc/localtime
# date

This would set the current timezone to GMT +6 BDT or Asia/Dhaka timezone, zone I belong to.

How to change timezone in CentOS 7 or RHEL 7

CentOS 7, comes with a tool called ‘timedatectl’. This can be used to find and set the symlink for you instead of doing the work that were required in CentOS 6.

To list available time zones, run:

# timedatectl list-timezones

You can find your desired timezone, as following:

# timedatectl list-timezones | grep Chicago

Now, to set a time zone, use the command set-timezone with timedatectl command. For example, if I want to set the time zone to America/Chicago, I would run the following:

# timedatectl set-timezone America/Chicago
# date

This also should create the symlink of locatime file to the zoneinfo directory. You can see that with the following:

# ls -l /etc/localtime

How To: Get Username from UID & Vice Versa in Linux

Question:

I have an UID, how do I get the username belongs to this UID in Linux?

How to Get UID from USERNAME in Linux

We usually know, there is a dedicated command called ‘id’ in linux given to find UID from username is called ‘id

You can use that to get the UID from the username in linux:

# id -u root
0

How to get Username from UID in Linux

Although, there is no built in command get fetch the username from the UID. We can use a pipe and regular expression match on getent to do that.

getent is a unix command that helps a user get entries in a number of important text files called databases. This includes the passwd and group databases which store user information – hence getent is a common way to look up user details on Unix.

You can use the following command to find username of the UID 752 for example in a system:

# getent passwd "752"|cut -d: -f1
texstard

getent can take group database too, although, we have used passwd database as that contains the UID of the respective linux user.

Linux How To: Install IPTABLES in CentOS 7 / RHEL 7 Replacing FirewallD

CentOS 7 / RHEL 7 doesn’t come with iptables by default. It uses a full functional firewall system called ‘firewalld’. I have been a big fan of iptables and it’s capability from the very first, and since I have switched to CentOS 7, I couldn’t stop using it. I had to stop firewalld and install iptables in all of my CentOS 7 installation and start using iptables rules as I was using before. Here is a small How To guide on installing Iptables and disabling firewalld from a CentOS 7 or RHEL 7 or a similar variant distro.

How to Install IPTABLES in CentOS 7

To begin using iptables, you need to download and install iptables-service package from the repo. It isn’t installed automatically on CentOS 7. To do that, run the following command:

# yum install iptables-services -y

How to stop the firewalld service and start the Iptables service

Once the iptables-serivces package is installed, you can now stop the firewalld and start the iptables. Keeping both kind of network filtering too can create conflicts and it is recommended to use any out of two. To do that run the following:

# systemctl stop firewalld
# systemctl start iptables

Now to disable firewalld from the starting after the boot, you need to disable the firewalld:

# systemctl disable firewalld

To disallow starting firewalld manually as well, you can mask it:

# systemctl mask firewalld

Now you can enable iptables to start at the boot time by enabling iptables using systemctl command:

# systemctl enable iptables

How to check status of iptables in centOS 7

In previous distros, iptables status could be fetched using service command, although, the option is no longer available in CentOS 7. To fetch the iptables status, use the following:

# iptables -S

Iptables save command can still be used using service tool:

# service iptables save

This would save your iptables rules to /etc/sysconfig/iptables as it used to do in previous distros.