How To: Use SSH Password in a Script

You can obviously use RSA public/private keypair to access servers without password, although, sometimes, it may be desirable to use ssh password on a command line and run a remote command on another server. This can be done using a tool called ‘sshpass’. You can create a simple bash script using sshpass, that can help you monitor and control multiple servers from a single location.

How to use ssh password in script

First install sshpass:

# yum install sshpass -y

Once done, you can use sshpass command as following:

# sshpass -p "SSH_Password" ssh -o StrictHostKeyChecking=no SSH_Username@remote-ssh-server "yourcommand"

Just replace, the password, username, remote-ssh-server and your command with your desired setup, and viola!

Note: If yum says, the following:

No package sshpass* available.

then you would need to install epel repository to install sshpass. To install epel, run the following:

# yum install epel* -y
How To: Restrict a Folder to Your IP Only

Sometimes, for development purposes, you may want to restrict access to the folder, only to your IP, and deny others from accessing that folder. One way to do that is to use htaccess rules. A common rule, could be denying all the users and allowing your IP. To find out, your IP, you may visit the following:

http://ifconfig.co

Note the IP it has reported. Open the folder that you want to protect. Find the .htaccess file under the folder (If no file available, create one) and add the following:

order deny,allow
deny from all
allow from <your IP goes here>

Replace the <your IP goes here> from the snippets with the IP you have noted from ifconfig.co. Now, your folder should be accessible only from your IP.

How To: Start a Screen Session and Run a Command at a Time

Sometimes, you may want to run a screen command in a remote server. That makes it necessary to run the command inside the screen session while starting it.

How to start a screen session and run a command in one line

# screen -d -m sh -c "yourcommand"

From the man page of Screen:

-d -m : Start screen in “detached” mode. This creates a new session but doesn’t attach to it. This is useful for system startup scripts.

sh -c: Starts a shell and runs a command for you.


Quick Tip: How to Check Total Number of Mails in Postfix Queue

Exim provides a quick way to check the total number of mails in the queue. This is done using the exim -bpc Although, this is not the same for postfix. Postfix doesn’t come with an easy way to do that.

How to Check Total Number of Mails in Postfix Queue

A quick tip on what I use to check the postfix queue number is the following command:

# mailq | tail -n 1
-- 6899 Kbytes in 1518 Requests.

Basically, postfix returns the queue statistics at the end of the queue listing command. We are simply tailing that to find the number.


How To: Clear Postfix and Exim Queue

How to clear postfix queue

Postfix queue can be cleared using the postsuper command. The syntax is as following:

# postsuper -d ALL

It will clear all the postfix queue. You can specifically clear the deferred emails for example from the postfix queue as following:

# postsuper -d ALL deferred

If you have a large quantity in postfix queue, there is actually a quicker and easier way to do that. You can simply remove all the folders under /var/spool/postfix and it will clear the queue.

# rm -Rf /var/spool/postfix/*
# mailq | tail -n 1
Mail queue is empty

Note: The folders inside postfix would get created automatically once the queue starts filling up, nothing to worry about.

How to clear Exim Queue

Exim queue can be checked using the following:

# exim -bp

To check the number of mails in queue, you can use:

# exim -bpc

To remove a message from exim queue, you need to use the following:

# exim -Mrm {message-id}

There is no build in command to clear all the mails from exim queue. You can use a pipe command to clear the exim queue as following:

# exim -bp | exiqgrep -i | xargs exim -Mrm

Although, there are even quicker and easier way to clear the exim queue, specially if you have a lot of emails in queue and the server is pretty loaded.

# rm -Rf /var/spool/exim/input

Removing the input directory should clear the exim queue. Note: The directory would automatically create once the exim starts it’s queue again, no need to worry.

How To: Get Username from UID & Vice Versa in Linux

Question:

I have an UID, how do I get the username belongs to this UID in Linux?

How to Get UID from USERNAME in Linux

We usually know, there is a dedicated command called ‘id’ in linux given to find UID from username is called ‘id

You can use that to get the UID from the username in linux:

# id -u root
0

How to get Username from UID in Linux

Although, there is no built in command get fetch the username from the UID. We can use a pipe and regular expression match on getent to do that.

getent is a unix command that helps a user get entries in a number of important text files called databases. This includes the passwd and group databases which store user information – hence getent is a common way to look up user details on Unix.

You can use the following command to find username of the UID 752 for example in a system:

# getent passwd "752"|cut -d: -f1
texstard

getent can take group database too, although, we have used passwd database as that contains the UID of the respective linux user.

How to: Find dm number of a LVM logical volume

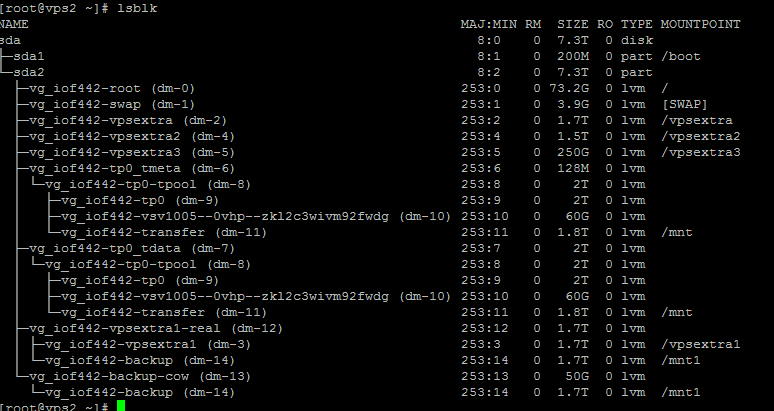
Sometimes, you will see the error thrown in dmesg or /var/log/messages are mentioned in dm-number format, while you manage the disk using lvm logical volume name. This is because lvm logical volumes are designed through kernel device mapper technique and kernel recognizes volumes using dm numbers. There is a tool to list all the device mappers used for block devices under Linux. Simply type the following to list the maps:

# lsblk

It shall show something like the following:

There you can see the dm number for each lvm volume is listed under first bracket. For example the swap in this server is created with LVM with the name vg_iof442/swap and has the dm-1 mapping.