How To: Manually Add Support of SSL for WWW on Cyberpanel

hmm, it’s a weird topic to write blog on. Because Cyberpanel comes with a built in Certbot, and can automatically detects www and without www to install SSL for. Then why am I writing this up? All because I found a VPS client today facing the issue. Even though, Cyberpanel was telling me that the SSL is issued, it was only issued for non-www domain, but the www domain left behind. Let’s see how can we resolve this.

First problem

First problem came up when I tried to discover the Cyberpanel certbot binaries.

[root@server-sg /]# find . -name "certbot"
./usr/local/CyberCP/bin/certbot
./usr/local/CyberCP/lib/python3.6/site-packages/certbot
./usr/local/CyberPanel/bin/certbot
./usr/local/CyberPanel/lib/python3.6/site-packages/certbot

[root@server-sg live]# /usr/local/CyberCP/bin/certbot --version
certbot 0.21.1
[root@server-sg live]# /usr/local/CyberPanel/bin/certbot --version
certbot 0.21.1

Both of the certbot I could find from Cyberpanel was very old, Certbot has 1.4 version in the Epel which has support for Acme 2 challenge, while the one that Cyberpanel is using doesn’t. I hence decided to install a certbot for our case:

yum install epel-release
yum install certbot

These should be it for the latest version of certbot to start working in your Cyberpanel host. Once done, you may now generate the SSL using the following:

certbot certonly  --webroot -w /home/yourdomain.com/public_html -d yourdomain.com -d www.yourdomain.com

Remember to replace yourdomain.com with the actual one that is having problem with. Cyberpanel creates the home directory with the primary domain, so the remember to give the correct document root for the value of attribute ‘-w’.

Once this id done, certbot should automatically verify the challenge and get the issued license for you. Lets encrypt license are usually stored at the following directory:

/etc/letsencrypt/live/yourdomain.com/

Files are:
/etc/letsencrypt/live/yourdomain.com/privatekey.pem
/etc/letsencrypt/live/yourdomain.com/fullchain.pem

If you had already created the SSL using Cyberpanel (which you must have done if you viewing this post), then remember, certbot will place the SSLs in /etc/letsencrypt/live/yourdomain.com-001/ folder. The name of the folder would be shown at the time you complete issuing SSL with certbot.

There are couple of ways you may use the SSL now. Either you may replace the old directory with the new, or just change the settings in either the vhost conf or the openlitespeed SSL settings. I find the easiest way is just to replace the old directory with the new. Something like this should work:

mv /etc/letsencrypt/live/yourdomain.com /etc/letsencrypt/live/old_yourdomain.com
mv /etc/letsencrypt/live/yourdomain.com-001 /etc/letsencrypt/live/yourdomain.com

Once this is done, remember to restart your openlitespeed:

service lsws restart

Now your https on the WWW should work without any problem. If not, try clearing your browser cache and retry.
Can You Test Emptiness of Laravel Collection using empty()?

In short, Yes and No. Not the way we commonly do a variable, but in laravel way yes. It’s a common mistake done by almost all the laravel developer once in a lifetime until the bug appears (Well, you are not counted, if you are exceptional :P). So, let’s explore.

Let’s look at how laravel collection is constructed. Go to your laravel tinker console and try this:

php artisan tinker
Psy Shell v0.9.12 (PHP 7.2.31 — cli) by Justin Hileman
>>> $collection = collect([])
=> Illuminate\Support\Collection {#3164
     all: [],
   }

You see, when I create an empty collection, laravel still puts an underlying array called ‘all’. This is the manipulator array and contains all the content inside. This array is accessible through the collection all method:

>>> $collection->all()
=> []

You see, the return is an empty array. But when it’s just the collection, it’s not really empty, it has an underlying content holder.

So, how can we test emptiness of the collection? Well, there are 3 ways.

I) Laravel gives a way to return the number of element in the collection with a collection method calls count(). You can test it against 0 to see if the collection is empty or not

>>> $collection->count()
=> 0

II) You may use the regular php count() method to return that it doesn’t contain any leaf element and test it against 0:

>>> count($collection)
=> 0

III) If you are a big fan of ’empty’ and still would like to follow, then you can grab the content of the collection using all method and test it against empty as following:

>>> empty($collection->all())
=> true

So, yeah, now you know all the ways 🙂

How To: Restore Zimbra Quarantined Email by Clam AKA Heuristics.Encrypted.PDF Release Point

Zimbra Mail Server automatically quarantines emails that get hit by the Antivirus scan using Clam when the mail is received. While putting the email on the recipient inbox, what it does, instead of giving the original email with the attachment, it sends a virus detected email with the following kind of error message:

Virus (Heuristics.Encrypted.PDF) in mail to YOU

Virus Alert
Our content checker found
virus: Heuristics.Encrypted.PDF

by Zimbra

It actually means, the original mail is now quarantined. Zimbra maintains a virus quarantine email account that is not normally available in the ‘Manage Account’ list of Zimbra Admin panel. You can find it if you search with ‘virus’ in the ‘Search’ box of the admin panel. What zimbra does in quarantine situation, is that, it pushes the mail to the quarantine email instead of original recipient.

Now, to get back the mail delivered to the original recipient, we need to first get the quarantine email account, get the message id, and then we need to inject the mail into the LMTP pipe that bypasses any scanning. Here are the steps on how to do this:

# First get to the zimbra user
$ su - zimbra

# Get the email account that is used to store virus detected mails
$ zmprov gcf zimbraAmavisQuarantineAccount
zimbraAmavisQuarantineAccount: [email protected]

# [email protected] this should be our quarantine email account, now we need to get the quarantine account's mailbox id
$ zmprov gmi [email protected]
mailboxId: 73
quotaUsed: 644183

# Mailbox id here for the quarantine account is 73. Now go to the message storage of this id using the following command: cd /opt/zimbra/store/0/<mailboxId>/msg/0
$ cd /opt/zimbra/store/0/73/msg/0

# list the messages
$ ls *

These are your quarantined emails. Now for example the complainer is ‘[email protected]’. To search for the emails designated for this email account, you may use the following:

$ grep -l [email protected] *
281-1216.msg
300-1400.msg
301-1476.msg

This should return you all the emails that got quarantined for the above user.

Now the question is, how can we get these emails delivered to the designated user bypassing the antivirus/antispam tools. To do this, you need to inject the mail into LMTP pipe. You may do this using ‘zmlmtpinject’ command as following:

$ zmlmtpinject -r [email protected] -s [email protected] 281-1216.msg

Remember, to change [email protected] to the original recipient. [email protected] would be the newly rewritten sender for this mail delivery and ‘281-1216.msg’ is the file name of the original email that you found out from the grep command. You can do lmtp injections for one email mail with each command. So, you would require to do this for each emails.

How to Make Cloudflare Work with HAProxy for TLS Termination

Remember:
This is a part of dirty hack series. This is not the only way you can achieve what we want to achieve. But this is only used when you can trust the connections between your HAProxy and the Origin servers. Otherwise, you should not use this technique.

One common problem with using HAProxy and Cloudflare is that, the SSL that Cloudflare gives us, it gets terminated at HAProxy on L7 load balancer. For such cases, Cloudflare can not verify the Origin server and drops the connection. For such cases, your HAProxy will not work. What would you do for such cases? There are two ways to do this.

First one is, Cloudflare gives you a origin certificate, that you can install at HAProxy. I won’t dig into deep into this in this blog post.

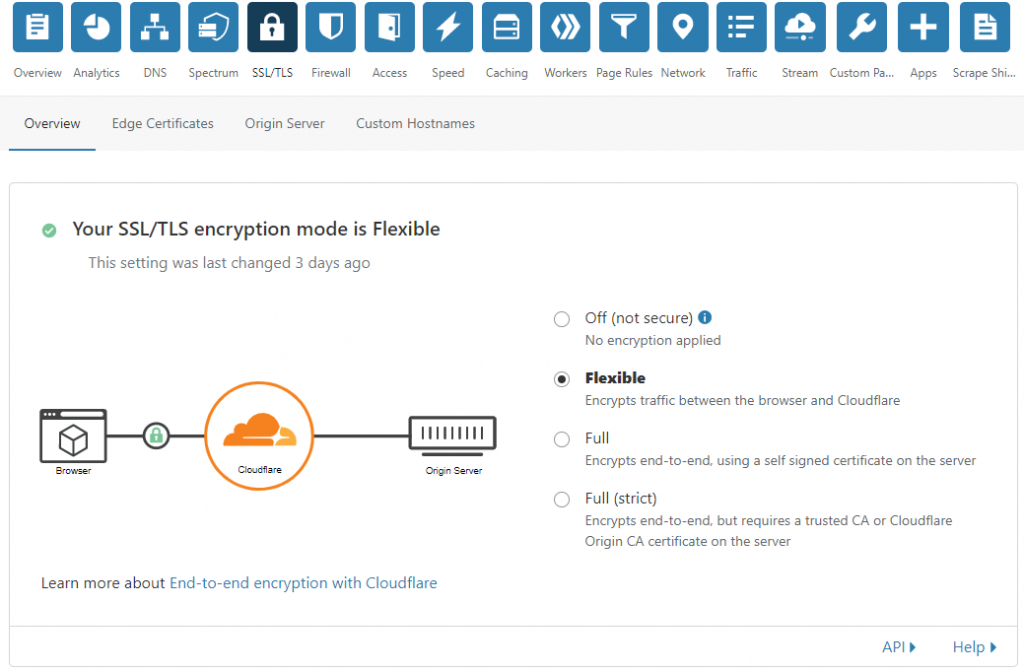
But if you can trust your connections between HAProxy and backend Origin servers, as well as the connections between Cloudflare and HAproxy, you can choose the second one. For this case, Cloudflare allows you to Encrypt only the connections between the Visitors and Cloudflare. It won’t matter what you are doing behind the Cloudflare. This option is called ‘Flexible’ option, that you can select from your Cloudflare >> SSL/TLS tab.

Fix TLS Termination by HAProxy with Flexible Encryption Mode of Cloudflare

Once you set this to Flexible, this should start working ASAP. Remember, this is not essentially the best way to do this, but the quickest way only if load balancing is more important to you instead the data integrity.

Lost connection after starttls from Hostname (IP) – Virtualmin – Postfix

Problem Definition:

I have some VPS clients using Virtualmin as their LAMP/LEMP stack. After some recent updates to Virtualmin, they started seeing some Postfix errors. The error is the following:

lost connection after STARTTLS from unknown[0.0.0.0]

Virtualmin used to configure postfix to allow ‘Non TLS’ connections to the port 587, which they recently stopped configuring. Now, if you connect to 587 port, you have to follow the TLS, no matter what. My clients didn’t bother to use TLS/SSL before, which caused the error.

Virtualmin comes with Let’s Encrypt. That’s make it easy to solve the problem TLS problem.

Solution Summary:

Here is the basic to solve the problem, first you make virtualmin to install Let’s encrypt SSL for the domain you want to use for SMTP. Virtualmin primarily going to install this for your Apache. Once done, Copy the same certificate to your Postfix, Virtualmin allows you to do it with single click.

Detailed Steps:

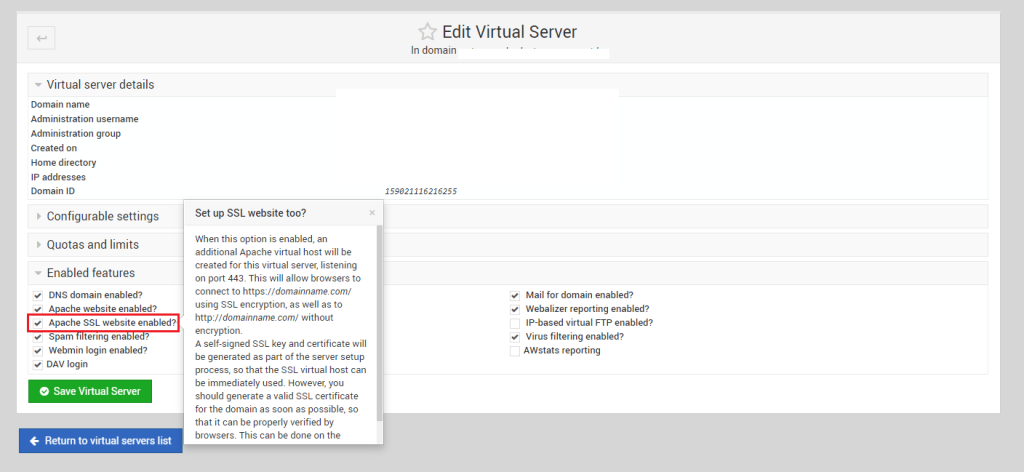
First, login to your Virtualmin at 10000 port, then select the domain you use for the SMTP. Once done, you can go to Edit Virtual Server and expand the option ‘Enabled Features’. From here check the option says ‘Apache SSL Website Enabled?’

Check Apache SSL Website Enabled

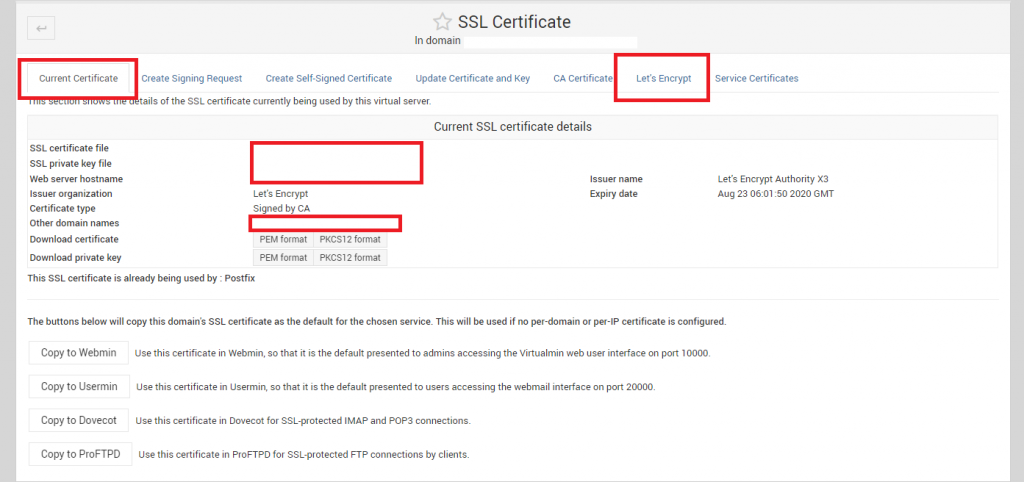
Next, go to Server Configuration >> SSL Certificate, we will get two tabs, ‘Current Certificate’ & ‘Let’s Encrypt’. Both are important. First go to Let’s Encrypt:

Let’s Encrypt Virtualmin

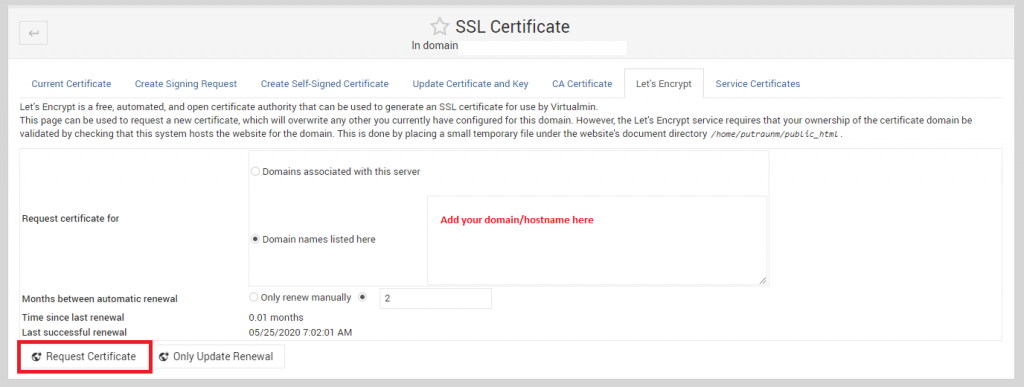
In the Let’s Encrypt tab, select the ‘Domain names listed here‘ and enter the domain that only has valid A Records or loads to the server, otherwise, remember, Let’s Encrypt won’t process for any single exception unlike cpanel or cyberpanel

Let’s Encrypt Virtualmin Add Domains

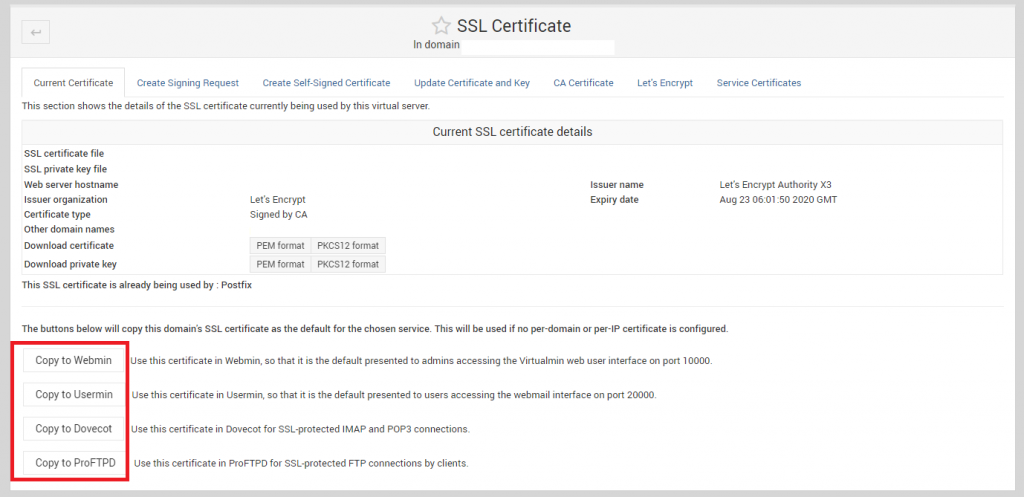
Once done, request the certificate. After the certificate installation is done, go back to ‘Current Certificate’ tab. On the bottom of the tab, there are couple of Copy To ‘Services’ option available. Here you should see the option says ‘Copy to Postfix’. Use that to copy the certificate to Postfix and use it during TLS/SSL transactions.

Copy SSL to Services (Postfix) Virtualmin.

In my case, I have already copied the SSL to Postfix, which is why it is not showing the option ‘Copy To Postfix’. But the option should be above the ProFTPD.

Once done, you may now recheck and the SMTP should work with TLS and 587 port.

How to Use Sticky Session for CSRF submission on Highly Scalable Cloud App in Haproxy

HINT: If you are a nginx fan and used it in mass scale, then, you must have done this using ip_hash (Nginx Documentation). It follows the same purpose for Haproxy. Difference and benefits of using Haproxy over Nginx for L7 proxy in a highly scalable and reliable cloud app would be a discussion for another day.

Case Discussion:

Suppose, you have a Cloud app, that is load balanced & scaled between multiple servers using Haproxy, for example:

101.101.101.101
202.202.202.202
303.303.303.303

Now, if your app has a submission form, for example, a poll submission from your users, then, there is an issue in this Haproxy setup.

Let’s say, an User A, requests for the app, and gets the data from the server 101.101.101.101, the CSRF token he gets for the poll submission to his browser, also maintains the app hosted on 101.101.101.101. But when he press the submit button, HAProxy puts him on 202.202.202.202 app, and the app hosted on 202.202.202.202 instantly rejects the token for the session as the session is not registered for that app. For such cases, we need to maintain a ‘Sticky’ session based on the cookie set by the right server. That means, if the cookie is set by 101.101.101.101, HAproxy should obey and give the user 101.101.101.101 until the cookie or the session is reset or regenerated.

How To Do That:

What we need to do, let haproxy write the server id in the cookie, and make the directive ‘server’ to follow the cookie. Please remember, there are couple of other way to achieve this. There is another way of doing this is called ‘IP Affinity’, where you make sticky session based on IP of the user. There is another based on PHP session value. Setting sticky session based on php session should also work. I preferred the cookie based sticky session, just on random selection.

So, to write the server id in the cookie, you need to add the following in the haproxy ‘backend’ directive as following:

backend app-main
balance roundrobin
cookie SERVERID insert indirect nocache

In the cookie directive, you can see, we are taking the HAProxy variable ‘SERVERID’ and inserting that to the cookie attribute. Now, all you need to do, is to configure your balancing IPs to follow the cookie, like the following:

backend app-main
balance roundrobin
cookie SERVERID insert indirect nocache
server nginx1 101.101.101.101 cookie S1
server nginx2 202.202.202.202 cookie S2
server nginx3 303.303.303.303 cookie S3

S1, S2, S3 are just 3 different names of the cookies for the specific servers. After the above is done, you can now restart and see Haproxy is following stickiness based on the session you have.

Just to find out, how to test if you are using laravel, try to regenerate the session based on the session() helper method as following:

session()->regenerate()->csrf_token();

You should be able to see the content loading from different web servers when the session regenerates. But it will persists when the regenerate session method is not called.

Quick Tips: An error occurred. Your account may be over its quota or you attempted to upload a folder – Cpanel

An error occurred. Your account may be over its quota or you attempted to
upload a folder.

The error is very obvious. It means the account is over the quota. But what if it isn’t? This error is generic, cpanel throws this, whenever it fails to upload the file, regardless of what error it returns. There is a possibility that your IDS (Intrusion detection system) is discarding the upload, so double checking the IDS log should help you to conclude that. But what if, that is also not the case?

Ok, that can actually still happen. It happens when the customer uses cloudflare and uses cloudflare to login to the cpanel using cpanel proxy and then use it to upload the file. Cloudflare sees the upload going through web and blocks it. So, just double check the domain he uses to login to the cpanel, and check whether it uses some kind of 3rd party web application firewall loaded application or not like Cloudflare. If it does, that could be the case!

Troubleshoot: -bash: fuser: command not found

If you are trying to use a command, fuser, that is used to identify process using lock file or socket file, and having the following error:

-bash: fuser: command not found

that means, your system doesn’t have the psmisc package installed. Usually, killall, fuser type of commands are under this package. CentOS 7 sometimes, do not install the package by default. To install it, run the following:

yum install psmisc -y

Once done, you should be able to use fuser command.

How To: Use SSH Password in a Script

You can obviously use RSA public/private keypair to access servers without password, although, sometimes, it may be desirable to use ssh password on a command line and run a remote command on another server. This can be done using a tool called ‘sshpass’. You can create a simple bash script using sshpass, that can help you monitor and control multiple servers from a single location.

How to use ssh password in script

First install sshpass:

# yum install sshpass -y

Once done, you can use sshpass command as following:

# sshpass -p "SSH_Password" ssh -o StrictHostKeyChecking=no SSH_Username@remote-ssh-server "yourcommand"

Just replace, the password, username, remote-ssh-server and your command with your desired setup, and viola!

Note: If yum says, the following:

No package sshpass* available.

then you would need to install epel repository to install sshpass. To install epel, run the following:

# yum install epel* -y

How To: Restrict a Folder to Your IP Only

Sometimes, for development purposes, you may want to restrict access to the folder, only to your IP, and deny others from accessing that folder. One way to do that is to use htaccess rules. A common rule, could be denying all the users and allowing your IP. To find out, your IP, you may visit the following:

http://ifconfig.co

Note the IP it has reported. Open the folder that you want to protect. Find the .htaccess file under the folder (If no file available, create one) and add the following:

order deny,allow
deny from all
allow from <your IP goes here>

Replace the <your IP goes here> from the snippets with the IP you have noted from ifconfig.co. Now, your folder should be accessible only from your IP.