How to Set Default Route Interface when there are multiple Interfaces in CentOS

Consider the following situation, you have two interfaces in your system, eth0, and eth1 (or more). Both the interfaces have a default gateway. But how can you choose which interface to follow as the default outbound requests by the server? This could be a situation like adding secondary alias IP addresses to an interface (Like eth0, eth0:0, eth0:1, eth0:2, etc).

In these cases, Linux can decide based on its own algorithm. The problem with this is in the case of Licensing. In most licensing systems these days, you need to provide an outbound IP address to your server. If this IP changes over time, you would have trouble managing the license. For these cases, you need to define your default interface to Linux.

You may set this configuration under /etc/sysconfig/network file. The ‘key’ for the settings is ‘GATEWAYDEV’.

So for example if your gatewaydev would be eth0:1, the file would look like something following:

NETWORKING=yes
HOSTNAME=hemonto.ethii.com
DOMAINNAME=ethii.com
GATEWAYDEV=eth0:1

or if it is eth1, the following:

NETWORKING=yes
HOSTNAME=hemonto.ethii.com
DOMAINNAME=ethii.com
GATEWAYDEV=eth1

I Hope, this helps somebody. Good luck
Unable to connect to any wifi with NetworkManager due to error: Secrets were required, but not provided

I was trying to connect to wifi from a CentOS 7 minimal installation using the following article:

But I started seeing the following error:

Unable to connect to any wifi with NetworkManager due to error: Secrets were required, but not provided

The reason the above error is showing is that NetworkManager is trying to reuse an existing connection, which shouldn’t happen. You need to delete the connection first.

nmcli con delete <SSID>

Now, you can connect with the following:

nmcli dev wifi connect <SSID> password <password>

How to find wifi password from saved wifi connection in Windows 10

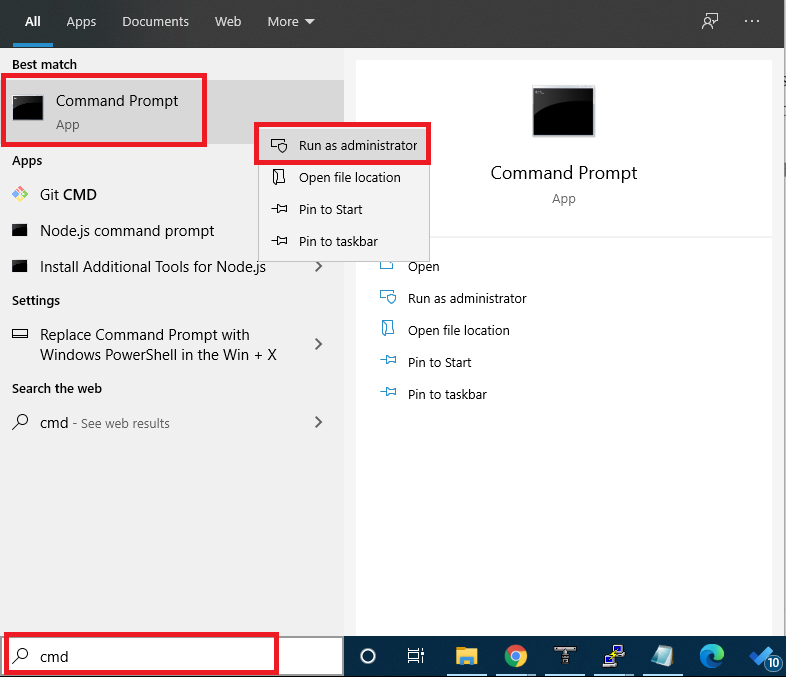
You may get the password from using ‘netsh’ windows command. First go to your windows 10 search box, and type ‘cmd’

Now, from the result, there should be an option called ‘Command Prompt’, right click on it, and ‘Run as administrator’. Now on the black command prompt, type the following:

netsh wlan show profile "your wifi name" key=clear

Replace the part “your wifi name” with your one. So, for example if you connect to a wifi connection that has a name ‘Mellowhost_Portable’, then the command should be like the following:

netsh wlan show profile "Mellowhost_Portable" key=clear

This shall show you the full profile of your wifi details, including the password. Password should be available under the ‘Security Settings’, inside the ‘Key Content’ section.

Hope it helps.

How to: Use WINMTR to Diagnose Network Issues

MTR is a great tool to understand if there is a routing issue. There are many times, customer says the website/web server is slow or not being able to access the network etc. After some basic checks, if no solution is concluded, it is important to get a MTR report from the client. As most of the users use Windows, it is common to use WinMTR.

To run WINMTR, you need to first download it from here:

https://sourceforge.net/projects/winmtr/

or here

https://winmtr.en.uptodown.com/windows

Once the app is downloaded, double clicking it will open it. WinMTR is a portable executable binary. It doesn’t require installation.

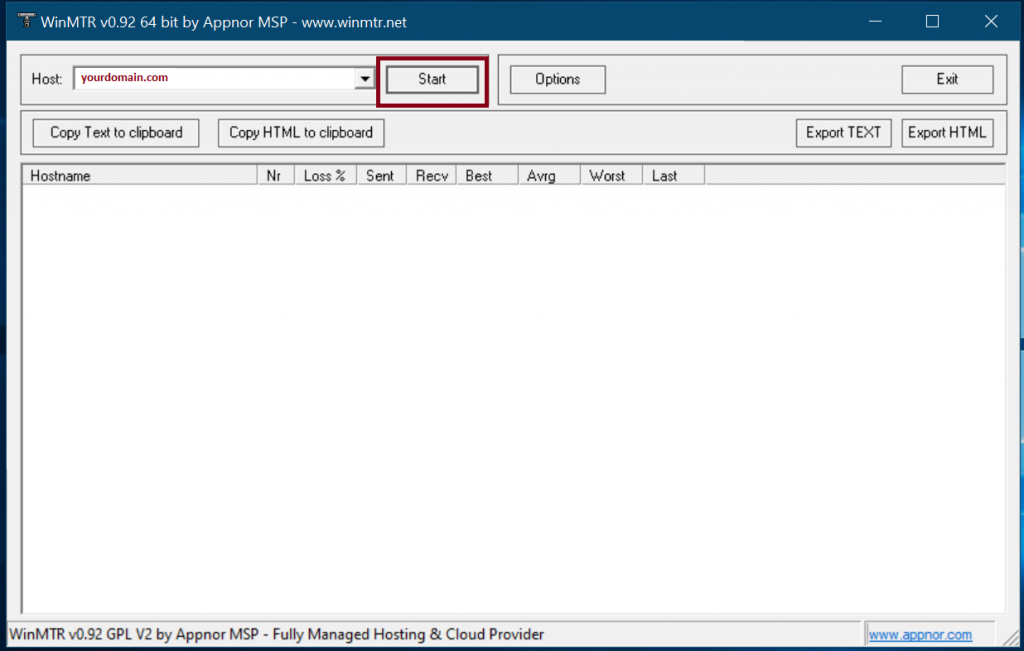
Once opened, you can enter the ‘domain name’ that is having trouble in the ‘Host’ section and press start.

Start winMTR by entering your domain in the Host section

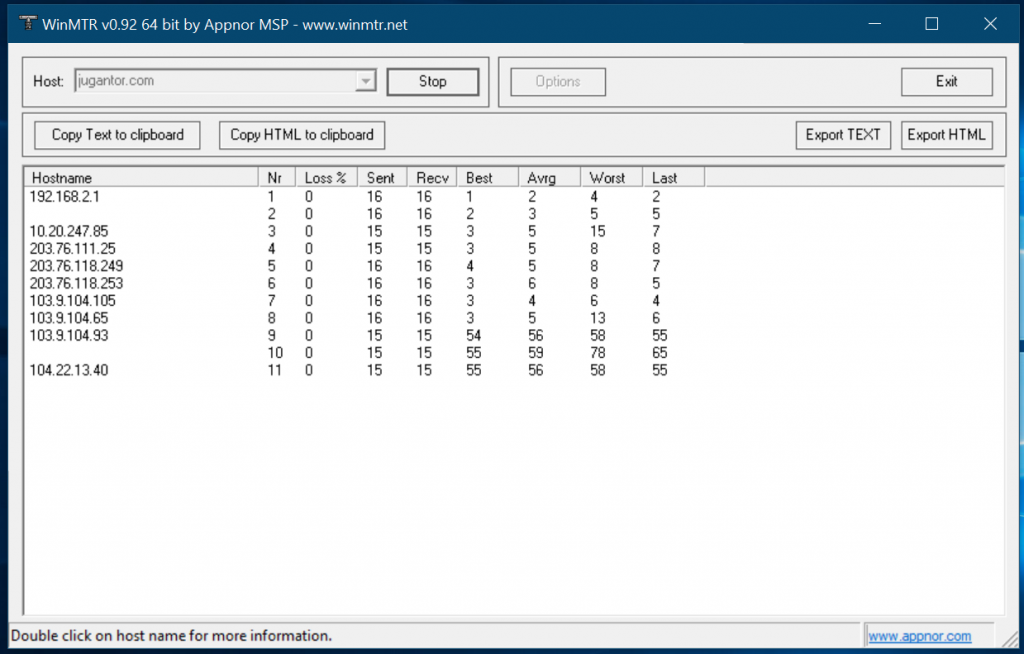
Once you start, it will start reaching the domain you entered and hit each of the node it passes for routing, with giving the amount of drops each node is hitting

WintMTR running – (I have hidden two hops for privacy)

If you are seeing drops of anything above 2-5%, that node is problematic. If the node is dropping a lot, but the next node isn’t dropping enough, then the node is set to transparently hiding the packet responses for security, then that node is not problematic. So if your packet isn’t reaching the destination and it is dropping somehwere or looping in a node, that means, the problem is within that node. Now you can locate the node and see where does it belong. If it belongs to within your territory, then the issue is within your ISP or IIG. But if it is outside your territory but at the end of the tail, then the issue is with the Host.

In most case, we ask for running the MTR for 5 minutes and then export to TEXT and send it over for us to analyse to customers. You can export the report by stopping the MTR and clicking ‘Export TEXT’ available in the winMTR window.

How to Stop Redirecting All Traffic Trough OpenVPN

There are cases, where you might want to use OpenVPN to redirect only a fraction of traffic, but not all. By default, after you connect to OpenVPN, server would push the call 'redirect-gateway' to the client to make the client divert all the traffic through tun network.

This behavior can be override with the following command line argument:

--pull-filter ignore redirect-gateway

You can add it in the openvpn command line as following:

openvpn --pull-filter ignore redirect-gateway --config "your_file.ovpn"

Once this is done, remember that, you have to route the targetted traffic using either the route command or 'ip route' command, otherwise no traffic will route through your openvpn tunnel network.

How to Save OpenVPN Username & Password

If you are using OpenVPN in a Linux platform through command line, it is always handy to be able to save the authentication information in a file and let openvpn use them. There are two ways you can do it.

First Method

First save the password in a file e.g auth.txt with two lines:

username
password

First line is for username and the second line is for password.

If you are using .ovpn files for configuration, open the .ovpn file and simply add the following:

auth-user-pass auth.txt

Now, your authentication would use the authentication given in that file

Second Method

You may add the auth-user-pass in the openvpn command line argument, but you have to make sure, this is passed after the --config. Here is an example

openvpn --config "your_file.ovpn" --auth-user-pass "auth.txt"

That should be enough.

How to install ifconfig in CentOS 7

CentOS 7 doesn’t come with ifconfig tools. It encourages users to use ‘ip’ tool for network administration. Although, it is still possible to use ifconfig with CentOS 7. ifconfig is a part of net-tools package. All you have to do is to install the net-tools package using yum.

How to install ifconfig in CentOS 7

Run the following command to install net-tools package in CentOS 7, this will install ifconfig as well:

# yum install net-tools -y
# ifconfig