The GPG keys listed for the “MySQL 5.7 Community Server” repository are already installed but they are not correct for this package.

When you try to run yum update, you see an error like the following:

The GPG keys listed for the "MySQL 5.7 Community Server" repository are already installed but they are not correct for this package.

This is coming because the GPG key for Mysql 5.7 community repo has changed. To update the GPG key, you may run the following:

rpm --import https://repo.mysql.com/RPM-GPG-KEY-mysql-2022

This shall resolves the issue for you. Good luck.

How to Set Default Route Interface when there are multiple Interfaces in CentOS

Consider the following situation, you have two interfaces in your system, eth0, and eth1 (or more). Both the interfaces have a default gateway. But how can you choose which interface to follow as the default outbound requests by the server? This could be a situation like adding secondary alias IP addresses to an interface (Like eth0, eth0:0, eth0:1, eth0:2, etc).

In these cases, Linux can decide based on its own algorithm. The problem with this is in the case of Licensing. In most licensing systems these days, you need to provide an outbound IP address to your server. If this IP changes over time, you would have trouble managing the license. For these cases, you need to define your default interface to Linux.

You may set this configuration under /etc/sysconfig/network file. The ‘key’ for the settings is ‘GATEWAYDEV’.

So for example if your gatewaydev would be eth0:1, the file would look like something following:

NETWORKING=yes
HOSTNAME=hemonto.ethii.com
DOMAINNAME=ethii.com
GATEWAYDEV=eth0:1

or if it is eth1, the following:

NETWORKING=yes
HOSTNAME=hemonto.ethii.com
DOMAINNAME=ethii.com
GATEWAYDEV=eth1

I Hope, this helps somebody. Good luck
How to connect CentOS Server to the Internet using USB Wifi Adapter?

I was recently working on an Asus RS300 server, installed with CentOS 7 minimal installation before placing it to the datacenter. I didn’t have any RJ45 cable to get this connected to the internet at home. I had a spare ‘Linksys wusb600n’ USB wifi adapter, that I wanted to try out. I connected it to the USB, and got the interface listed as wlp18s0b1 using ifconfig.

To connect this to wifi, we can use nmcli like the following:

Show the connection:

nmcli connection show

To connect to the wifi with the password, use the following:

nmcli dev wifi connect your-ssid password your-wifi-pass

Remember to replace ‘your-ssid’ with the wifi name of your and ‘your-wifi-pass’ with the password for your wifi.

Once you run the above command, this should get connected to the wifi. Now, you can see the connection details and up the device like the following:

nmcli connection show
nmcli connection up wlp18s0b1

Remember to replace ‘wlp18s0b1’ with the one you can see in ifconfig.

Good luck.

Troubleshoot: -bash: fuser: command not found

If you are trying to use a command, fuser, that is used to identify process using lock file or socket file, and having the following error:

-bash: fuser: command not found

that means, your system doesn’t have the psmisc package installed. Usually, killall, fuser type of commands are under this package. CentOS 7 sometimes, do not install the package by default. To install it, run the following:

yum install psmisc -y

Once done, you should be able to use fuser command.

Quick Tip: How to Check Total Number of Mails in Postfix Queue

Exim provides a quick way to check the total number of mails in the queue. This is done using the exim -bpc Although, this is not the same for postfix. Postfix doesn’t come with an easy way to do that.

How to Check Total Number of Mails in Postfix Queue

A quick tip on what I use to check the postfix queue number is the following command:

# mailq | tail -n 1
-- 6899 Kbytes in 1518 Requests.

Basically, postfix returns the queue statistics at the end of the queue listing command. We are simply tailing that to find the number.


Troubleshooting: Imunify360 database is corrupt. Application cannot run with corrupt database

Error Message:

# service imunify360 start
Starting imunify360: WARNING [+ 3743ms] defence360agent.utils.check_db|DatabaseError detected: database disk image is malformed
WARNING [+ 3766ms] defence360agent.cli.subparsers.common.server|Imunify360 database is corrupt. Application cannot run with corrupt database. Please, contact Imunify360 support team at https://cloudlinux.zendesk.com

Detail Information & Explanation:

If you are using imunify360, an application firewall for linux servers by Cloudlinux team, you might incur an error where it says the database is corrupt. You might first see ‘Imunify360 is not started’ error from the WHM panel and end up getting the above error message as stated. Imunify360 uses a SQL database, located under ‘/var/imunify360/imunify360.db’. This image is checked everytime Imunfi360 tries to start, and if the database is malformed, it would not start. Fortunately, imunify360 comes with tools to handle this database and recover if corrupted.

How to Fix:

First, we start by running database integrity check. This can be done using the following:

imunfiy360-agent checkdb

(From Imunify360 Doc: checkdb  – Check database integrity)

Once done, you can now use ‘migratedb’ to repair and restore if the database is corrupted.

imunify360-agent migratedb

(From Imunify360 Doc: migratedb – Check and repair database if it is corrupted.)

If migratedb fails, the only way to recover this is to reinstall imunify360.

Linux: Assertion failed on job for iptables.service.

If you are using Centos 7 or RHEL 7 or any of it’s variant, you are probably using ‘Firewalld’ by default. Although, if you are a iptables fan like me, who likes it’s simplicity and manipulative nature instead of a full form firewall, then you probably have disabled firewalld from your CentOS 7 instance and using iptables. There are couple of servers, where I use runtime iptables rules for postrouting and masquerading. These rules are dynamically generated by my scripts instead of the sysconfig file under:

/etc/sysconfig/iptables

This file is generated upon running the iptables save command:

service iptables save

which I rarely do so.

Error Details

Which is why, I don’t have a /etc/sysconfig/iptables file in those servers and a common error I see while restarting iptables in those system is the following:

# systemctl restart iptables.service
Assertion failed on job for iptables.service.

How to Fix The Error

The error appears because you don’t have any rule in /etc/sysconfig/iptables or the file doesn’t exist either. You can ignore the error as iptables would still run. To eradicate the error, simply make sure you have some iptables rules loaded on your system using the status command:

iptables -S

And then, run:

service iptables save

Once done, restarting iptables shouldn’t show the error any longer.

How to: Find dm number of a LVM logical volume

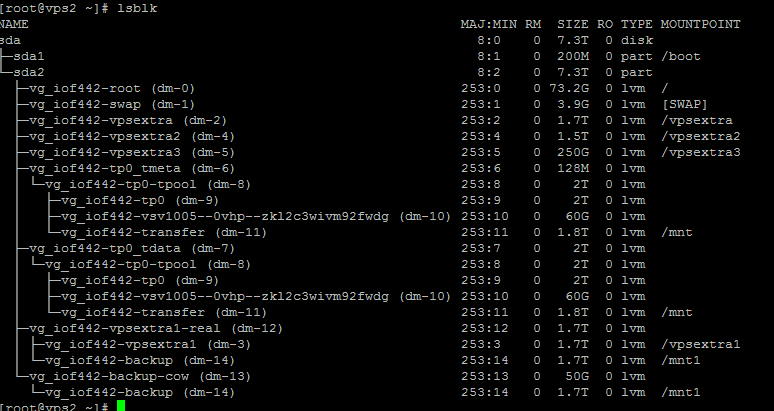
Sometimes, you will see the error thrown in dmesg or /var/log/messages are mentioned in dm-number format, while you manage the disk using lvm logical volume name. This is because lvm logical volumes are designed through kernel device mapper technique and kernel recognizes volumes using dm numbers. There is a tool to list all the device mappers used for block devices under Linux. Simply type the following to list the maps:

# lsblk

It shall show something like the following:

There you can see the dm number for each lvm volume is listed under first bracket. For example the swap in this server is created with LVM with the name vg_iof442/swap and has the dm-1 mapping.

device-mapper: cache: You have created a cache device with a lot of individual cache blocks

The error would be similar to the following to be exact:

[172593.817178] device-mapper: cache: You have created a cache device with a lot of individual cache blocks (3276800)
[172593.817182] All these mappings can consume a lot of kernel memory, and take some time to read/write.
[172593.817185] Please consider increasing the cache block size to reduce the overall cache block count.

It usually appears because you have created a large cache pool, while using a small chunk size.

Here is what to be said about chunk size in lvmcache2 manual:

The size of data blocks managed by a cache pool can be specified with
the –chunksize option when the cache LV is created. The default
unit is KiB. The value must be a multiple of 32KiB between 32KiB and
1GiB.

Using a chunk size that is too large can result in wasteful use of
the cache, where small reads and writes can cause large sections of
an LV to be mapped into the cache. However, choosing a chunk size
that is too small can result in more overhead trying to manage the
numerous chunks that become mapped into the cache. Overhead can
include both excessive CPU time searching for chunks, and excessive
memory tracking chunks.

Basically chunk size is determining the block size at which your caches are going to be stored. To find your current chunk size run:

lvs -o+chunksize vgname/cachevolumename

Should return something like the following:

#lvs -o+chunksize vg0/newvz
LV VG Attr LSize Pool Origin Data% Meta% Move Log Cpy%Sync Convert Chunk
newvz vg0 Cwi-aoC— 1.50t [cache] 14.14 0.75 5.12 64.00k

A good chunk size for a large cache device of size 200GB+ would be 256k. You may set the chunk size while setting up the device :

lvcreate –type cache-pool –chunksize 256K -L CacheSize -n CachePoolLV VG FastPVs