How to Fix zmconfigd failed in Zimbra – Starting zmconfigd…failed.

Sometimes, if you restart Zimbra, you see zmconfigd is not starting or saying it’s failed. You may also see the zmconfigd service is not running in the Zimbra admin panel. There are couple of common reasons why zmconfigd fails to start.

Disable IPv6

One reason of zmconfigd fails to start is IPv6, for some reason, it fails to route the IPv6 and fails to start. A quick solution to this problem is to disable ipv6 and restart zmconfigd. You may do this like the following:

#Edit your sysctl.conf file
nano /etc/sysctl.conf

# paste the following inside the file
net.ipv6.conf.all.disable_ipv6 = 1
net.ipv6.conf.default.disable_ipv6 = 1
net.ipv6.conf.lo.disable_ipv6 = 1

# Save the file, and update sysctl in realtime
sysctl -p

# now try to restart zmconfigd
su - zimbra
zmconfigdctl restart

Now you can check the zmconfigd status with the following, to know if it’s running or not:

[root@mailapp ~]# cat /opt/zimbra/log/zmconfigd.pid
19722

If it returns an ID, it means the zmconfigd is running.

Netcat is not installed

Another reason of the error could be because nc is not installed in your system. Zimbra zmconfigd has a dependency on netcat package. Netcat is available through nmap-ncat in centos systems. You may run the following to install netcat:

yum install nc
# or 
yum install nmap-netcat
How to use Postfix as Relay for Mailgun

Mailgun is a popular SMTP Relay/API service, one of my favorite. For transactional emails I have favored Mandrill before they declared to shutdown and later on merged with Mailchimp. Mandrill has cleaner network than any other services for transactional emails till this date. But what if, you need a smtp relay along with transactional emails? Mandrill fails there, as they can’t be entirely used as a SMTP relay. For those cases, I prefer Mailgun over Sendgrid, one of the main reason is, Sendgrid has poor network quality over Mailgun.

If you try to configure Sendgrid with Postfix, you will see, it will work without smtp_sasl_auth_enable set to true/yes. But this won’t be the case with Mailgun. To use Mailgun as smtp relay, you need to set the following in your main.cf file:

# set the relayhost to use 587 port of mailgun:
relayhost = [smtp.mailgun.org]:587

# set the authentication using static method:
smtp_sasl_password_maps = static:[email protected]:password
# you can get the smtp authentication from Sending >> Domain Settings >> Select Domain >> SMTP Credentials

# set sasl authentication on
smtp_sasl_auth_enable = yes

# set sasl security options to no anonymous:
smtp_sasl_security_options = noanonymous

Once these are done, you can save the file and restart postfix to start relaying with Mailgun. In cases, if you see the following error:

SASL authentication failed; cannot authenticate to server smtp.mailgun.org[34.224.137.116]: no mechanism available

Along with the following:

warning: SASL authentication failure: No worthy mechs found

This means, you are lacking the SASL authentication library for postfix or libsasl2 is not enough to cover the dependencies. To resolve this, you can install the cyrus-sasl libraries. You may do that using the following:

yum install cyrus-sasl cyrus-sasl-lib cyrus-sasl-plain

This should be it, your SMTP should now send mails using Mailgun as the relay.

How To: Restore Zimbra Quarantined Email by Clam AKA Heuristics.Encrypted.PDF Release Point

Zimbra Mail Server automatically quarantines emails that get hit by the Antivirus scan using Clam when the mail is received. While putting the email on the recipient inbox, what it does, instead of giving the original email with the attachment, it sends a virus detected email with the following kind of error message:

Virus (Heuristics.Encrypted.PDF) in mail to YOU

Virus Alert
Our content checker found
virus: Heuristics.Encrypted.PDF

by Zimbra

It actually means, the original mail is now quarantined. Zimbra maintains a virus quarantine email account that is not normally available in the ‘Manage Account’ list of Zimbra Admin panel. You can find it if you search with ‘virus’ in the ‘Search’ box of the admin panel. What zimbra does in quarantine situation, is that, it pushes the mail to the quarantine email instead of original recipient.

Now, to get back the mail delivered to the original recipient, we need to first get the quarantine email account, get the message id, and then we need to inject the mail into the LMTP pipe that bypasses any scanning. Here are the steps on how to do this:

# First get to the zimbra user
$ su - zimbra

# Get the email account that is used to store virus detected mails
$ zmprov gcf zimbraAmavisQuarantineAccount
zimbraAmavisQuarantineAccount: [email protected]

# [email protected] this should be our quarantine email account, now we need to get the quarantine account's mailbox id
$ zmprov gmi [email protected]
mailboxId: 73
quotaUsed: 644183

# Mailbox id here for the quarantine account is 73. Now go to the message storage of this id using the following command: cd /opt/zimbra/store/0/<mailboxId>/msg/0
$ cd /opt/zimbra/store/0/73/msg/0

# list the messages
$ ls *

These are your quarantined emails. Now for example the complainer is ‘[email protected]’. To search for the emails designated for this email account, you may use the following:

$ grep -l [email protected] *
281-1216.msg
300-1400.msg
301-1476.msg

This should return you all the emails that got quarantined for the above user.

Now the question is, how can we get these emails delivered to the designated user bypassing the antivirus/antispam tools. To do this, you need to inject the mail into LMTP pipe. You may do this using ‘zmlmtpinject’ command as following:

$ zmlmtpinject -r [email protected] -s [email protected] 281-1216.msg

Remember, to change [email protected] to the original recipient. [email protected] would be the newly rewritten sender for this mail delivery and ‘281-1216.msg’ is the file name of the original email that you found out from the grep command. You can do lmtp injections for one email mail with each command. So, you would require to do this for each emails.

Lost connection after starttls from Hostname (IP) – Virtualmin – Postfix

Problem Definition:

I have some VPS clients using Virtualmin as their LAMP/LEMP stack. After some recent updates to Virtualmin, they started seeing some Postfix errors. The error is the following:

lost connection after STARTTLS from unknown[0.0.0.0]

Virtualmin used to configure postfix to allow ‘Non TLS’ connections to the port 587, which they recently stopped configuring. Now, if you connect to 587 port, you have to follow the TLS, no matter what. My clients didn’t bother to use TLS/SSL before, which caused the error.

Virtualmin comes with Let’s Encrypt. That’s make it easy to solve the problem TLS problem.

Solution Summary:

Here is the basic to solve the problem, first you make virtualmin to install Let’s encrypt SSL for the domain you want to use for SMTP. Virtualmin primarily going to install this for your Apache. Once done, Copy the same certificate to your Postfix, Virtualmin allows you to do it with single click.

Detailed Steps:

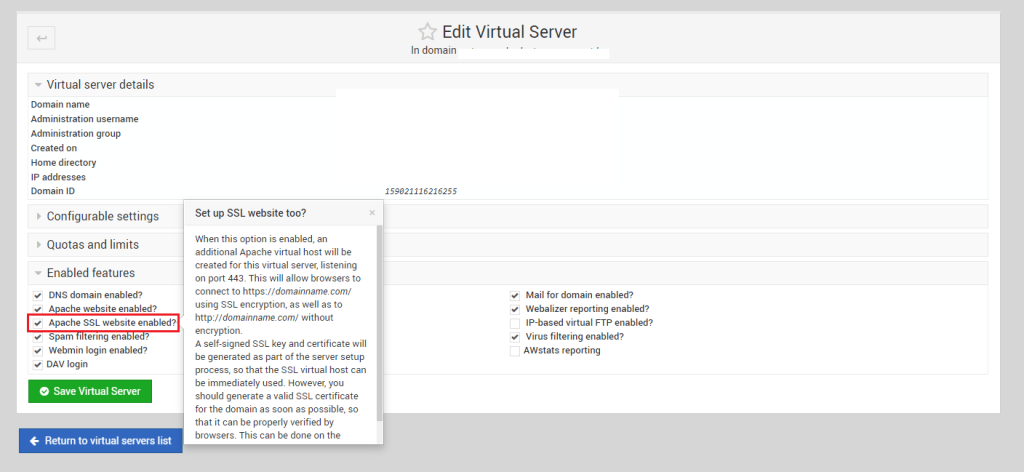
First, login to your Virtualmin at 10000 port, then select the domain you use for the SMTP. Once done, you can go to Edit Virtual Server and expand the option ‘Enabled Features’. From here check the option says ‘Apache SSL Website Enabled?’

Check Apache SSL Website Enabled

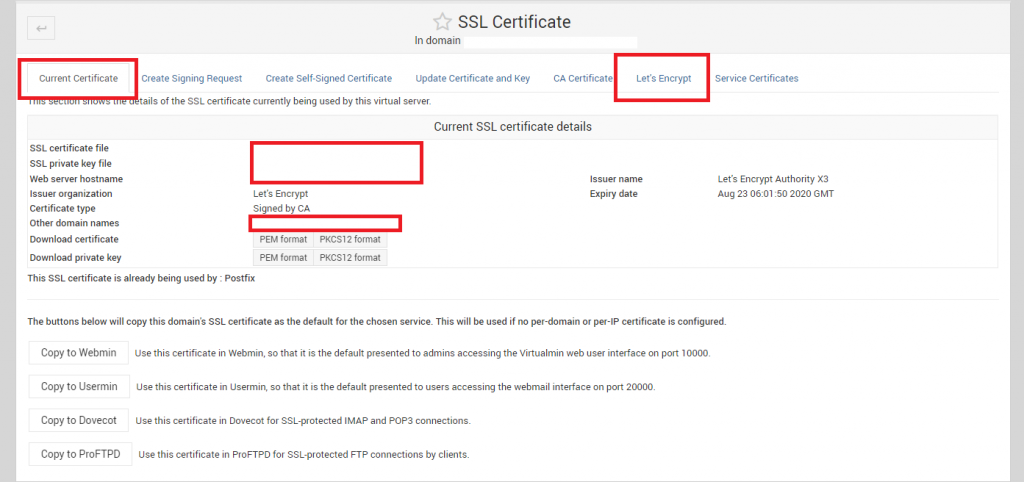
Next, go to Server Configuration >> SSL Certificate, we will get two tabs, ‘Current Certificate’ & ‘Let’s Encrypt’. Both are important. First go to Let’s Encrypt:

Let’s Encrypt Virtualmin

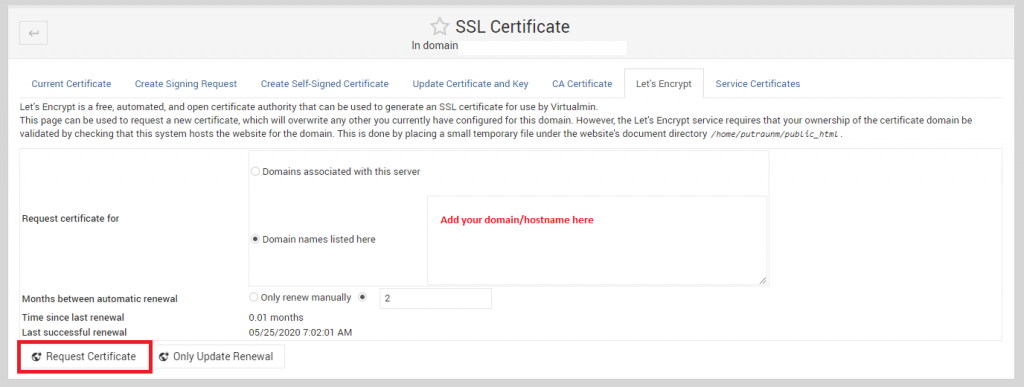
In the Let’s Encrypt tab, select the ‘Domain names listed here‘ and enter the domain that only has valid A Records or loads to the server, otherwise, remember, Let’s Encrypt won’t process for any single exception unlike cpanel or cyberpanel

Let’s Encrypt Virtualmin Add Domains

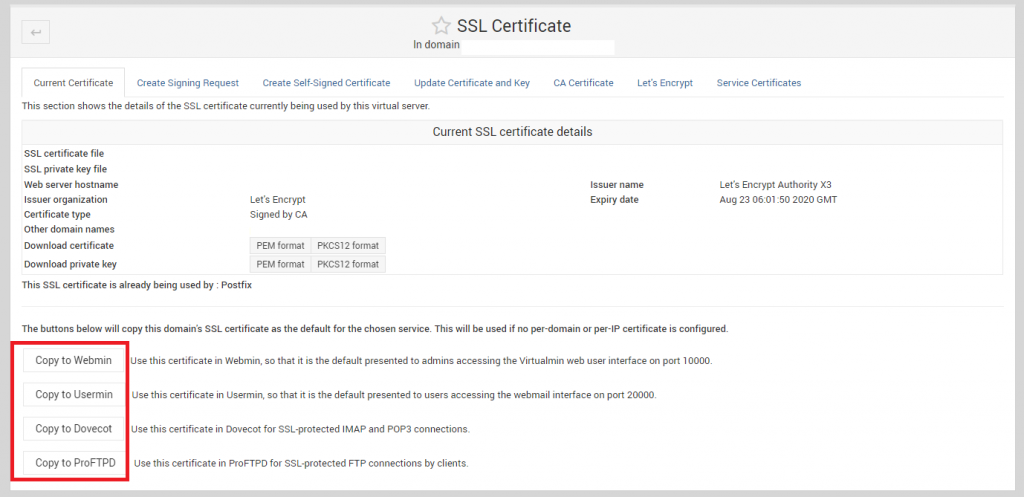
Once done, request the certificate. After the certificate installation is done, go back to ‘Current Certificate’ tab. On the bottom of the tab, there are couple of Copy To ‘Services’ option available. Here you should see the option says ‘Copy to Postfix’. Use that to copy the certificate to Postfix and use it during TLS/SSL transactions.

Copy SSL to Services (Postfix) Virtualmin.

In my case, I have already copied the SSL to Postfix, which is why it is not showing the option ‘Copy To Postfix’. But the option should be above the ProFTPD.

Once done, you may now recheck and the SMTP should work with TLS and 587 port.

How to setup Postfix relay with authentication in CentOS 7

To configure postfix to relay mail using another MTA, you may do the following steps:

postconf -e 'relayhost = smtp.to.relay.com'
postconf -e 'smtp_sasl_auth_enable = yes'
postconf -e 'smtp_sasl_password_maps = hash:/etc/postfix/sasl_passwd'
postconf -e 'smtp_sasl_security_options='

Replace smtp.to.relay.com with the original MTA hostname that you going to use for relaying. Now, create the sasl_passwd file in /etc/postfix with the following inside:

smtp.to.relay.com smtp_username:smtp_password

Now, use postmap to generate postfix hash db:

postmap /etc/postfix/sasl_passwd

You can verify if it’s working with the following:

postmap -q smtp.to.relay.com /etc/postfix/sasl_passwd

This will return the username and password for your smtp relay host.

Now all you need to do is to restart the postfix

service postfix restart

Troubleshoot: fatal: open lock file /var/lib/postfix/master.lock: unable to set exclusive lock

Error Message & Trace details:

One of my customer came with an error saying the postfix in his server isn’t working. The server was running CentOS 7, and the system postfix status was inactive, means not running. Although, the system queue was running I could see. The error that was returning while restarting/checking status was the following:

# service postfix status
Redirecting to /bin/systemctl status postfix.service
● postfix.service - Postfix Mail Transport Agent
Loaded: loaded (/usr/lib/systemd/system/postfix.service; enabled; vendor preset: disabled)
Active: failed (Result: exit-code) since Tue 2018-01-09 04:04:05 UTC; 1s ago
Process: 9201 ExecStart=/usr/sbin/postfix start (code=exited, status=1/FAILURE)
Process: 9197 ExecStartPre=/usr/libexec/postfix/chroot-update (code=exited, status=0/SUCCESS)
Process: 9194 ExecStartPre=/usr/libexec/postfix/aliasesdb (code=exited, status=0/SUCCESS)
Main PID: 1358 (code=killed, signal=TERM)

Jan 09 04:04:03 twin7.hifrank.biz systemd[1]: Starting Postfix Mail Transport Agent...
Jan 09 04:04:03 twin7.hifrank.biz postfix/master[9273]: fatal: open lock file /var/lib/postfix/master.lock: unable to set exclusive lock: Resource tempo...vailable
Jan 09 04:04:04 twin7.hifrank.biz postfix/master[9272]: fatal: daemon initialization failure
Jan 09 04:04:05 twin7.hifrank.biz postfix/postfix-script[9274]: fatal: mail system startup failed
Jan 09 04:04:05 twin7.hifrank.biz systemd[1]: postfix.service: control process exited, code=exited status=1
Jan 09 04:04:05 twin7.hifrank.biz systemd[1]: Failed to start Postfix Mail Transport Agent.
Jan 09 04:04:05 twin7.hifrank.biz systemd[1]: Unit postfix.service entered failed state.
Jan 09 04:04:05 twin7.hifrank.biz systemd[1]: postfix.service failed.

How to fix:

The error to note here is the following:

fatal: open lock file /var/lib/postfix/master.lock

I first killed the smtp and smtpd processes that runs by postfix:

# killall -9 smtp
# killall -9 smtpd

But that didn’t solve the problem. I then used the fuser command to check which process holds the lock file:

# fuser /var/lib/postfix/master.lock
/var/lib/postfix/master.lock: 18698

Then we check the process 18698 and kill the responsible process:

# ps -axwww|grep 18698
9333 pts/0 S+ 0:00 grep --color=auto 18698

18698 ? Ss 4:28 /usr/libexec/postfix/master -w
# killall -9 /usr/libexec/postfix/master
or
# kill -9 18698

Once the process is killed, you can now start the postfix:

# service postfix start
# service postfix status|grep Active
Redirecting to /bin/systemctl status postfix.service
Active: active (running) since Tue 2018-01-09 04:15:50 UTC; 4min 45s ago