Mailgun is a popular SMTP Relay/API service, one of my favorite. For transactional emails I have favored Mandrill before they declared to shutdown and later on merged with Mailchimp. Mandrill has cleaner network than any other services for transactional emails till this date. But what if, you need a smtp relay along with transactional emails? Mandrill fails there, as they can’t be entirely used as a SMTP relay. For those cases, I prefer Mailgun over Sendgrid, one of the main reason is, Sendgrid has poor network quality over Mailgun.
If you try to configure Sendgrid with Postfix, you will see, it will work without smtp_sasl_auth_enable set to true/yes. But this won’t be the case with Mailgun. To use Mailgun as smtp relay, you need to set the following in your main.cf file:
# set the relayhost to use 587 port of mailgun:
relayhost = [smtp.mailgun.org]:587

# set the authentication using static method:
smtp_sasl_password_maps = static:[email protected]:password
# you can get the smtp authentication from Sending >> Domain Settings >> Select Domain >> SMTP Credentials

# set sasl authentication on
smtp_sasl_auth_enable = yes

# set sasl security options to no anonymous:
smtp_sasl_security_options = noanonymous
Once these are done, you can save the file and restart postfix to start relaying with Mailgun. In cases, if you see the following error:
SASL authentication failed; cannot authenticate to server smtp.mailgun.org[34.224.137.116]: no mechanism available
Along with the following:
warning: SASL authentication failure: No worthy mechs found
This means, you are lacking the SASL authentication library for postfix or libsasl2 is not enough to cover the dependencies. To resolve this, you can install the cyrus-sasl libraries. You may do that using the following:
I have some VPS clients using Virtualmin as their LAMP/LEMP stack. After some recent updates to Virtualmin, they started seeing some Postfix errors. The error is the following:
lost connection after STARTTLS from unknown[0.0.0.0]
Virtualmin used to configure postfix to allow ‘Non TLS’ connections to the port 587, which they recently stopped configuring. Now, if you connect to 587 port, you have to follow the TLS, no matter what. My clients didn’t bother to use TLS/SSL before, which caused the error.
Virtualmin comes with Let’s Encrypt. That’s make it easy to solve the problem TLS problem.
Solution Summary:
Here is the basic to solve the problem, first you make virtualmin to install Let’s encrypt SSL for the domain you want to use for SMTP. Virtualmin primarily going to install this for your Apache. Once done, Copy the same certificate to your Postfix, Virtualmin allows you to do it with single click.
Detailed Steps:
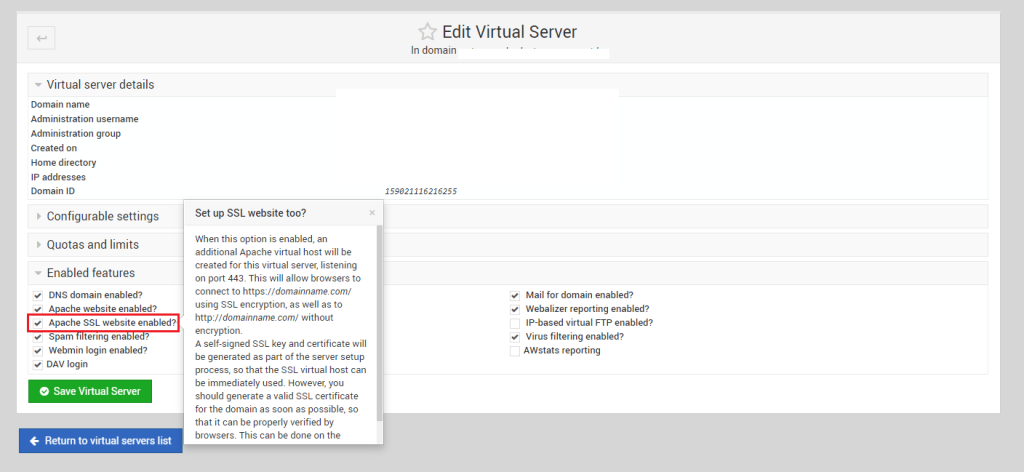
First, login to your Virtualmin at 10000 port, then select the domain you use for the SMTP. Once done, you can go to Edit Virtual Server and expand the option ‘Enabled Features’. From here check the option says ‘Apache SSL Website Enabled?’
Check Apache SSL Website Enabled
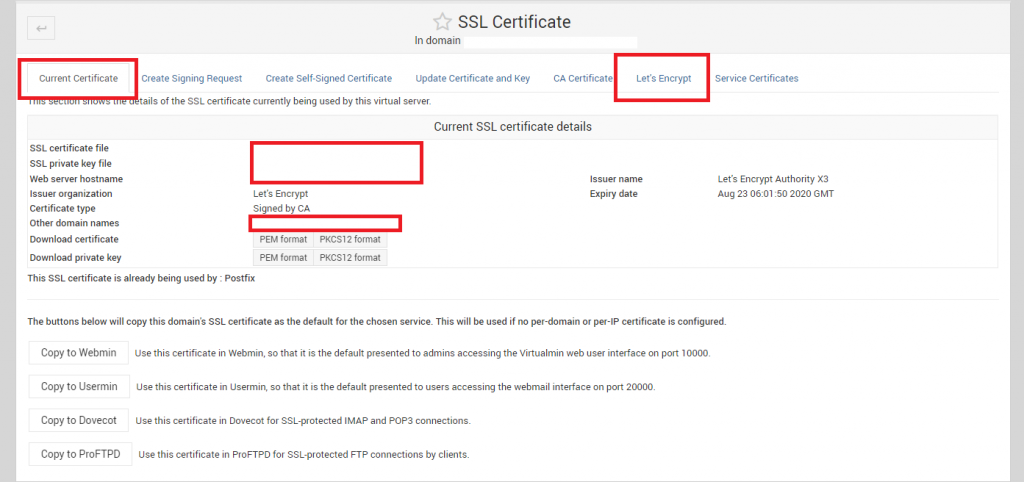
Next, go to Server Configuration >> SSL Certificate, we will get two tabs, ‘Current Certificate’ & ‘Let’s Encrypt’. Both are important. First go to Let’s Encrypt:
Let’s Encrypt Virtualmin
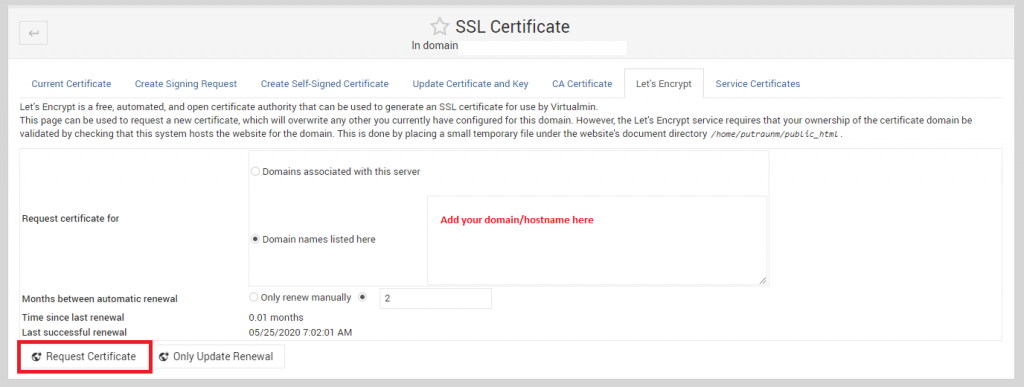
In the Let’s Encrypt tab, select the ‘Domain names listed here‘ and enter the domain that only has valid A Records or loads to the server, otherwise, remember, Let’s Encrypt won’t process for any single exception unlike cpanel or cyberpanel
Let’s Encrypt Virtualmin Add Domains
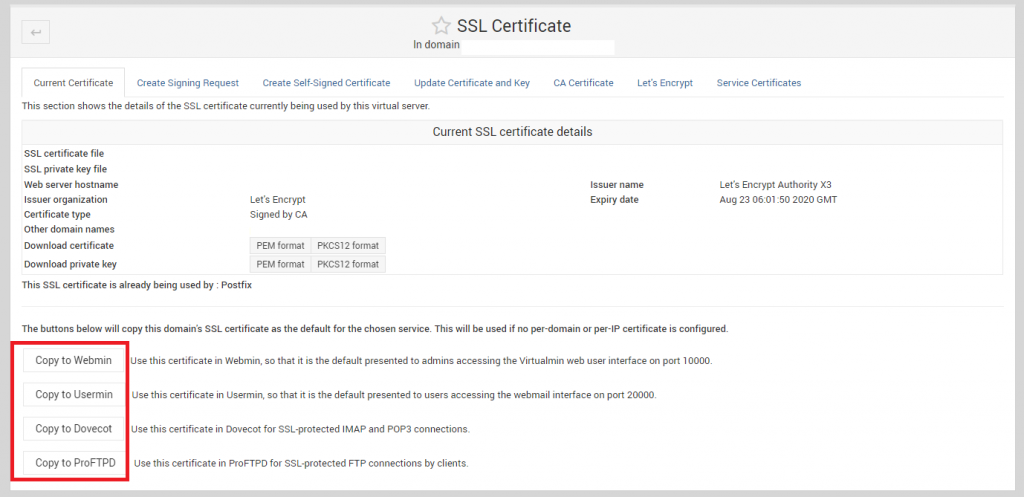
Once done, request the certificate. After the certificate installation is done, go back to ‘Current Certificate’ tab. On the bottom of the tab, there are couple of Copy To ‘Services’ option available. Here you should see the option says ‘Copy to Postfix’. Use that to copy the certificate to Postfix and use it during TLS/SSL transactions.
Copy SSL to Services (Postfix) Virtualmin.
In my case, I have already copied the SSL to Postfix, which is why it is not showing the option ‘Copy To Postfix’. But the option should be above the ProFTPD.
Once done, you may now recheck and the SMTP should work with TLS and 587 port.
Exim provides a quick way to check the total number of mails in the queue. This is done using the exim -bpc Although, this is not the same for postfix. Postfix doesn’t come with an easy way to do that.
How to Check Total Number of Mails in Postfix Queue
A quick tip on what I use to check the postfix queue number is the following command:
Postfix queue can be cleared using the postsuper command. The syntax is as following:
# postsuper -d ALL
It will clear all the postfix queue. You can specifically clear the deferred emails for example from the postfix queue as following:
# postsuper -d ALL deferred
If you have a large quantity in postfix queue, there is actually a quicker and easier way to do that. You can simply remove all the folders under /var/spool/postfix and it will clear the queue.
# rm -Rf /var/spool/postfix/*

# mailq | tail -n 1

Mail queue is empty
Note: The folders inside postfix would get created automatically once the queue starts filling up, nothing to worry about.
How to clear Exim Queue
Exim queue can be checked using the following:
# exim -bp
To check the number of mails in queue, you can use:
# exim -bpc
To remove a message from exim queue, you need to use the following:
# exim -Mrm {message-id}
There is no build in command to clear all the mails from exim queue. You can use a pipe command to clear the exim queue as following:
# exim -bp | exiqgrep -i | xargs exim -Mrm
Although, there are even quicker and easier way to clear the exim queue, specially if you have a lot of emails in queue and the server is pretty loaded.
# rm -Rf /var/spool/exim/input
Removing the input directory should clear the exim queue. Note: The directory would automatically create once the exim starts it’s queue again, no need to worry.
One of my customer came with an error saying the postfix in his server isn’t working. The server was running CentOS 7, and the system postfix status was inactive, means not running. Although, the system queue was running I could see. The error that was returning while restarting/checking status was the following:
# service postfix status

Redirecting to /bin/systemctl status postfix.service

● postfix.service - Postfix Mail Transport Agent

Loaded: loaded (/usr/lib/systemd/system/postfix.service; enabled; vendor preset: disabled)

Active: failed (Result: exit-code) since Tue 2018-01-09 04:04:05 UTC; 1s ago

Process: 9201 ExecStart=/usr/sbin/postfix start (code=exited, status=1/FAILURE)

Process: 9197 ExecStartPre=/usr/libexec/postfix/chroot-update (code=exited, status=0/SUCCESS)

Process: 9194 ExecStartPre=/usr/libexec/postfix/aliasesdb (code=exited, status=0/SUCCESS)

Main PID: 1358 (code=killed, signal=TERM)
Jan 09 04:04:03 twin7.hifrank.biz systemd[1]: Starting Postfix Mail Transport Agent...

Jan 09 04:04:03 twin7.hifrank.biz postfix/master[9273]: fatal: open lock file /var/lib/postfix/master.lock: unable to set exclusive lock: Resource tempo...vailable

Jan 09 04:04:04 twin7.hifrank.biz postfix/master[9272]: fatal: daemon initialization failure

Jan 09 04:04:05 twin7.hifrank.biz postfix/postfix-script[9274]: fatal: mail system startup failed

Jan 09 04:04:05 twin7.hifrank.biz systemd[1]: postfix.service: control process exited, code=exited status=1

Jan 09 04:04:05 twin7.hifrank.biz systemd[1]: Failed to start Postfix Mail Transport Agent.

Jan 09 04:04:05 twin7.hifrank.biz systemd[1]: Unit postfix.service entered failed state.

Jan 09 04:04:05 twin7.hifrank.biz systemd[1]: postfix.service failed.
How to fix:
The error to note here is the following:
fatal: open lock file /var/lib/postfix/master.lock
I first killed the smtp and smtpd processes that runs by postfix:
# killall -9 smtp

# killall -9 smtpd
But that didn’t solve the problem. I then used the fuser command to check which process holds the lock file:
Once the process is killed, you can now start the postfix:
# service postfix start

# service postfix status|grep Active

Redirecting to /bin/systemctl status postfix.service

Active: active (running) since Tue 2018-01-09 04:15:50 UTC; 4min 45s ago