How to Disable Clamd & Spamassasign in Virtualmin

Question

My clamscan is taking a lot of CPU & memory of my vps. I use Virtualmin as the control panel. How can I disable Clamscan and Spamassign from taking excessive cpu and memory?

Solution

If you are receiving an inbound spam attack or an email bounce attack on your VPS, and you use Clamscan and Spamassasign for your incoming mail filtering, it is highly possible that, you will run out of RAM and CPU. To solve the problem, you need to disable Clamscan and Spamassign for at least the time you are dealing with the attack or have developed a way to deal the attack. To disable Clamd and Spamassasign, you may follow the following steps

How to Disable Clamd and Spamassasign

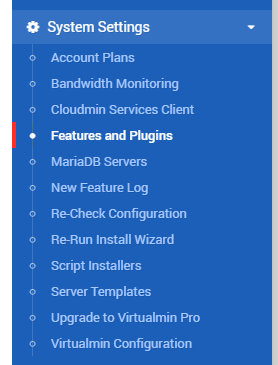
First login to your virtualmin 10000 port, and go to System Settings >> Features and Plugins

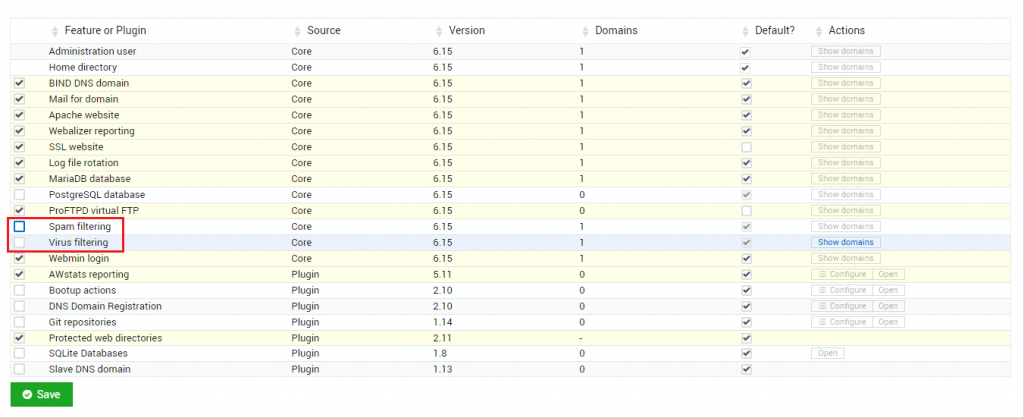
Now uncheck the options ‘Spam filtering’ and ‘Virus filtering’ option and save it

Now go to your Webmin tab >> Under the System >> Bootup and Shutdown

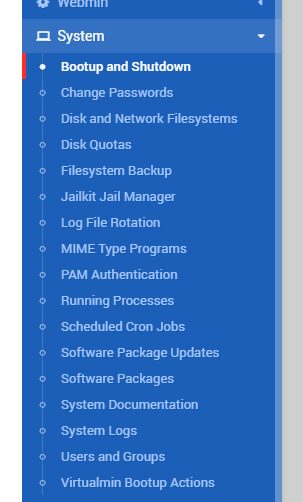
Now select the services with the name ‘clam’ and ‘spamassassin.service’, then click on ‘Disable now and on boot’ option. Once saved, also make sure they are saying ‘No’ in running. If not, select them again and go to the bottom of the page, and press ‘Stop’ to shut them down immediately.

How to Restart Virtualmin / Webmin

Question

How to restart Virtualmin control panel?

Solution

If you are using virtualmin as a control panel, you use 10000 port to login to your control panel. It shall look like the following:

https://your.hostname.com:10000

Now, if your browser says something like the following:

It means your webmin is either down or crashed.

Restart Virtualmin or Restart Webmin

To solve this, you may start the webmin by logging to your SSH and running the following command:

service webmin start
or
/etc/init.d/webmin start

In case, you need to double sure to stop the service, you may do the following:

service webmin stop
or
/etc/init.d/webmin stop

Once you done, stopping, make sure to start it with the following:

service webmin start
or
/etc/init.d/webmin start

Once the webmin starts successfully, you may access your virtulmin control panel on port 10000, either with your hostname or the IP, like the following:

https://your.hostname.com:10000
or
https://11.11.11.11:10000
(replace 11.11.11.11 with your server IP)

How to Change memory_limit in Virtualmin

Question

I want to change the memory_limit of a virtual host in virtualmin. How can I do that?

Solution

First, login to Virtualmin on port 10000, now, select the virtual host from the dropdown under Virtualmin tab. Now under the services, there are PHP 5 Configuration and PHP 7 Configuration

Click on the version you want to change configuration for. It will show you a list of options to change php variables.

Now there is ‘Resource Limit’, that contains the options like maximum execution time, or memory limit for PHP.

Now, change the ‘Maximum Memory Allocation’ option to something that you want to change memory_limit of php in virtualmin

Lost connection after starttls from Hostname (IP) – Virtualmin – Postfix

Problem Definition:

I have some VPS clients using Virtualmin as their LAMP/LEMP stack. After some recent updates to Virtualmin, they started seeing some Postfix errors. The error is the following:

lost connection after STARTTLS from unknown[0.0.0.0]

Virtualmin used to configure postfix to allow ‘Non TLS’ connections to the port 587, which they recently stopped configuring. Now, if you connect to 587 port, you have to follow the TLS, no matter what. My clients didn’t bother to use TLS/SSL before, which caused the error.

Virtualmin comes with Let’s Encrypt. That’s make it easy to solve the problem TLS problem.

Solution Summary:

Here is the basic to solve the problem, first you make virtualmin to install Let’s encrypt SSL for the domain you want to use for SMTP. Virtualmin primarily going to install this for your Apache. Once done, Copy the same certificate to your Postfix, Virtualmin allows you to do it with single click.

Detailed Steps:

First, login to your Virtualmin at 10000 port, then select the domain you use for the SMTP. Once done, you can go to Edit Virtual Server and expand the option ‘Enabled Features’. From here check the option says ‘Apache SSL Website Enabled?’

Check Apache SSL Website Enabled

Next, go to Server Configuration >> SSL Certificate, we will get two tabs, ‘Current Certificate’ & ‘Let’s Encrypt’. Both are important. First go to Let’s Encrypt:

Let’s Encrypt Virtualmin

In the Let’s Encrypt tab, select the ‘Domain names listed here‘ and enter the domain that only has valid A Records or loads to the server, otherwise, remember, Let’s Encrypt won’t process for any single exception unlike cpanel or cyberpanel

Let’s Encrypt Virtualmin Add Domains

Once done, request the certificate. After the certificate installation is done, go back to ‘Current Certificate’ tab. On the bottom of the tab, there are couple of Copy To ‘Services’ option available. Here you should see the option says ‘Copy to Postfix’. Use that to copy the certificate to Postfix and use it during TLS/SSL transactions.

Copy SSL to Services (Postfix) Virtualmin.

In my case, I have already copied the SSL to Postfix, which is why it is not showing the option ‘Copy To Postfix’. But the option should be above the ProFTPD.

Once done, you may now recheck and the SMTP should work with TLS and 587 port.