Error: The websocket handshake failed at PM – Cpanel Terminal

Error:

When you try to open the terminal from Cpanel, it shows you an error in the red screen like the following:

The WebSocket handshake failed at 1:34:27 PM.

Solution

The error is appearing because Cpanel uses a socket to create a terminal window for you from the Cpanel. But this verifies the origin of your URL. If you are behind a proxy, then Cpanel won’t let the socket establish.

Most of the time, I have seen the user using Cloudflare behind the domain and using the same domain to access the Cpanel. Unfortunately, Cloudflare’s proxied IP won’t be able to create the websocket. Hence, you must use a domain or hostname or the server IP to access the Cpanel, to use Terminal.

-bash: smartctl: command not found

Error Details

When I try to check the S.M.A.R.T details of my drive, using the following command:

smartctl -a /dev/sda

I get an error:

-bash: smartctl: command not found

What can I do?

Solution

This error is appearing because you do not have the S.M.A.R.T tools installed on your system.

How to Install Smart tools on CentOS 7?

To install smart tools, you can run the following:

yum install smartmontools -y

Once done, you may run the smartctl command again, and it shall work:

[root@172 ~]# smartctl -a /dev/sda
smartctl 7.0 2018-12-30 r4883 [x86_64-linux-3.10.0-1127.el7.x86_64] (local build)
Copyright (C) 2002-18, Bruce Allen, Christian Franke, www.smartmontools.org

=== START OF INFORMATION SECTION ===
Model Family:     Crucial/Micron BX/MX1/2/3/500, M5/600, 1100 SSDs
Device Model:     Micron_1100_MTFDDAK2T0TBN

dial unix /tmp/padapter.usk: socket: too many open files

Error Definition

There are times, when your application may throw error like the following in Linux:

dial unix /tmp/padapter.usk: socket: too many open files

It could only contain the following, without relating the fast message:

socket: too many open files

How to Fix

This error appears because Linux file system puts a limit of amount of open files you may use at a time. It is calculated based on a variable system set is called ‘file-max’. File System also keeps a variable called ‘file-nr’ to count the number of file you have in usage. To quickly look at your usage, you may run the following:

[root@server-sg ~]# cat /proc/sys/fs/file-nr
4512    0       265535

The first number is the amount of file descriptions in use in your linux system. Here the last number is your hard limit and the second number is your soft limit. The hard limit is your file-max. To know your file-max value, you may run the following:

[root@server-sg ~]# cat /proc/sys/fs/file-max
265535

As we see, the limit is set to 265535 and the usage is 4512. If the usage goes up for some reason, for example an infinite loop on the cache creation, you may run out of file system open limit and hit the error. To set the value fir file-max, we will take sysctl.conf in consideration.

First open sysctl.conf file with the following:

nano /etc/sysctl.conf

Add the following line and save:

fs.file-max = 524280

This will increase your open file limit to 524280. Now to reflect the change immediately, you need to run the following:

sysctl -p

You should be done now.

How to Enable Logging in Odoo

There are two ways to see the Odoo Logs. One is rough and can be used to see the latest Odoo logs, it’s the Journal tools. You may do this using the following if your Odoo service is installed as odoo13 for example

journalctl -u odoo13

Note: If you are having trouble primarily in installing Odoo properly, you may check the following:

The other way, is the enable logging to a file. This has to be enabled from the odoo.conf file which is located under /etc/ folder. First we open the /etc/odoo.conf file:

nano /etc/odoo.conf

Now, search to see if you have a directive called ‘logfile’. If you don’t, you may add the following to /etc/odoo.conf:

logfile = /var/log/odoo13/odoo.log

If you already have the directive, but commented out, like this:

; logfile = /var/log/odoo13/odoo.log

You may remove the ‘;’ in front of the logfile directive and save the file. Now you may restart your Odoo instance to allow odoo log the information to the file /var/log/odoo13/odoo.log

systemctl restart odoo13

If the restart showing some errors, probably because it is failing to put permission to odoo13 folder. You may try the following:

mkdir /var/log/odoo13
chown -Rf odoo:odoo /var/log/odoo13
systemctl restart odoo13

How To: Manually Add Support of SSL for WWW on Cyberpanel

hmm, it’s a weird topic to write blog on. Because Cyberpanel comes with a built in Certbot, and can automatically detects www and without www to install SSL for. Then why am I writing this up? All because I found a VPS client today facing the issue. Even though, Cyberpanel was telling me that the SSL is issued, it was only issued for non-www domain, but the www domain left behind. Let’s see how can we resolve this.

First problem

First problem came up when I tried to discover the Cyberpanel certbot binaries.

[root@server-sg /]# find . -name "certbot"
./usr/local/CyberCP/bin/certbot
./usr/local/CyberCP/lib/python3.6/site-packages/certbot
./usr/local/CyberPanel/bin/certbot
./usr/local/CyberPanel/lib/python3.6/site-packages/certbot

[root@server-sg live]# /usr/local/CyberCP/bin/certbot --version
certbot 0.21.1
[root@server-sg live]# /usr/local/CyberPanel/bin/certbot --version
certbot 0.21.1

Both of the certbot I could find from Cyberpanel was very old, Certbot has 1.4 version in the Epel which has support for Acme 2 challenge, while the one that Cyberpanel is using doesn’t. I hence decided to install a certbot for our case:

yum install epel-release
yum install certbot

These should be it for the latest version of certbot to start working in your Cyberpanel host. Once done, you may now generate the SSL using the following:

certbot certonly  --webroot -w /home/yourdomain.com/public_html -d yourdomain.com -d www.yourdomain.com

Remember to replace yourdomain.com with the actual one that is having problem with. Cyberpanel creates the home directory with the primary domain, so the remember to give the correct document root for the value of attribute ‘-w’.

Once this id done, certbot should automatically verify the challenge and get the issued license for you. Lets encrypt license are usually stored at the following directory:

/etc/letsencrypt/live/yourdomain.com/

Files are:
/etc/letsencrypt/live/yourdomain.com/privatekey.pem
/etc/letsencrypt/live/yourdomain.com/fullchain.pem

If you had already created the SSL using Cyberpanel (which you must have done if you viewing this post), then remember, certbot will place the SSLs in /etc/letsencrypt/live/yourdomain.com-001/ folder. The name of the folder would be shown at the time you complete issuing SSL with certbot.

There are couple of ways you may use the SSL now. Either you may replace the old directory with the new, or just change the settings in either the vhost conf or the openlitespeed SSL settings. I find the easiest way is just to replace the old directory with the new. Something like this should work:

mv /etc/letsencrypt/live/yourdomain.com /etc/letsencrypt/live/old_yourdomain.com
mv /etc/letsencrypt/live/yourdomain.com-001 /etc/letsencrypt/live/yourdomain.com

Once this is done, remember to restart your openlitespeed:

service lsws restart

Now your https on the WWW should work without any problem. If not, try clearing your browser cache and retry.

How to Add Openlitespeed Server to Haproxy – Avoid 503 Haproxy Error

For past one month, Openlitespeed has been my favorite piece of web server. Litespeed has always outperformed all the other webservers including Nginx as well in any of my production environment. But I have recently switched to using OLS which is a Opensource version of Litespeed with some limited features. I get LS kind of performance along with no worry for paying. How better could it be?

OLS comes with some weird problem. As OLS is less used, finding a solution for such cases could be difficult. I faced a very similar kind of issue yesterday.

I added a OLS based server to my HAProxy cluster, but the HAProxy can not find the OLS server working. When I try to access the web app hosted under OLS server using local IP masking, I see the website without a problem. That means, OLS is interpreting the Domain with IP relation well. But failing to respond when Haproxy is requesting through IP address.

The problem is, OLS is not configured to respond to ‘default’ requests on ‘127.0.0.1’, ‘localhost’ or the server’s main IP. To find out this, I enabled ‘High’ Debug mode of OLS. To do this, first visit the OLS Webadmin Console, it can be accessed with https://IP:7080

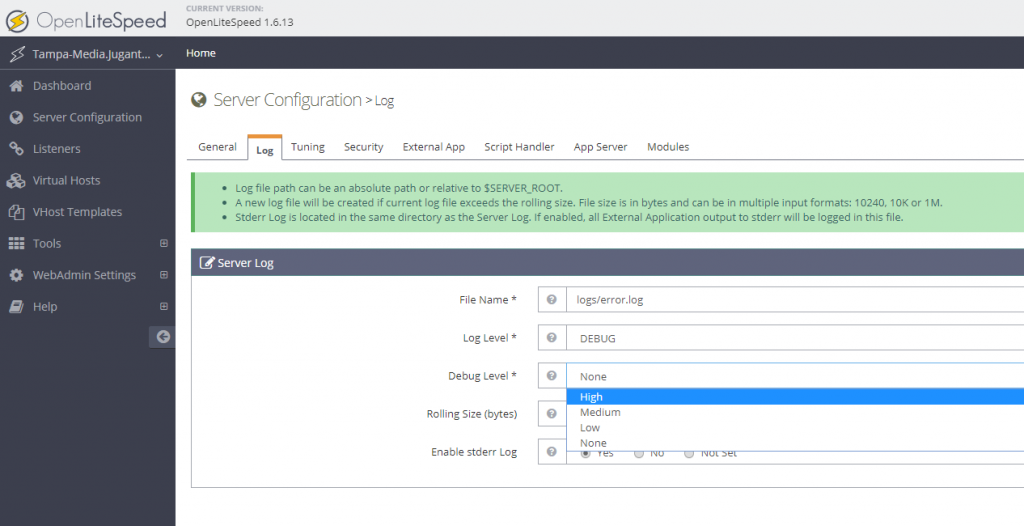
After login, go to Server Configuration >> Log >> Edit Server Log >> Set ‘Debug Level’ to High and Save

Set high debug level in openlitespeed

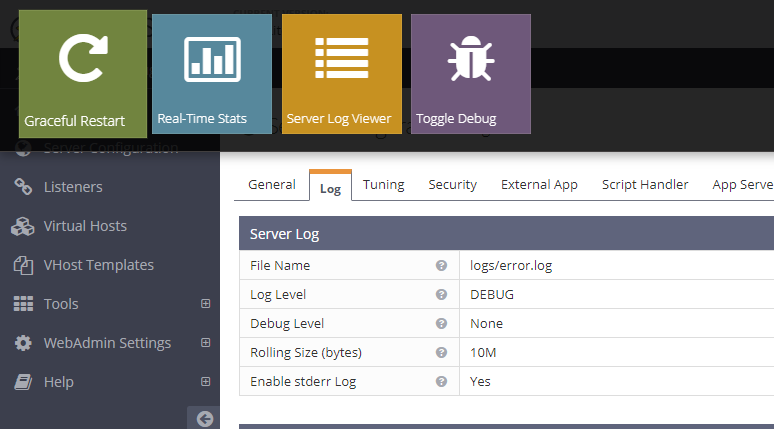
Once saving is done, you may gracefully restart the OLS

Gracefully restart Openlitespeed

Once this is done, you may now monitor the error.log file located usually under /usr/local/lsws/logs. Now tail the output of error.log while processing requests with Haproxy:

tail -f /usr/local/lsws/logs/error.log

You can see, OLS has returned 404 error for the localhost/ request. That means, Haproxy is requesting the IP with a header ‘localhost/’, and the server should return something with code 200 to make sure the server is in business.

What we need to do, is to make OLS respond to request for basic IP and localhost to 200 with the main site instead of ‘404’ error. To do this, we need to go to Webconsole of OLS again >> Listeners

You will see you have two Listeners, one for Default/Non HTTP and the HTTPS/SSL. In my case, I was using only HAProxy to Origin with no SSL, means 80. I selected the Default.

Open 80 Listener View in Openlitespeed

In the Listener List, you can find your Virtualhost, click on the ‘Edit’ of your Virtualhost

Virtualhost Edit Openlitespeed

Now, you can map the virtualhost. You will see your primary domain as the ‘Virtual Host’, which can’t be changed here. But what you can do is to map this virtualhost to several domains. The trick is to add your server’s IP and the localhost in the ‘domains’ list with comma seperation as following:

localhost mapping to OLS

Once this is saved, restart your OLS and now your HAProxy should be able to read requests and starting forwarding requests to your OLS server.

Lost connection after starttls from Hostname (IP) – Virtualmin – Postfix

Problem Definition:

I have some VPS clients using Virtualmin as their LAMP/LEMP stack. After some recent updates to Virtualmin, they started seeing some Postfix errors. The error is the following:

lost connection after STARTTLS from unknown[0.0.0.0]

Virtualmin used to configure postfix to allow ‘Non TLS’ connections to the port 587, which they recently stopped configuring. Now, if you connect to 587 port, you have to follow the TLS, no matter what. My clients didn’t bother to use TLS/SSL before, which caused the error.

Virtualmin comes with Let’s Encrypt. That’s make it easy to solve the problem TLS problem.

Solution Summary:

Here is the basic to solve the problem, first you make virtualmin to install Let’s encrypt SSL for the domain you want to use for SMTP. Virtualmin primarily going to install this for your Apache. Once done, Copy the same certificate to your Postfix, Virtualmin allows you to do it with single click.

Detailed Steps:

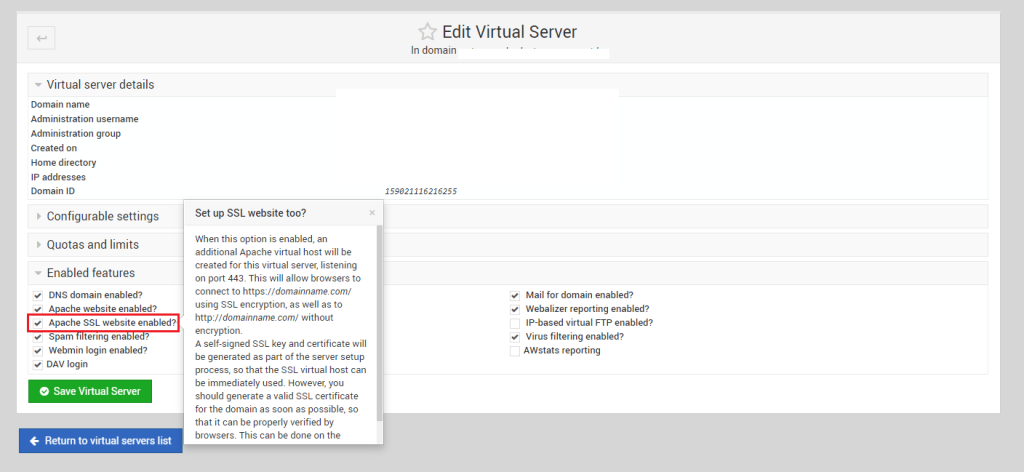
First, login to your Virtualmin at 10000 port, then select the domain you use for the SMTP. Once done, you can go to Edit Virtual Server and expand the option ‘Enabled Features’. From here check the option says ‘Apache SSL Website Enabled?’

Check Apache SSL Website Enabled

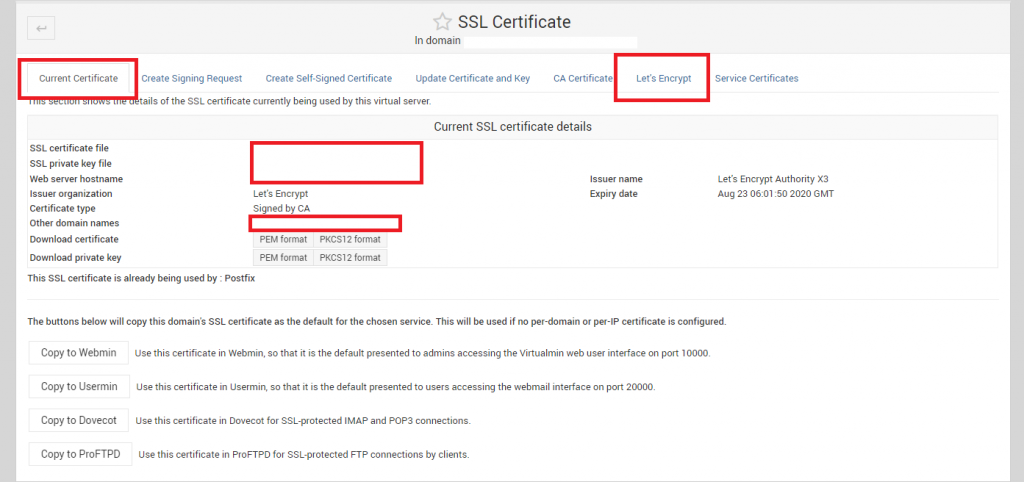
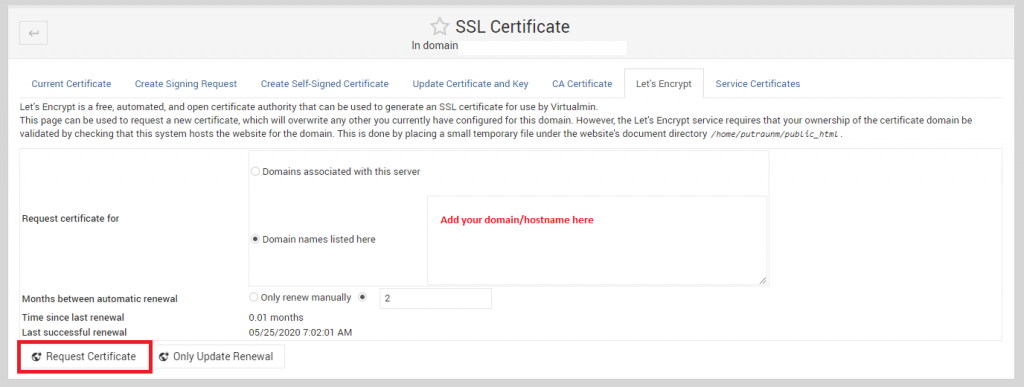
Next, go to Server Configuration >> SSL Certificate, we will get two tabs, ‘Current Certificate’ & ‘Let’s Encrypt’. Both are important. First go to Let’s Encrypt:

Let’s Encrypt Virtualmin

In the Let’s Encrypt tab, select the ‘Domain names listed here‘ and enter the domain that only has valid A Records or loads to the server, otherwise, remember, Let’s Encrypt won’t process for any single exception unlike cpanel or cyberpanel

Let’s Encrypt Virtualmin Add Domains

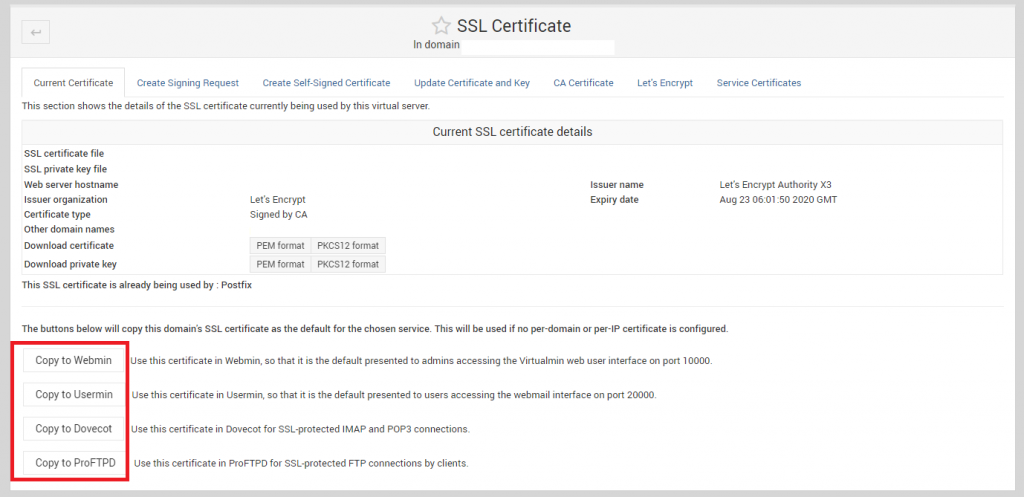
Once done, request the certificate. After the certificate installation is done, go back to ‘Current Certificate’ tab. On the bottom of the tab, there are couple of Copy To ‘Services’ option available. Here you should see the option says ‘Copy to Postfix’. Use that to copy the certificate to Postfix and use it during TLS/SSL transactions.

Copy SSL to Services (Postfix) Virtualmin.

In my case, I have already copied the SSL to Postfix, which is why it is not showing the option ‘Copy To Postfix’. But the option should be above the ProFTPD.

Once done, you may now recheck and the SMTP should work with TLS and 587 port.

Troubleshoot: -bash: fuser: command not found

If you are trying to use a command, fuser, that is used to identify process using lock file or socket file, and having the following error:

-bash: fuser: command not found

that means, your system doesn’t have the psmisc package installed. Usually, killall, fuser type of commands are under this package. CentOS 7 sometimes, do not install the package by default. To install it, run the following:

yum install psmisc -y

Once done, you should be able to use fuser command.

Troubleshoot: You must upgrade to Litespeed “5.2.1 build 2 or later”, in order to upgrade to the next version of cPanel & WHM.

Error Message

You must upgrade to Litespeed “5.2.1 build 2 or later”, in order to upgrade to the next version of cPanel & WHM.

Explanation

The error appears because Litespeed below 5.2.1 doesn’t have SSL compatibility with Cpanel 11.68. Although, this goes further, if you uninstall the plugin, and upcp will still fail to update the Cpanel/WHM. A workaround for this, is to install and uninstall the plugin through Litespeed auto installer. Here is how to do that:

Download Litespeed Auto Installer for Cpanel

# wget https://www.litespeedtech.com/packages/cpanel/lsws_whm_autoinstaller.sh
# chmod a+x lsws_whm_autoinstaller.sh

Install Litespeed for Cpanel/WHM using Auto Installer

# ./lsws_whm_autoinstaller.sh TRIAL 1 8080 username testpass1234 [email protected] 1 0

Uninstall Litespeed

# /usr/local/lsws/admin/misc/uninstall.sh

Uninstall Litespeed WHM Plugin

# /usr/local/cpanel/whostmgr/docroot/cgi/lsws/lsws_whm_plugin_uninstall.sh

Run upcp:

# /scripts/upcp --force

Troubleshoot: Server IP address could not be found

I had a client ticket today, with the following screenshot:

The error says, ‘server IP address could not be found’. This type of error means there is a DNS resolution error. There could be 3 possibilities:

  1. Client hasn’t updated the dns nameservers for the domain
  2. Host’s DNS server is down.
  3. Client’s DNS resolver isn’t working.

To check if the client has updated the proper dns nameservers, you can use intodns.com. It will also tell you if the host DNS is down or not. If both are ok, you should check if you are able to load other domains using your Internet, if not, it has things to do with the local DNS resolver of your desktop or the ISP. In my case, it was client who failed to update the nameservers of the domain. All that was required to update the nameservers with the server ones.