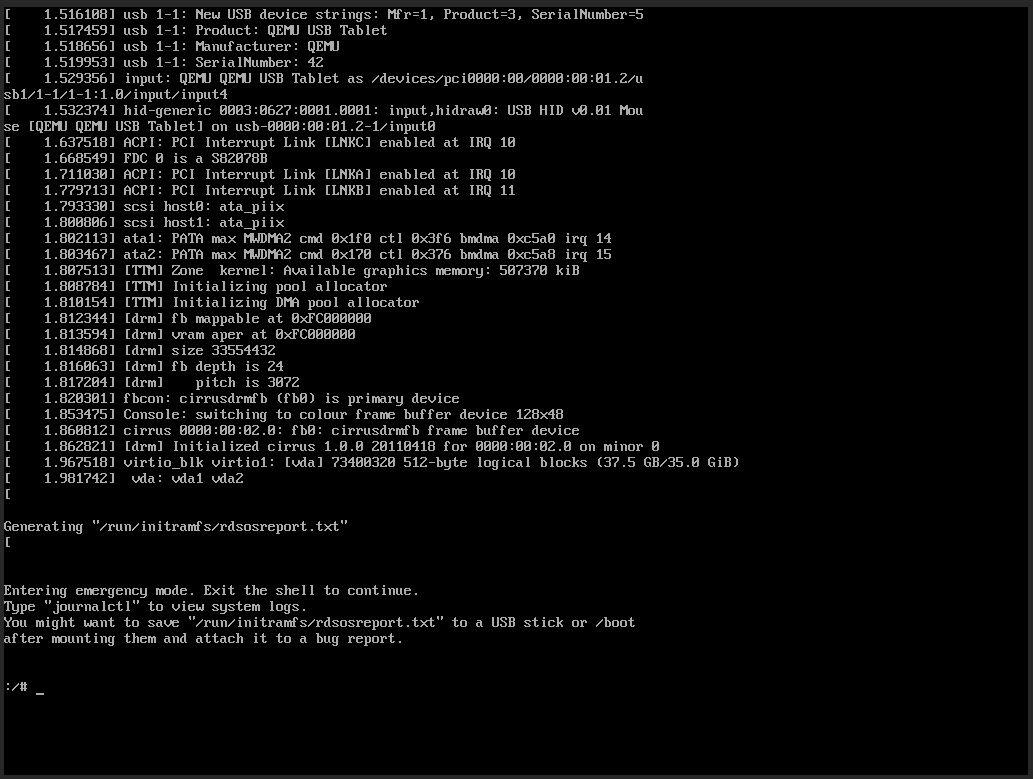
The GPG keys listed for the “MySQL 5.7 Community Server” repository are already installed but they are not correct for this package.

When you try to run yum update, you see an error like the following:

The GPG keys listed for the "MySQL 5.7 Community Server" repository are already installed but they are not correct for this package.

This is coming because the GPG key for Mysql 5.7 community repo has changed. To update the GPG key, you may run the following:

rpm --import https://repo.mysql.com/RPM-GPG-KEY-mysql-2022

This shall resolves the issue for you. Good luck.

Unable to register authentication agent: GDBus.Error:org.freedesktop.PolicyKit1.Error.Failed: Cannot determine user of subject – Cyberpanel – CentOS 7

Error details:

After installing cyberpanel, you see the below error from shell when running any command:

** (pkttyagent:8559): WARNING **: 02:28:34.621: Unable to register authentication agent: GDBus.Error:org.freedesktop.PolicyKit1.Error.Failed: Cannot determine user of subject
Error registering authentication agent: GDBus.Error:org.freedesktop.PolicyKit1.Error.Failed: Cannot determine user of subject (polkit-error-quark, 0)

Resolution:

The error is appearing because cybepranel adds the following line in your fstab:

proc    /proc        proc        defaults,hidepid=2    0 0

This is hiding the /proc from your shell that uses polkit. To fix this, keeping the above mount rule, you need to add a group for polkitd user and assign that group to to access /proc. You may do this using the following:

groupadd nohideproc
usermod -a -G nohideproc polkitd
mount -o remount,rw,hidepid=2,gid=nohideproc /proc
systemctl restart polkit
systemctl restart polkit (do this twice)

Once done, you may edit your fstab, and comment the old line, add the following line:

# Edit your fstab:
nano /etc/fstab

# comment the following line :
from : proc    /proc        proc        defaults,hidepid=2    0 0
to : # proc    /proc        proc        defaults,hidepid=2    0 0

# add the following line
proc /proc proc defaults,hidepid=2,gid=nohidproc 0 0

Good luck.

How to connect CentOS Server to the Internet using USB Wifi Adapter?

I was recently working on an Asus RS300 server, installed with CentOS 7 minimal installation before placing it to the datacenter. I didn’t have any RJ45 cable to get this connected to the internet at home. I had a spare ‘Linksys wusb600n’ USB wifi adapter, that I wanted to try out. I connected it to the USB, and got the interface listed as wlp18s0b1 using ifconfig.

To connect this to wifi, we can use nmcli like the following:

Show the connection:

nmcli connection show

To connect to the wifi with the password, use the following:

nmcli dev wifi connect your-ssid password your-wifi-pass

Remember to replace ‘your-ssid’ with the wifi name of your and ‘your-wifi-pass’ with the password for your wifi.

Once you run the above command, this should get connected to the wifi. Now, you can see the connection details and up the device like the following:

nmcli connection show
nmcli connection up wlp18s0b1

Remember to replace ‘wlp18s0b1’ with the one you can see in ifconfig.

Good luck.

CENTOS 6 : YUM ERROR : ALL MIRROR URLS ARE NOT USING FTP, HTTP[S] OR FILE

If you are still using CentOS 6, and trying to update the system using the following command:

yum update -y

You probably end up with the following:

Loaded plugins: fastestmirror, refresh-packagekit, security
Setting up Update Process
Determining fastest mirrors
YumRepo Error: All mirror URLs are not using ftp, http[s] or file.
Eg. Invalid release/repo/arch combination/
removing mirrorlist with no valid mirrors: /var/cache/yum/x86_64/6/base/mirrorlist.txt
Error: Cannot find a valid baseurl for repo: base

The error is coming up because CentOS 6 has now hit the end of life, and the URLs are moved to centos vault. Now to update the CentOS, you would need to replace the URLs.

How to Fix

To fix the error, you need to replace your CentOS-base.repo file. Open up the following file using nano:

nano /etc/yum.repos.d/CentOS-Base.repo

Now, replace the full code using the following:

[base]
name=CentOS-$releasever - Base
# mirrorlist=http://mirrorlist.centos.org/?release=$releasever&arch=$basearch&repo=os&infra=$infra
# baseurl=http://mirror.centos.org/centos/$releasever/os/$basearch/
baseurl=https://vault.centos.org/6.10/os/$basearch/
gpgcheck=1
gpgkey=file:///etc/pki/rpm-gpg/RPM-GPG-KEY-CentOS-6

# released updates
[updates]
name=CentOS-$releasever - Updates
# mirrorlist=http://mirrorlist.centos.org/?release=$releasever&arch=$basearch&repo=updates&infra=$infra
# baseurl=http://mirror.centos.org/centos/$releasever/updates/$basearch/
baseurl=https://vault.centos.org/6.10/updates/$basearch/
gpgcheck=1
gpgkey=file:///etc/pki/rpm-gpg/RPM-GPG-KEY-CentOS-6

# additional packages that may be useful
[extras]
name=CentOS-$releasever - Extras
# mirrorlist=http://mirrorlist.centos.org/?release=$releasever&arch=$basearch&repo=extras&infra=$infra
# baseurl=http://mirror.centos.org/centos/$releasever/extras/$basearch/
baseurl=https://vault.centos.org/6.10/extras/$basearch/
gpgcheck=1
gpgkey=file:///etc/pki/rpm-gpg/RPM-GPG-KEY-CentOS-6

Notice, how we replaced mirror.centos.org to valut.centos.org in the repo file.

Now, clean the yum, and update

yum clean all
yum update -y

You should be good to go now.

How to Fix Locale Font Issue with Odoo Qweb Reports

Issue

When looking at the html report in Odoo, locale fonts look ok, but if you download the Qweb report to print in pdf format, it prints gibberish. How to fix that?

Resolution

Odoo uses a templating engine for reporting called ‘Qweb’. Qweb can be used to generate two types of reports. One is HTML and the other is PDF. Odoo primarily uses Qweb engine to generate the HTML code. After that, it uses a tool called ‘wkhtmltopdf’ to convert the report to pdf and make it printable. Now when, we look at the HTML version of the report, fonts are shown based on Unicode supported browsers or the fonts you have installed on your computer. But when you try to convert this to PDF using wkhtmltopdf, that tool has to have exclusive access to those fonts to be able to convert them from HTML to pdf for you. As wkhtmlpdf command runs in the server you have installed Odoo, hence, you would need to install the font package in the server.

In my case, I required to install Bengali fonts. For CentOS, it is available under the lohit package, that contains several indian fonts including bengali. To install bengali font package in CentOS 7, use the following command:

yum install lohit-bengali* -y

Once done, your wkhtmltopdf should be able to read the bengali fonts from your html/qweb templates and able to convert them to PDF for you.

-bash: smartctl: command not found

Error Details

When I try to check the S.M.A.R.T details of my drive, using the following command:

smartctl -a /dev/sda

I get an error:

-bash: smartctl: command not found

What can I do?

Solution

This error is appearing because you do not have the S.M.A.R.T tools installed on your system.

How to Install Smart tools on CentOS 7?

To install smart tools, you can run the following:

yum install smartmontools -y

Once done, you may run the smartctl command again, and it shall work:

[root@172 ~]# smartctl -a /dev/sda
smartctl 7.0 2018-12-30 r4883 [x86_64-linux-3.10.0-1127.el7.x86_64] (local build)
Copyright (C) 2002-18, Bruce Allen, Christian Franke, www.smartmontools.org

=== START OF INFORMATION SECTION ===
Model Family:     Crucial/Micron BX/MX1/2/3/500, M5/600, 1100 SSDs
Device Model:     Micron_1100_MTFDDAK2T0TBN

How to reset root password in CentOS 7

Resetting admin password in CentOS 7 is different than of CentOS 6, as CentOS 7 utilized Grub 2 and has a different procedure to access Single User Mode. First, boot your system in Single User Mode to reset the root password by following the below tutorial:

Once done, now, you may first chroot the system:

chroot /sysroot

Now, you may reset the password using the following:

passwd root

You should be done. If you are using SELinux, then you need to relabel accordingly:

touch /.autorelabel

Then, exit chroot and reboot the system:

exit && reboot

You should be done now.

How to boot CentOS 7 in Single User Mode

Booting CentOS 7 in single user mode is total different than of CentOS 6 as it uses a different version of Grub. We will go step by step to boot into single user mode in CentOS 7.

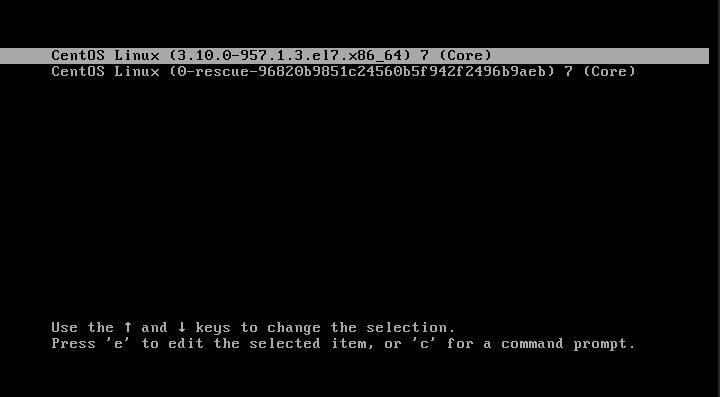
  1. First, boot the screen and press an arrow key while the timer comes on this screen to stop the timer

    CentOS 7 Boot Screen

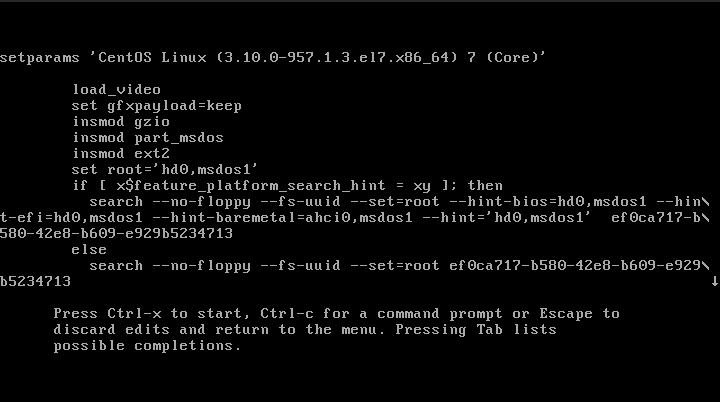
  2. Press ‘e’ on the selected default CentOS version. That will take you to the following screen

    CentOS 7 Boot Edit Screen

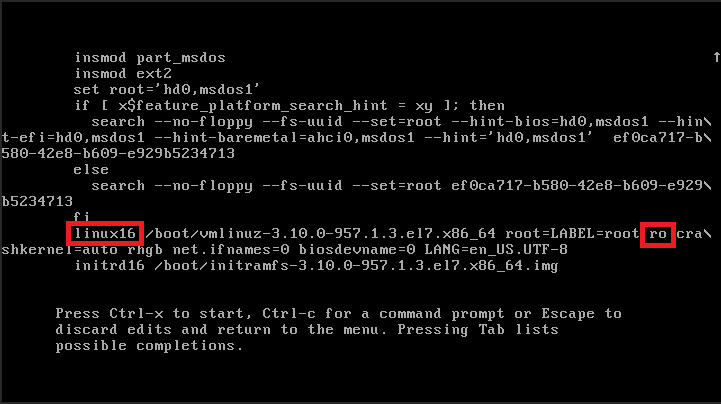
  3. These are grub commands that the bootloader is using to boot you to the system. Arrow down in this window to the line, that starts with linux16. Now take the right arrow on the keyboard to take your cursor to the word that says ‘ro’ as shown in the image

    Linux16 Command Boot

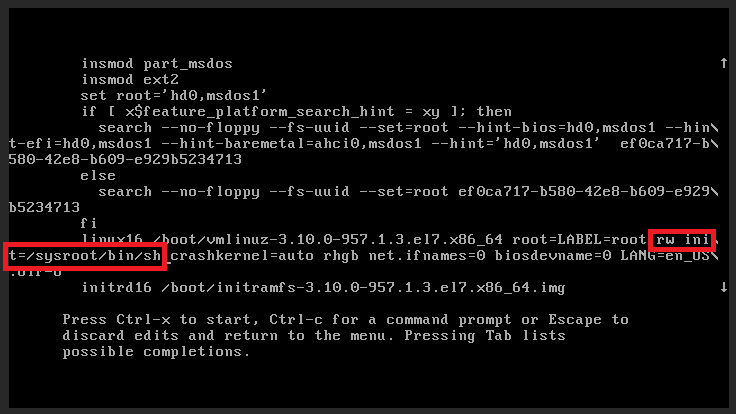
  4. Now replace ro with rw init=/sysroot/bin/sh as shown below

    CentOS 7 Boot Sysroot

  5. Now press Ctrl + x to start Single User Mode

    Boot in Single User Mode CentOS 7

You should be done now, you are on the single user mode console. If you would like to use the main system, you may chroot as the following:

chroot /sysroot

Now, if you are trying to reset the root password, after booting into the single user mode, you may follow the following to reset the root password:

How to Fix zmconfigd failed in Zimbra – Starting zmconfigd…failed.

Sometimes, if you restart Zimbra, you see zmconfigd is not starting or saying it’s failed. You may also see the zmconfigd service is not running in the Zimbra admin panel. There are couple of common reasons why zmconfigd fails to start.

Disable IPv6

One reason of zmconfigd fails to start is IPv6, for some reason, it fails to route the IPv6 and fails to start. A quick solution to this problem is to disable ipv6 and restart zmconfigd. You may do this like the following:

#Edit your sysctl.conf file
nano /etc/sysctl.conf

# paste the following inside the file
net.ipv6.conf.all.disable_ipv6 = 1
net.ipv6.conf.default.disable_ipv6 = 1
net.ipv6.conf.lo.disable_ipv6 = 1

# Save the file, and update sysctl in realtime
sysctl -p

# now try to restart zmconfigd
su - zimbra
zmconfigdctl restart

Now you can check the zmconfigd status with the following, to know if it’s running or not:

[root@mailapp ~]# cat /opt/zimbra/log/zmconfigd.pid
19722

If it returns an ID, it means the zmconfigd is running.

Netcat is not installed

Another reason of the error could be because nc is not installed in your system. Zimbra zmconfigd has a dependency on netcat package. Netcat is available through nmap-ncat in centos systems. You may run the following to install netcat:

yum install nc
# or 
yum install nmap-netcat

How to Install Mysqlfrm / Mysql-utilities in CentOS 7

Mysql provides a set of utility tools that can be used to recover your data from Mysql data files. One of them is ‘Mysqlfrm’. This tool is not given in primary MySQL bundles, instead it comes with Mysql-utilities.

This package can be installed from ‘mysql-tools-community’ repo, those are available from MySQL Yum Repos

Command would be:

yum install mysql-utilities

This would also install another python package called ‘mysql-connector-python’ for you form the ‘mysql-connectors-community’ repo automatically. There is one catch. Sometimes, due to python version dependencies, you may fail to connect to mysql through the automatically detected mysql-connector-python that is automatically installed by mysql-utilities. You may know that if you are seeing the following error when you type mysqlfrom in the command line:

# mysqlfrm
Traceback (most recent call last):
  File "/usr/bin/mysqlfrm", line 27, in <module>
    from mysql.utilities.common.tools import (check_python_version,
ImportError: No module named utilities.common.tools

For these cases, you may install an older version of mysql connector for python, using the following before installing mysql-utilities:

yum install mysql-connector-python.noarch

This would install an older version of mysql connector that works better with Python 2.7 or similar.

Once the above is done, you may now install mysql-utilities using the following back again:

yum install mysql-utilities

As you have already installed the connector, this won’t try to reinstall the mysql connector from dependencies and use the other one that you got installed.

Now you may use the mysqlfrm tool to read your frm files and recover the table structures if required. Here is a great article from 2014 and still valid on mysqlfrm use cases:

How to recover table structure from .frm files with MySQL Utilities