How to install SSL in Zimbra with Certificate and CA-bundle

There are 3 things you need:

  1. Private key
  2. Certificate
  3. Ca-bundle

First, switch to the user zimbra:

su - zimbra

Let’s except your files are located here:

Private Key: /tmp/private.key
Certificate: /tmp/your.domain.com.crt
Ca-Bundle: /tmp/your.domain.com.ca-bundle

Now, copy your private key file to the following location:

cp /tmp/private.key /opt/zimbra/ssl/zimbra/commercial/commercial.key

Now, first, verify 3 things to make sure, they are correct:

/opt/zimbra/bin/zmcertmgr verifycrt comm /opt/zimbra/ssl/zimbra/commercial/commercial.key /tmp/your.domain.com.crt /tmp/your.domain.com.ca-bundle

If it, says ok, now you may deploy the certificate like the following:

/opt/zimbra/bin/zmcertmgr deploycrt comm /tmp/your.domain.com.crt /tmp/your.domain.com.ca-bundle

Once done, now, exit from the user zimbra and restart zimbra:

exit
service zimbra restart

Your SSL should work now.
How To Manually Renew SSL in Cyberpanel

In case you are failing to renew your domain SSL using let’s encrypt in a cyberpanel environment. This might help you.

First, make sure, you have the certbot installed.

yum install epel-release -y
yum install certbot -y

Once done, now, you can get a certificate using the following command:

certbot certonly  --webroot -w /home/yourdomain.com/public_html/yourdomain.com/ -d yourdomain.com -d www.yourdomain.com

Make sure to replace ‘/home/yourdomain.com/public_html/yourdomain.com/’ with the path of your home directory and ‘yourdomain.com’ with the original domain. This will show something like the following once the retrieve is done

IMPORTANT NOTES:
 - Congratulations! Your certificate and chain have been saved at:
   /etc/letsencrypt/live/yourdomain.com-0003/fullchain.pem
   Your key file has been saved at:
   /etc/letsencrypt/live/yourdomain.com-0003/privkey.pem
   Your cert will expire on 2022-03-12. To obtain a new or tweaked
   version of this certificate in the future, simply run certbot
   again. To non-interactively renew *all* of your certificates, run
   "certbot renew"

The noticeable thing is the following:

/etc/letsencrypt/live/yourdomain.com-0003/

This ends with 003 because this is the 3rd time, it is getting a certificate from Let’s Encrypt for the same domain.

Now, first go to /etc/letsencrypt/live and change this folder to yourdomain.com, and then restart lsws like the following:

cd /etc/letsencrypt/live
mv yourdomain.com yourdomain.com_old_1
mv yourdomain.com-003 yourdomain.com
service lsws restart

Your SSL should be up and running now. Good luck.

How to Install Let’s Encrypt in Cpanel

Let’s Encrypt is a popular tool to use free SSL for your website. Cpanel comes with Sectigo free ssl service through requesting and pooling system. Although, you might feel interested in getting the SSL released immediately without a queue based approach, and would prefer to use Let’s Encrypt that’s why.

There are two ways, you may install Let’s Encrypt in Cpanel.

  1. Using Cpanel Plugin

First one would be using the plugin created by Cpanel. Login to your server as root:

ssh root@server_ip

Then, run the following to install Let’s Encrypt in your cpanel system

/usr/local/cpanel/scripts/install_lets_encrypt_autossl_provider

It might take a couple of minutes, then it should install Let’s Encrypt as a provider in AutoSSL.

Now, go to WHM >> Manage AutoSSL and select Let’s Encrypt as the provider instead of Sectigo Cpanel default. You need to check the Agreement rules under the Let’s Encrypt selection and you may create the account in Let’s Encrypt using the same tool.

Once done, your new SSLs would be issued using the Let’s Encrypt tool through Cpanel AutoSSL plugin.

2. Using FleetSSL

There is a 3rd party tool, existed before Cpanel provided a plugin for Let’s Encrypt. It’s FleetSSL. One key benefit of using FleetSSL is that, it allows the Cpanel end users to control issuing and renewing the SSL from Cpanel. One key cons of using FleetSSL is that, it is not free of charge, it comes with 30$ one time fees. But mainly hosting provider would not mind to use this as it is a nice addition for the end user feature set in a hosting provider’s point of view.

You may check for details here:

https://letsencrypt-for-cpanel.com/

Now, once you complete installing Let’s Encrypt SSL, you may now use Let’s Encrypt for different cpanel services like webmail/cpanel/whm/calenders/MTA services. You may check the following to know how to:

How to Make Cloudflare Work with HAProxy for TLS Termination

Remember:
This is a part of dirty hack series. This is not the only way you can achieve what we want to achieve. But this is only used when you can trust the connections between your HAProxy and the Origin servers. Otherwise, you should not use this technique.

One common problem with using HAProxy and Cloudflare is that, the SSL that Cloudflare gives us, it gets terminated at HAProxy on L7 load balancer. For such cases, Cloudflare can not verify the Origin server and drops the connection. For such cases, your HAProxy will not work. What would you do for such cases? There are two ways to do this.

First one is, Cloudflare gives you a origin certificate, that you can install at HAProxy. I won’t dig into deep into this in this blog post.

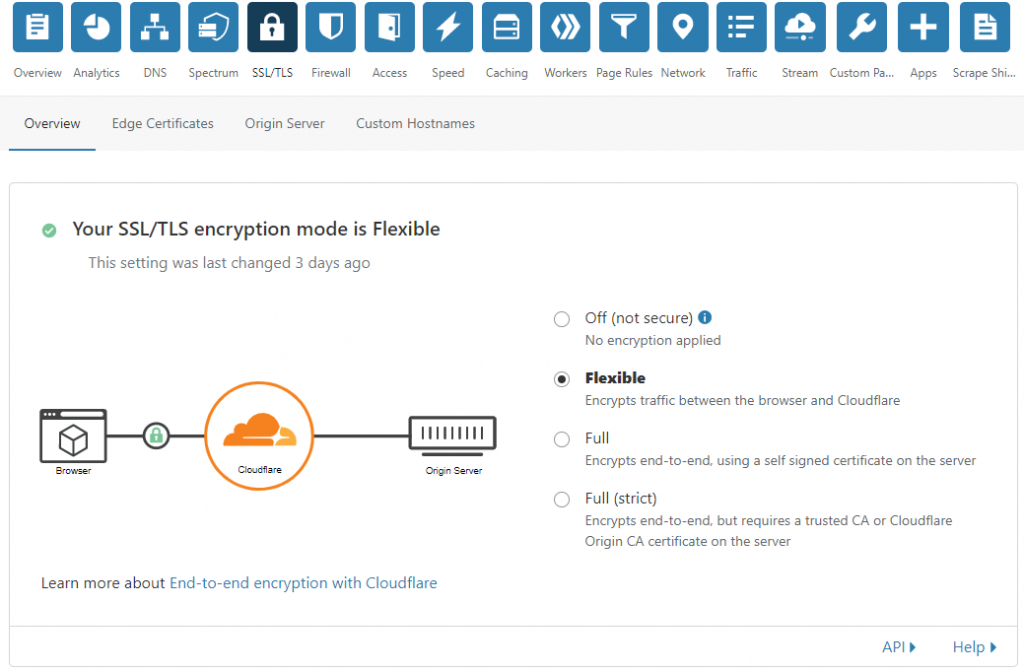
But if you can trust your connections between HAProxy and backend Origin servers, as well as the connections between Cloudflare and HAproxy, you can choose the second one. For this case, Cloudflare allows you to Encrypt only the connections between the Visitors and Cloudflare. It won’t matter what you are doing behind the Cloudflare. This option is called ‘Flexible’ option, that you can select from your Cloudflare >> SSL/TLS tab.

Fix TLS Termination by HAProxy with Flexible Encryption Mode of Cloudflare

Once you set this to Flexible, this should start working ASAP. Remember, this is not essentially the best way to do this, but the quickest way only if load balancing is more important to you instead the data integrity.