How to Make Cloudflare Work with HAProxy for TLS Termination

Remember:
This is a part of dirty hack series. This is not the only way you can achieve what we want to achieve. But this is only used when you can trust the connections between your HAProxy and the Origin servers. Otherwise, you should not use this technique.

One common problem with using HAProxy and Cloudflare is that, the SSL that Cloudflare gives us, it gets terminated at HAProxy on L7 load balancer. For such cases, Cloudflare can not verify the Origin server and drops the connection. For such cases, your HAProxy will not work. What would you do for such cases? There are two ways to do this.

First one is, Cloudflare gives you a origin certificate, that you can install at HAProxy. I won’t dig into deep into this in this blog post.

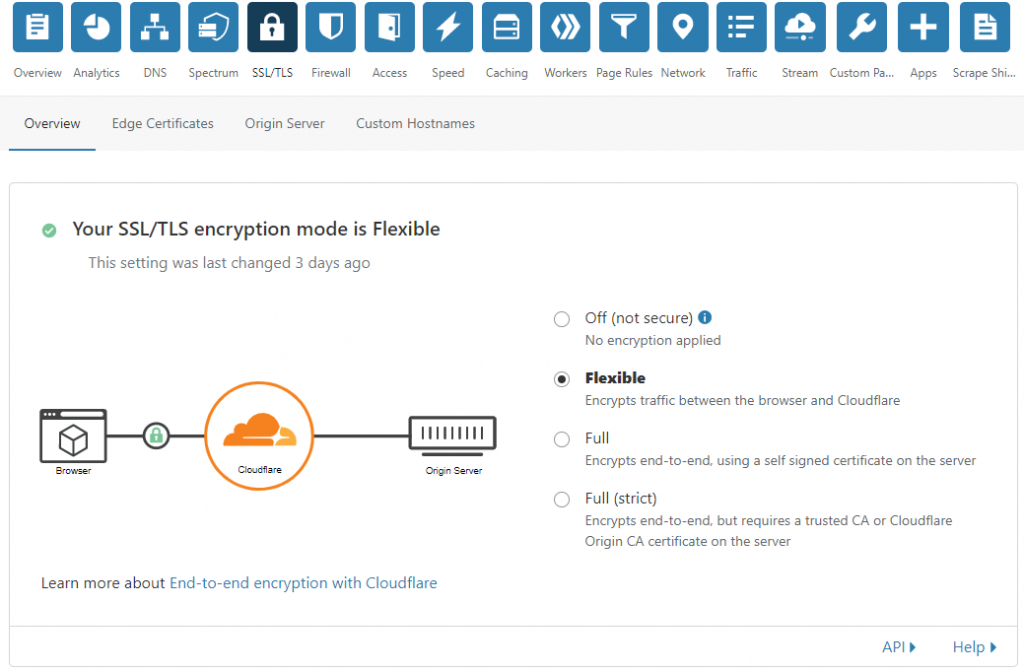
But if you can trust your connections between HAProxy and backend Origin servers, as well as the connections between Cloudflare and HAproxy, you can choose the second one. For this case, Cloudflare allows you to Encrypt only the connections between the Visitors and Cloudflare. It won’t matter what you are doing behind the Cloudflare. This option is called ‘Flexible’ option, that you can select from your Cloudflare >> SSL/TLS tab.

Fix TLS Termination by HAProxy with Flexible Encryption Mode of Cloudflare

Once you set this to Flexible, this should start working ASAP. Remember, this is not essentially the best way to do this, but the quickest way only if load balancing is more important to you instead the data integrity.

Lost connection after starttls from Hostname (IP) – Virtualmin – Postfix

Problem Definition:

I have some VPS clients using Virtualmin as their LAMP/LEMP stack. After some recent updates to Virtualmin, they started seeing some Postfix errors. The error is the following:

lost connection after STARTTLS from unknown[0.0.0.0]

Virtualmin used to configure postfix to allow ‘Non TLS’ connections to the port 587, which they recently stopped configuring. Now, if you connect to 587 port, you have to follow the TLS, no matter what. My clients didn’t bother to use TLS/SSL before, which caused the error.

Virtualmin comes with Let’s Encrypt. That’s make it easy to solve the problem TLS problem.

Solution Summary:

Here is the basic to solve the problem, first you make virtualmin to install Let’s encrypt SSL for the domain you want to use for SMTP. Virtualmin primarily going to install this for your Apache. Once done, Copy the same certificate to your Postfix, Virtualmin allows you to do it with single click.

Detailed Steps:

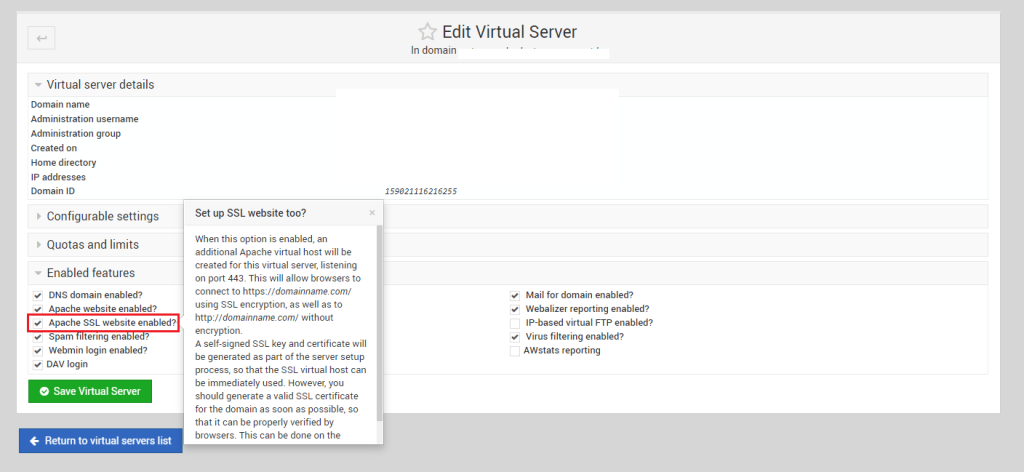
First, login to your Virtualmin at 10000 port, then select the domain you use for the SMTP. Once done, you can go to Edit Virtual Server and expand the option ‘Enabled Features’. From here check the option says ‘Apache SSL Website Enabled?’

Check Apache SSL Website Enabled

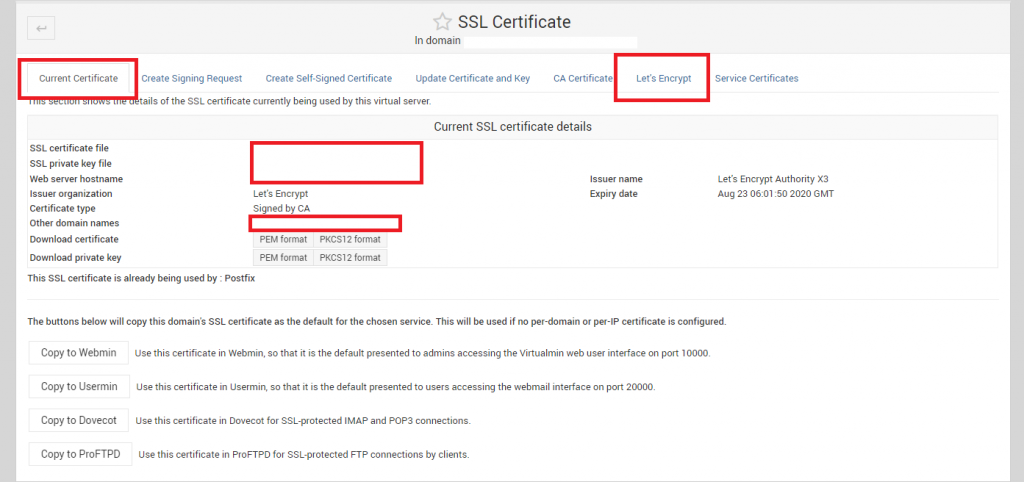
Next, go to Server Configuration >> SSL Certificate, we will get two tabs, ‘Current Certificate’ & ‘Let’s Encrypt’. Both are important. First go to Let’s Encrypt:

Let’s Encrypt Virtualmin

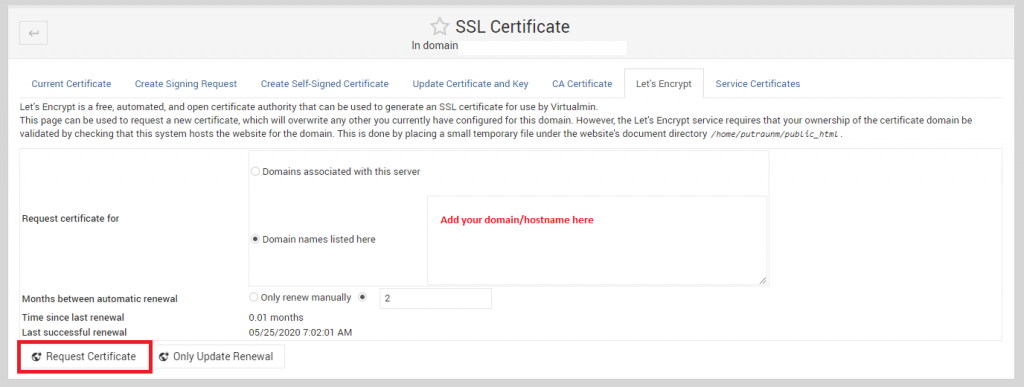
In the Let’s Encrypt tab, select the ‘Domain names listed here‘ and enter the domain that only has valid A Records or loads to the server, otherwise, remember, Let’s Encrypt won’t process for any single exception unlike cpanel or cyberpanel

Let’s Encrypt Virtualmin Add Domains

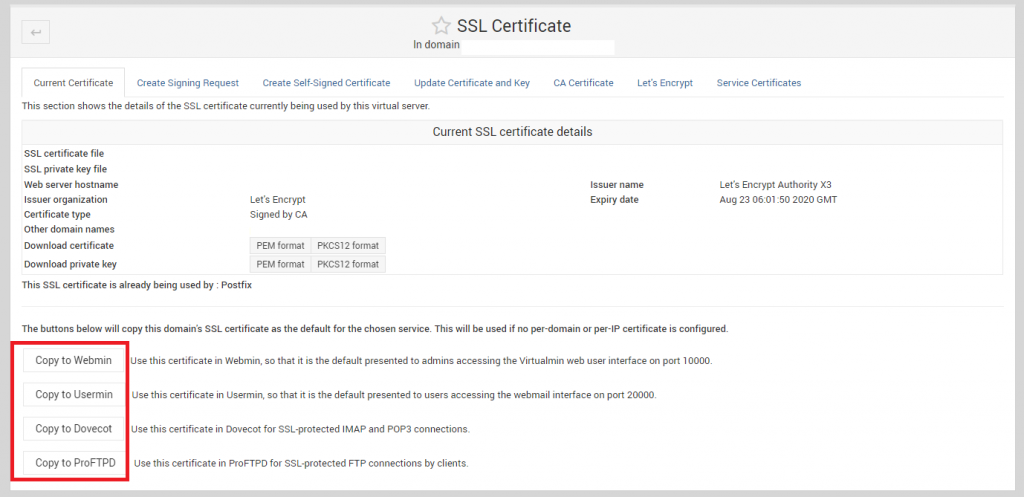
Once done, request the certificate. After the certificate installation is done, go back to ‘Current Certificate’ tab. On the bottom of the tab, there are couple of Copy To ‘Services’ option available. Here you should see the option says ‘Copy to Postfix’. Use that to copy the certificate to Postfix and use it during TLS/SSL transactions.

Copy SSL to Services (Postfix) Virtualmin.

In my case, I have already copied the SSL to Postfix, which is why it is not showing the option ‘Copy To Postfix’. But the option should be above the ProFTPD.

Once done, you may now recheck and the SMTP should work with TLS and 587 port.

How to Use Sticky Session for CSRF submission on Highly Scalable Cloud App in Haproxy

HINT: If you are a nginx fan and used it in mass scale, then, you must have done this using ip_hash (Nginx Documentation). It follows the same purpose for Haproxy. Difference and benefits of using Haproxy over Nginx for L7 proxy in a highly scalable and reliable cloud app would be a discussion for another day.

Case Discussion:

Suppose, you have a Cloud app, that is load balanced & scaled between multiple servers using Haproxy, for example:

101.101.101.101
202.202.202.202
303.303.303.303

Now, if your app has a submission form, for example, a poll submission from your users, then, there is an issue in this Haproxy setup.

Let’s say, an User A, requests for the app, and gets the data from the server 101.101.101.101, the CSRF token he gets for the poll submission to his browser, also maintains the app hosted on 101.101.101.101. But when he press the submit button, HAProxy puts him on 202.202.202.202 app, and the app hosted on 202.202.202.202 instantly rejects the token for the session as the session is not registered for that app. For such cases, we need to maintain a ‘Sticky’ session based on the cookie set by the right server. That means, if the cookie is set by 101.101.101.101, HAproxy should obey and give the user 101.101.101.101 until the cookie or the session is reset or regenerated.

How To Do That:

What we need to do, let haproxy write the server id in the cookie, and make the directive ‘server’ to follow the cookie. Please remember, there are couple of other way to achieve this. There is another way of doing this is called ‘IP Affinity’, where you make sticky session based on IP of the user. There is another based on PHP session value. Setting sticky session based on php session should also work. I preferred the cookie based sticky session, just on random selection.

So, to write the server id in the cookie, you need to add the following in the haproxy ‘backend’ directive as following:

backend app-main
balance roundrobin
cookie SERVERID insert indirect nocache

In the cookie directive, you can see, we are taking the HAProxy variable ‘SERVERID’ and inserting that to the cookie attribute. Now, all you need to do, is to configure your balancing IPs to follow the cookie, like the following:

backend app-main
balance roundrobin
cookie SERVERID insert indirect nocache
server nginx1 101.101.101.101 cookie S1
server nginx2 202.202.202.202 cookie S2
server nginx3 303.303.303.303 cookie S3

S1, S2, S3 are just 3 different names of the cookies for the specific servers. After the above is done, you can now restart and see Haproxy is following stickiness based on the session you have.

Just to find out, how to test if you are using laravel, try to regenerate the session based on the session() helper method as following:

session()->regenerate()->csrf_token();

You should be able to see the content loading from different web servers when the session regenerates. But it will persists when the regenerate session method is not called.
How to Empty a Model In Odoo / Mass Delete in Odoo / Mass Unlink

In Odoo, we use unlink() ORM method to delete a record. But if you are trying to empty a model or wants to delete multiple records, the best way to do it, is to use two steps.

First, search the records:

record_set = self.env['your.model'].search([])

Second, unlink them all at once instead of looping through them:

record_set.unlink()

If you have a list of ids, search them using the list:

ids = [1, 2, 3, 10, 11, 12]
record_set = self.env['your.model'].search([('id', 'in', ids)])

and unlink:

record_set.unlink()

Remember, there is no need to loop through this iterable object, odoo unlink does it for you.

TIPS: If you want to get all the ids in a model directly in a list, you can use the following:

record_list = self.env['your.model'].search([]).ids

How to Add Invoice to Purchase Order in Odoo Automatically

I was facing an issue in two way matching algorithm for Incoming Receipts & Vendor bills in my Odoo installation. As vendor bills are tagged in Purchase Orders only through use of ‘Create Bill’, I had to make an algorithm to calculate the matching. Remember, the match would only work if the supply chain members follows the right way of doing it, otherwise, it would fail. That’s what happened, it fails almost 3 times out of 10. Then I realized, the invoice needs to be pinned automatically in the stock.picking model, instead of purchase.order model at the time a Receipt is validated, to keep the tracking for my matching.

While doing so, first challenge is to pin an invoice to a purchase id. By default, the model for invoicing, ‘account.invoice’ has a foreign read only key for purchase, which is purchase_id. But remember, this is a read only field, and can’t be written/created in a new or existing record using record. I dig down the Odoo codes a little under purchase/models/account_invoice.py and could find the Odoo function that can do the job for us. It’s called ‘purchase_order_change()’.

Here is a snippet of adding an invoice automatically to a purchase ID:

invoice_id = self.env['account.invoice'].create({
'type': 'in_invoice',
'purchase_id': self.purchase_id.id,
'partner_id': self.purchase_id.partner_id.id,
})

invoice_id.purchase_order_change()

This will create an invoice in Draft state. Remember, you need to validate this invoice, if you would like to create the invoice number, not just an invoice entry. You may do it manually or you may do it automatically ‘How to Automatically Validate an Invoice in Odoo

Remember, I am triggering the snippet from the stock.picking, not from purchase.order, which is why, the ‘self’, is related to stock.picking and calling self.purchase_id to link the original purchase_id that triggered the stock.picking record.

Now, a small tip. What if, if you want to align the invoice to only have the products you have received in this particular receipt? Easy as pie:

for invoice_line in invoice_id.mapped('invoice_line_ids'):
check = 1
for move_line in self.mapped('move_line_ids'):
if invoice_line.product_id.id == move_line.porduct_id.id:
check = 0

if check:
invoice_line.unlink()

Simple! Isn’t it? Happy coding!

How to Save OpenVPN Username & Password

If you are using OpenVPN in a Linux platform through command line, it is always handy to be able to save the authentication information in a file and let openvpn use them. There are two ways you can do it.

First Method

First save the password in a file e.g auth.txt with two lines:

username
password

First line is for username and the second line is for password.

If you are using .ovpn files for configuration, open the .ovpn file and simply add the following:

auth-user-pass auth.txt

Now, your authentication would use the authentication given in that file

Second Method

You may add the auth-user-pass in the openvpn command line argument, but you have to make sure, this is passed after the --config. Here is an example

openvpn --config "your_file.ovpn" --auth-user-pass "auth.txt"

That should be enough.

How To: Install AutoSSL for Server Hostname – Cpanel Server

How about install Let’s Encrypt for Cpanel?

Before we start, you may first want to install Let’s Encrypt to use an Immediately Issuing provider for your SSL in Cpanel?

https://mellowhost.com/blog/how-to-install-lets-encrypt-in-cpanel.html

Once done, you may now continue using this tutorial to install Let’s Encrypt for your Service SSL in Cpanel/WHM/Webmail.

How To Install AutoSSL for Server Hostname / Webmail / Cpanel / WHM

Starting from Cpanel 11.58, Cpanel is offering Free SSL, issued by ‘Cpanel INC’ for free of charge to the valid cpanel license owner. If you are using cpanel, login to your WHM >> Providers >> Enable Cpanel & from Options >> Check Allow AutoSSL to replace invalid or expiring non-AutoSSL certificates.

Now, running upcp should automatically install the free SSL for your cpanel server hostname. If it doesn’t, it is probably because your server IP and the hostname IP are resolving to wrong address. To understand and troubleshoot the problem, run the following script from command line:

# /usr/local/cpanel/bin/checkallsslcerts

This script checks and installs certificate for expired, invalid and self signed certificates for the server services. If you are seeing an error like the following:

[WARN] The system failed to acquire a signed certificate from the cPanel Store because of the following error: (XID 62hp6x) The system queried for a temporary file at “http://server91.mellowhost.com/.well-known/pki-validation/D92868E512FB02354F2498B94E67430B.txt”, but the web server responded with the following error: 404 (Not Found). A DNS (Domain Name System) or web server misconfiguration may exist.

It means, your hostname is resolving to the wrong IP. You would need to check if the hostname is resolving to an IP which has first virtualhost pointed to /var/www/html or not under /etc/apache2/conf/httpd.conf

Linux How To: Install IPTABLES in CentOS 7 / RHEL 7 Replacing FirewallD

CentOS 7 / RHEL 7 doesn’t come with iptables by default. It uses a full functional firewall system called ‘firewalld’. I have been a big fan of iptables and it’s capability from the very first, and since I have switched to CentOS 7, I couldn’t stop using it. I had to stop firewalld and install iptables in all of my CentOS 7 installation and start using iptables rules as I was using before. Here is a small How To guide on installing Iptables and disabling firewalld from a CentOS 7 or RHEL 7 or a similar variant distro.

How to Install IPTABLES in CentOS 7

To begin using iptables, you need to download and install iptables-service package from the repo. It isn’t installed automatically on CentOS 7. To do that, run the following command:

# yum install iptables-services -y

How to stop the firewalld service and start the Iptables service

Once the iptables-serivces package is installed, you can now stop the firewalld and start the iptables. Keeping both kind of network filtering too can create conflicts and it is recommended to use any out of two. To do that run the following:

# systemctl stop firewalld
# systemctl start iptables

Now to disable firewalld from the starting after the boot, you need to disable the firewalld:

# systemctl disable firewalld

To disallow starting firewalld manually as well, you can mask it:

# systemctl mask firewalld

Now you can enable iptables to start at the boot time by enabling iptables using systemctl command:

# systemctl enable iptables

How to check status of iptables in centOS 7

In previous distros, iptables status could be fetched using service command, although, the option is no longer available in CentOS 7. To fetch the iptables status, use the following:

# iptables -S

Iptables save command can still be used using service tool:

# service iptables save

This would save your iptables rules to /etc/sysconfig/iptables as it used to do in previous distros.

Quick Tip: How to view public IP using SSH terminal/cURL/wget

There are times when you might require to view the IP address your server is using for outgoing connections. If you are in command line/console/mosh/ssh/rsh, you want an one command solution instead of visiting a page like whatismyip.com using lynx browser or so on. Here is a quick tip that I regularly use to perform this:

Using cURL:

curl ifconfig.co

Using wget:

wget -qO- ifconfig.co

ifconfig.co does it simple and easy.

Check File System for Errors with Status/Progress Bar

File system check can be tedious sometimes. User may want to check the progress of the fsck, which is not enabled by default. To do that, add -C (capital C) with the fsck command.

fsck -C /dev/sda1

The original argument is:

fsck -C0 /dev/sda1

Although, it would work without number if you put the -C in front of other arguments, like -f (forcing the file system check) -y (yes to auto repair). A usable fsck command could be the following:

fsck -fy -C0 /dev/sda1

or

fsck -C -fy /dev/sda1

Please note, -c (small C) would result a read only test. This test will try to read all the blocks in the disk and see if it is able to read them or not. It is done through a program called ‘badblock’. If you are running badblock test on a large system, be ready to spend a large amount of time for that.