How to Fix zmconfigd failed in Zimbra – Starting zmconfigd…failed.

Sometimes, if you restart Zimbra, you see zmconfigd is not starting or saying it’s failed. You may also see the zmconfigd service is not running in the Zimbra admin panel. There are couple of common reasons why zmconfigd fails to start.

Disable IPv6

One reason of zmconfigd fails to start is IPv6, for some reason, it fails to route the IPv6 and fails to start. A quick solution to this problem is to disable ipv6 and restart zmconfigd. You may do this like the following:

#Edit your sysctl.conf file
nano /etc/sysctl.conf

# paste the following inside the file
net.ipv6.conf.all.disable_ipv6 = 1
net.ipv6.conf.default.disable_ipv6 = 1
net.ipv6.conf.lo.disable_ipv6 = 1

# Save the file, and update sysctl in realtime
sysctl -p

# now try to restart zmconfigd
su - zimbra
zmconfigdctl restart

Now you can check the zmconfigd status with the following, to know if it’s running or not:

[root@mailapp ~]# cat /opt/zimbra/log/zmconfigd.pid
19722

If it returns an ID, it means the zmconfigd is running.

Netcat is not installed

Another reason of the error could be because nc is not installed in your system. Zimbra zmconfigd has a dependency on netcat package. Netcat is available through nmap-ncat in centos systems. You may run the following to install netcat:

yum install nc
# or 
yum install nmap-netcat

Grep Non ASCII Character Sets

I had an interesting challenge today about filtering a list using grep with a set like the following:

senegalese footballer|সেনেগালীয় ফুটবলার
species of insect|কীটপতঙ্গের প্রজাতি
indian cricket player|ভারতীয় ক্রিকেটার
Ajit Manohar Pai|অজিত পৈ|অজিত মনোহর পাই|অজিত ভরদ্বাজ পাই
ajit pai|অজিত পাই

You would need to grep to match them based on pipe. My target was to match lines that had multiple pipes, at least 2. I took a bit greedy approach for this to understand and find how to match Bengali characters using Grep. So, I started matching Alphanumeric first with a Pipe and then Bengali Characters with a Pipe, instead of just counting how many pipes I have at least.

If you are aware, conventional regex can detect and match unicode character sets like, if you want to match a ‘Greek’ set, you can do \p{Greek} in regular expressions. But for some reason, this wasn’t matching the Bengali in the following grep:

grep -Ei "\p{Bengali}" test.txt

I then looked at the grep manual and found a key information. Grep by default uses POSIX regex, and -E is just the extended version of POSIX grep. Unfortunately, this regex engine does not support PCRE, which is basically used to grep the unicode sets here. POSIX can only work with the HEX boundaries, which may sometimes get pretty difficult to match range boundaries of non ascii characters. To make it simpler, you can use PERL Regex that is a PCRE supporting engine. To use that, you may do the following:

grep -Pi "\p{Bengali}" test.txt

To get all the unicode that are available with a set in a PCRE supported Regex engine, you may check the following:

Regex Unicode Scripts

Now, let’s come to the original matching, what we have to match at least 2 pipes, the first one being the basic alphanumeric with whitespace being the simpler one:

grep -Pi "^[A-Za-z0-9\s]+\|" test.txt

Then, we need to add the First Bengali part with whitespace and a pipe

grep -Pi "^[A-Za-z0-9\s]+\|[\p{Bengali}\s]+\|" test.txt

This should suffice our purpose here in matching first being alphanumeric with a pipe, and second being the Bengali unicode set with a pipe at least.

How To Run a Command in All OpenVZ Containers

You can run single command in a container using the following:

vzctl exec 201 service httpd status

How to find out all the VZ containers:

vzlist -a

The other way? Yes, there is. VZ list is stored inside a file /proc/vz/veinfo, and we can use it with the help of shell to run command in each VZ as following:

for i in `cat /proc/vz/veinfo | awk '{print $1}'|egrep -v '^0$'`; \
do echo "Container $i"; vzctl exec $i <your command goes here>; done

An example, can be the following:

for i in `cat /proc/vz/veinfo | awk '{print $1}'|egrep -v '^0$'`; \
do echo "Container $i"; vzctl exec $i service httpd status; done

This should show all the httpd status of the VZ.

How To: Manually Add Support of SSL for WWW on Cyberpanel

hmm, it’s a weird topic to write blog on. Because Cyberpanel comes with a built in Certbot, and can automatically detects www and without www to install SSL for. Then why am I writing this up? All because I found a VPS client today facing the issue. Even though, Cyberpanel was telling me that the SSL is issued, it was only issued for non-www domain, but the www domain left behind. Let’s see how can we resolve this.

First problem

First problem came up when I tried to discover the Cyberpanel certbot binaries.

[root@server-sg /]# find . -name "certbot"
./usr/local/CyberCP/bin/certbot
./usr/local/CyberCP/lib/python3.6/site-packages/certbot
./usr/local/CyberPanel/bin/certbot
./usr/local/CyberPanel/lib/python3.6/site-packages/certbot

[root@server-sg live]# /usr/local/CyberCP/bin/certbot --version
certbot 0.21.1
[root@server-sg live]# /usr/local/CyberPanel/bin/certbot --version
certbot 0.21.1

Both of the certbot I could find from Cyberpanel was very old, Certbot has 1.4 version in the Epel which has support for Acme 2 challenge, while the one that Cyberpanel is using doesn’t. I hence decided to install a certbot for our case:

yum install epel-release
yum install certbot

These should be it for the latest version of certbot to start working in your Cyberpanel host. Once done, you may now generate the SSL using the following:

certbot certonly  --webroot -w /home/yourdomain.com/public_html -d yourdomain.com -d www.yourdomain.com

Remember to replace yourdomain.com with the actual one that is having problem with. Cyberpanel creates the home directory with the primary domain, so the remember to give the correct document root for the value of attribute ‘-w’.

Once this id done, certbot should automatically verify the challenge and get the issued license for you. Lets encrypt license are usually stored at the following directory:

/etc/letsencrypt/live/yourdomain.com/

Files are:
/etc/letsencrypt/live/yourdomain.com/privatekey.pem
/etc/letsencrypt/live/yourdomain.com/fullchain.pem

If you had already created the SSL using Cyberpanel (which you must have done if you viewing this post), then remember, certbot will place the SSLs in /etc/letsencrypt/live/yourdomain.com-001/ folder. The name of the folder would be shown at the time you complete issuing SSL with certbot.

There are couple of ways you may use the SSL now. Either you may replace the old directory with the new, or just change the settings in either the vhost conf or the openlitespeed SSL settings. I find the easiest way is just to replace the old directory with the new. Something like this should work:

mv /etc/letsencrypt/live/yourdomain.com /etc/letsencrypt/live/old_yourdomain.com
mv /etc/letsencrypt/live/yourdomain.com-001 /etc/letsencrypt/live/yourdomain.com

Once this is done, remember to restart your openlitespeed:

service lsws restart

Now your https on the WWW should work without any problem. If not, try clearing your browser cache and retry.

How To: Restore Zimbra Quarantined Email by Clam AKA Heuristics.Encrypted.PDF Release Point

Zimbra Mail Server automatically quarantines emails that get hit by the Antivirus scan using Clam when the mail is received. While putting the email on the recipient inbox, what it does, instead of giving the original email with the attachment, it sends a virus detected email with the following kind of error message:

Virus (Heuristics.Encrypted.PDF) in mail to YOU

Virus Alert
Our content checker found
virus: Heuristics.Encrypted.PDF

by Zimbra

It actually means, the original mail is now quarantined. Zimbra maintains a virus quarantine email account that is not normally available in the ‘Manage Account’ list of Zimbra Admin panel. You can find it if you search with ‘virus’ in the ‘Search’ box of the admin panel. What zimbra does in quarantine situation, is that, it pushes the mail to the quarantine email instead of original recipient.

Now, to get back the mail delivered to the original recipient, we need to first get the quarantine email account, get the message id, and then we need to inject the mail into the LMTP pipe that bypasses any scanning. Here are the steps on how to do this:

# First get to the zimbra user
$ su - zimbra

# Get the email account that is used to store virus detected mails
$ zmprov gcf zimbraAmavisQuarantineAccount
zimbraAmavisQuarantineAccount: [email protected]

# [email protected] this should be our quarantine email account, now we need to get the quarantine account's mailbox id
$ zmprov gmi [email protected]
mailboxId: 73
quotaUsed: 644183

# Mailbox id here for the quarantine account is 73. Now go to the message storage of this id using the following command: cd /opt/zimbra/store/0/<mailboxId>/msg/0
$ cd /opt/zimbra/store/0/73/msg/0

# list the messages
$ ls *

These are your quarantined emails. Now for example the complainer is ‘[email protected]’. To search for the emails designated for this email account, you may use the following:

$ grep -l [email protected] *
281-1216.msg
300-1400.msg
301-1476.msg

This should return you all the emails that got quarantined for the above user.

Now the question is, how can we get these emails delivered to the designated user bypassing the antivirus/antispam tools. To do this, you need to inject the mail into LMTP pipe. You may do this using ‘zmlmtpinject’ command as following:

$ zmlmtpinject -r [email protected] -s [email protected] 281-1216.msg

Remember, to change [email protected] to the original recipient. [email protected] would be the newly rewritten sender for this mail delivery and ‘281-1216.msg’ is the file name of the original email that you found out from the grep command. You can do lmtp injections for one email mail with each command. So, you would require to do this for each emails.

How to: Use WINMTR to Diagnose Network Issues

MTR is a great tool to understand if there is a routing issue. There are many times, customer says the website/web server is slow or not being able to access the network etc. After some basic checks, if no solution is concluded, it is important to get a MTR report from the client. As most of the users use Windows, it is common to use WinMTR.

To run WINMTR, you need to first download it from here:

https://sourceforge.net/projects/winmtr/

or here

https://winmtr.en.uptodown.com/windows

Once the app is downloaded, double clicking it will open it. WinMTR is a portable executable binary. It doesn’t require installation.

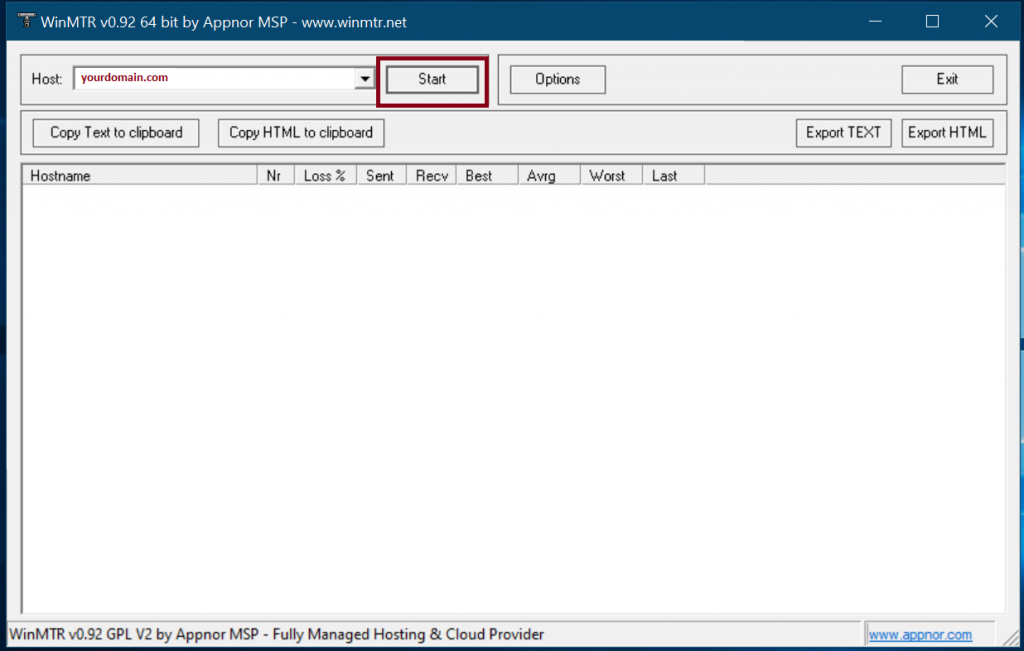
Once opened, you can enter the ‘domain name’ that is having trouble in the ‘Host’ section and press start.

Start winMTR by entering your domain in the Host section

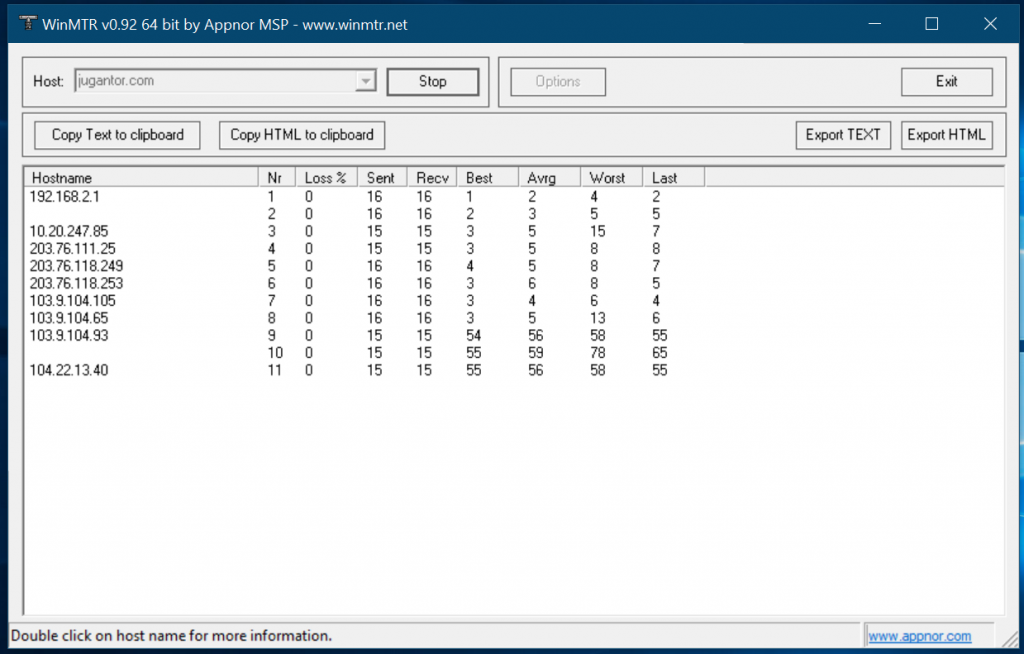
Once you start, it will start reaching the domain you entered and hit each of the node it passes for routing, with giving the amount of drops each node is hitting

WintMTR running – (I have hidden two hops for privacy)

If you are seeing drops of anything above 2-5%, that node is problematic. If the node is dropping a lot, but the next node isn’t dropping enough, then the node is set to transparently hiding the packet responses for security, then that node is not problematic. So if your packet isn’t reaching the destination and it is dropping somehwere or looping in a node, that means, the problem is within that node. Now you can locate the node and see where does it belong. If it belongs to within your territory, then the issue is within your ISP or IIG. But if it is outside your territory but at the end of the tail, then the issue is with the Host.

In most case, we ask for running the MTR for 5 minutes and then export to TEXT and send it over for us to analyse to customers. You can export the report by stopping the MTR and clicking ‘Export TEXT’ available in the winMTR window.

How To: Add Let’s Encrypt SSL in HAProxy – TLS Termination

HAProxy stays in the middle of origin server and the visitors. Hence, You need a SSL for the Visitors to HAProxy. You can use HAProxy is a secure private network to fetch data from backend without any SSL. But the requests between the visitor and HAProxy has to be encrypted. You can use Let’s Encrypt free signed SSL for this purpose.

First, we need to install ‘certbot’, python based client for Let’s Encrypt SSL. It is available in epel repository. In CentOS, you may do the following to install certbot

$ yum install epel-release
$ yum install certbot

Let’s Encrypt uses a Challenge Response technique to verify the host and issue the SSL. While HAProxy is enabled, and used to set to the origin service, this unfortunately, is not possible. certbot comes with an option called ‘standalone’, where it can work as a http server and resolve the Challenge Response issued by Let’s Encrypt. To do this, first we need to stop the haproxy server. You can do this with the following:

# stop haproxy
service haproxy stop

# get the ssl for your domain.com and www.domain.com
certbot certonly --standalone --preferred-challenges http --http-01-port 80 -d www.domain.com -d domain.com

Once this is done, 4 files are saved under /etc/letsencrypt/live/domain.com/

These should be:

cert.pem (Your certificate)
chain.pem
privatekey.pem (Your private key)
fullchain.pem (cert.pem and chain.pem combined)

Now, for haproxy, we need to combine 3 files, cert.pem, chain.pem and privatekey.pem, we can do that by combining fullchain.pem & privatekey.pem. You need to create a directory under /etc/haproxy/certs and then put the file in there. You can do that as following:

# create the directory
mkdir /etc/haproxy/certs

# Combine two files into one in one line
DOMAIN='domain.com' sudo -E bash -c 'cat /etc/letsencrypt/live/$DOMAIN/fullchain.pem /etc/letsencrypt/live/$DOMAIN/privkey.pem > /etc/haproxy/certs/$DOMAIN.pem'

# replace domain.com with each of your domain.

Now, we have the pem file ready to be used on haproxy frontend. To use, you may first edit the haproxy.cfg file, create a new section for frontend https, and use the certificate. An example is given below

frontend main_https
    bind *:443 ssl crt /etc/haproxy/certs/domain.com.pem
    reqadd X-Forwarded-Proto:\ https
    option http-server-close
    option forwardfor
    default_backend app-main

Once the https section is done, you may now want to force the http section to forward to https, you can do as following:

frontend main
    bind *:80
    redirect scheme https code 301 if !{ ssl_fc }
    option http-server-close
    option forwardfor

You should be all set now using Let’s Encrypt with your Haproxy in the frontend.

How to Renew Litespeed Trial Without Going to WHM

Litespeed requires you to download the Trial key to try out their trial or use the WHM to do that. If you want to skip the process and fan of console, here is the easiest way to do this step by step:

$ cd /usr/local/lsws/conf
$ service lsws stop
$ mv trial.key trial.key_backup
$ wget --no-check-certificate https://license2.litespeedtech.com/reseller/trial.key
$ chown root:nobody trial.key
$ service lsws start
$ /usr/local/lsws/bin/lshttpd -t
[OK] Your trial license key will expire in 14 days!

Remember, this can only be done twice, the first month only. So you would definitely like to purchase the license and register it with the purchased key after your trial ends. Kudos!

How To: Send Email Alert on Different HAProxy Status or Based on HAProxy Stats

HAProxy is a great simple load balancing tool written in Lua. It is extremely efficient as a software load balancer and highly configurable as well. On the contrary, HAProxy lacks programmable automated monitoring tools. It has a directive called ‘mailer’ which has only support above 1.8. Default CentOS 7 repo comes with HAProxy 1.5 and it has no mailer alert support either. Even with 1.8, it doesn’t come with lots of available configuration options neither the tool gets programmable facility.

That is where, I thought to work on to trigger codes from HAProxy stats. This can be done in many ways, in my cases, I did it using per minute crons. If you want it much quicker like every 5 seconds for example, you would have to run this as a daemon, which isn’t like making a rocket, should be easy and short. My entire idea is to allow you understanding how to create programmable 3rd party tools by fetching data from HAProxy socket and trigger monitors.

HAProxy Stats through Unix Socket

First, we need to enable the HAProxy stats that is available through socket. To turn on stats through unix socket, you need put the following line in your global section of haproxy.cfg file:

stats socket /var/lib/haproxy/stats

An example of Global settings section would be like the following:

global
    log         127.0.0.1 local2     #Log configuration

    chroot      /var/lib/haproxy
    pidfile     /var/run/haproxy.pid
    maxconn     40000
    user        haproxy             #Haproxy running under user and group "haproxy"
    group       haproxy
    daemon

    # turn on stats unix socket
    stats socket /var/lib/haproxy/stats

Check how the stats socket section is placed to fit it for your cfg file.

Once this is done, now you can restart the haproxy to start shooting stats through the socket. The output is basically a csv of the HAProxy stats page. So the values going to be in comma seperated format. To understand HAProxy stats page and exploding the values, you can visit the following:

https://www.haproxy.com/blog/exploring-the-haproxy-stats-page/

Now, how to read the unix-socket using bash? There is a tool called ‘socat’ that can be used to read data from unix socket. ‘socat’ means ‘socket cat’, you may read more details about ‘socat’ here:

https://linux.die.net/man/1/socat

If socat is not available on your CentOS yum, you may get it from epel-release.

yum install epel-release
yum install socat

Once ‘socat’ is available in your system, you can use it to redirect the io and show the output as following:

echo "show stat" | socat unix-connect:/var/lib/haproxy/stats stdio

Now as you can see, you can retrieve the whole HAProxy stats in CSV format, you may easily manipulate and operate data using a shell script. I have created a basic shell script to get the status of the HAProxy backends and send an email alert using ‘ssmtp’. Remember, ssmtp is highly configurable mail tool, you can customize smtp authentication as well with ‘ssmtp’. You may use any other tool like Sendmail for example or ‘Curl’ to any email API like Sendgrid, possibility is infinite here. Remember, as the data is instantly available to socket as soon as the HAProxy generates the event, hence, it can be as efficient as HAProxy built in functions like ‘mailer’ is.

#!/bin/bash

cd /root/
rm -f haproxy_stat.txt
echo "show stat" | socat unix-connect:/var/lib/haproxy/stats stdio|grep app-main > /root/test.txt

SEND_EMAIL=0

while IFS= read -r line
do

APP=`echo $line | cut -d"," -f2`
STAT=`echo $line | cut -d"," -f18`
SESSION=`echo $line | cut -d"," -f34`
if [ "$STAT" != "UP" ]; then
SEND_EMAIL=1
MESSAGE+="$APP $STAT $SESSION
"
fi

done < /root/test.txt

if [ $SEND_EMAIL -eq 1 ]; then
echo -e "Subject: Haproxy Instance Down \n\n$MESSAGE" | sudo ssmtp -vvv [email protected]

fi

Data that I am interested in are the status of the backend, name of the backend and the session rate of the backend. So, if the load balancer sees any backend is down, this would trigger the email delivery. You can use this to catch anything in the HAProxy, like a Frontend attack for example, like the delivery optimization of your load balancer etc. As you are now able to retrieve data directly from HAProxy to your own ‘programming’ console, you can program it whatever the way you want to. Hope this helps somebody! For any help, shoot a comment!

How To: Force HTTPS in HAProxy

In Haproxy for frontend, we have to listen to both 80 and 443 port for HTTP and HTTPS. But what if we want to force redirect all requests to https? HAProxy doesn’t support things like htaccess/mod_rewrite. So we have to do it using HAProxy directives and attributes.

HAProxy has a directive called ‘ssl_fc’. This one returns true if the HAProxy frontend is on https. We can use this to force redirect reqeusts to HTTPS as following:

#redirect to HTTPS if ssl_fc is false / off.
redirect scheme https code 301 if !{ ssl_fc }

You can add this code to the section where you have defined the frontend for 80.

Now, you can also redirect reqeusts to https based on the requested domain as following:

redirect scheme https code 301 if { hdr(Host) -i www.yourdomain.com } !{ ssl_fc }

Replace your domain with your expected domain name.