How to Fix: Facebook\WebDriver\Exception\UnknownErrorException: unknown error: cannot find Chrome binary – Laravel Dusk

When run the following command in your Laravel Automation Tool Dusk:

php artisan dusk

You get something like the following error:

[elastic-keldysh@pl1 blog]$ php artisan dusk
PHPUnit 9.3.11 by Sebastian Bergmann and contributors.

E                                                                   1 / 1 (100%)

Time: 00:00.339, Memory: 18.00 MB

There was 1 error:

1) Tests\Browser\ExampleTest::testBasicExample
Facebook\WebDriver\Exception\UnknownErrorException: unknown error: cannot find Chrome binary

/var/www/vhosts/elastic-keldysh.139-99-24-82.plesk.page/blog/vendor/php-webdriver/webdriver/lib/Exception/WebDriverException.php:139
/var/www/vhosts/elastic-keldysh.139-99-24-82.plesk.page/blog/vendor/php-webdriver/webdriver/lib/Remote/HttpCommandExecutor.php:370
/var/www/vhosts/elastic-keldysh.139-99-24-82.plesk.page/blog/vendor/php-webdriver/webdriver/lib/Remote/RemoteWebDriver.php:136
/var/www/vhosts/elastic-keldysh.139-99-24-82.plesk.page/blog/tests/DuskTestCase.php:40
/var/www/vhosts/elastic-keldysh.139-99-24-82.plesk.page/blog/vendor/laravel/dusk/src/Concerns/ProvidesBrowser.php:200
/var/www/vhosts/elastic-keldysh.139-99-24-82.plesk.page/blog/vendor/laravel/framework/src/Illuminate/Support/helpers.php:234
/var/www/vhosts/elastic-keldysh.139-99-24-82.plesk.page/blog/vendor/laravel/dusk/src/Concerns/ProvidesBrowser.php:201
/var/www/vhosts/elastic-keldysh.139-99-24-82.plesk.page/blog/vendor/laravel/dusk/src/Concerns/ProvidesBrowser.php:95
/var/www/vhosts/elastic-keldysh.139-99-24-82.plesk.page/blog/vendor/laravel/dusk/src/Concerns/ProvidesBrowser.php:65
/var/www/vhosts/elastic-keldysh.139-99-24-82.plesk.page/blog/tests/Browser/ExampleTest.php:21

ERRORS!
Tests: 1, Assertions: 0, Errors: 1.

The error actually appears because you do not have Chrome browser installed on your system. Now, exit from your user shell, and drop back to the root shell. From the root shell, if you are using CentOS 7, you may run the following:

First Download the Latest Chrome RPM:

wget https://dl.google.com/linux/direct/google-chrome-stable_current_x86_64.rpm

Run it with YUM:

yum install ./google-chrome-stable_current_*.rpm

If you are on CentOS 8, you may use dnf installer as following:

dnf localinstall google-chrome-stable_current_x86_64.rpm

Once the installation is done, you may now go back to the user shell and run laravel dusk:

[root@pl1 lib64]# su - elastic-keldysh
Last login: Thu Oct  1 15:39:18 IST 2020 on pts/0
[elastic-keldysh@pl1 ~]$ php artisan dusk
Could not open input file: artisan
[elastic-keldysh@pl1 ~]$ cd blog
[elastic-keldysh@pl1 blog]$ php artisan dusk
PHPUnit 9.3.11 by Sebastian Bergmann and contributors.

R                                                                   1 / 1 (100%)

Time: 00:02.367, Memory: 18.00 MB

There was 1 risky test:

1) Tests\Browser\ExampleTest::testBasicExample
This test did not perform any assertions

/var/www/vhosts/elastic-keldysh.139-99-24-82.plesk.page/blog/tests/Browser/ExampleTest.php:16

OK, but incomplete, skipped, or risky tests!
Tests: 1, Assertions: 0, Risky: 1.

It shall work now. Hope this helps.
How to Install Laravel in Plesk using SSH

In plesk, to install laravel, we need to do two prerequisites first.

  1. Enable SSH for the Plesk User:

2. Add default PHP binary to Plesk Shell to allow using Composer:

Once the above steps are done, now, you may install the laravel installer with the following:

[elastic-keldysh@pl1 ~]$ composer global require laravel/installer
Changed current directory to /var/www/vhosts/elastic-keldysh.139-99-24-82.plesk.page/.composer
Using version ^4.0 for laravel/installer
./composer.json has been created
Loading composer repositories with package information
Updating dependencies (including require-dev)
Package operations: 12 installs, 0 updates, 0 removals
  - Installing symfony/polyfill-php80 (v1.18.1): Downloading (100%)
  - Installing symfony/process (v5.1.6): Downloading (100%)
  - Installing symfony/polyfill-mbstring (v1.18.1): Downloading (100%)
  - Installing symfony/polyfill-intl-normalizer (v1.18.1): Downloading (100%)
  - Installing symfony/polyfill-intl-grapheme (v1.18.1): Downloading (100%)
  - Installing symfony/polyfill-ctype (v1.18.1): Downloading (100%)
  - Installing symfony/string (v5.1.6): Downloading (100%)
  - Installing psr/container (1.0.0): Downloading (100%)
  - Installing symfony/service-contracts (v2.2.0): Downloading (100%)
  - Installing symfony/polyfill-php73 (v1.18.1): Downloading (100%)
  - Installing symfony/console (v5.1.6): Downloading (100%)
  - Installing laravel/installer (v4.0.5): Downloading (100%)
symfony/service-contracts suggests installing symfony/service-implementation
symfony/console suggests installing symfony/event-dispatcher
symfony/console suggests installing symfony/lock
symfony/console suggests installing psr/log (For using the console logger)
Writing lock file
Generating autoload files
10 packages you are using are looking for funding.
Use the `composer fund` command to find out more!
[elastic-keldysh@pl1 ~]$

Once this is done, you may try to install laravel using the laravel command:

[elastic-keldysh@pl1 ~]$ laravel new blog
-bash: laravel: command not found

But, as you can see it is failed. It’s because the laravel binary is installed in the following path:

/var/www/vhosts/elastic-keldysh.139-99-24-82.plesk.page/.composer/vendor/bin

which doesn’t exist in our $PATH variable. Now you may add the above command to your PATH variable using the following tutorial:

I believe, you have already figured it out, it is as simple as the following command:

PATH=$PATH:/var/www/vhosts/elastic-keldysh.139-99-24-82.plesk.page/.composer/vendor/bin

Now, you may run the following to install laravel:

[elastic-keldysh@pl1 ~]$ laravel new blog

 _                               _
| |                             | |
| |     __ _ _ __ __ ___   _____| |
| |    / _` | '__/ _` \ \ / / _ \ |
| |___| (_| | | | (_| |\ V /  __/ |
|______\__,_|_|  \__,_| \_/ \___|_|

Creating a "laravel/laravel" project at "./blog"
Installing laravel/laravel (v8.0.3)
  - Installing laravel/laravel (v8.0.3): Downloading (100%)

So, yeah, as laravel says, Application ready! Build something amazing.

How to Update PATH Variable in Linux

A PATH variable is a system variable that stores the information about the binary files location that you may run for commands. When you log in as an user, or use a custom control panel like Plesk/Cyberpanel/Cpanel, you might want to add some custom paths as a user to take binary commands. One of the example, could be to change the default php path, or a laravel command location from vendor folder. To do this, you need to extend/update the PATH variable for a specific user.

PATH variable extends with the “:”. If you type the following, in your shell, you may see the existing paths in the PATH variable:

[elastic-keldysh@pl1 ~]$ echo $PATH
/usr/share/Modules/bin:/usr/local/bin:/usr/bin:/usr/local/sbin:/usr/sbin

Now, if I want to extend this to take the php binary available in /opt/plesk/php/7.2/bin/php, then we can extend the PATH variable using the following:

PATH=$PATH:/opt/plesk/php/7.2/bin/

Now, if you check, the PATH variable again, you can see it is added:

[elastic-keldysh@pl1 ~]$ echo $PATH
/usr/share/Modules/bin:/usr/local/bin:/usr/bin:/usr/local/sbin:/usr/sbin:/opt/plesk/php/7.2/bin/
[elastic-keldysh@pl1 ~]$

We have successfully modified the PATH variable, but only for the existing session. If you want to persist the changes, then, you need to add the command in .bashrc/.profile/.bash_profile file depending on your shell type and OS. You can add to either of the file and test with the following command:

[elastic-keldysh@pl1 ~]$ echo "PATH=$PATH:/opt/plesk/php/7.2/bin/" >> .profile

Replace .profile with .bashrc or .bash_profile depending on the file that works for you. You may logout and relogin, and then run the echo command again to see if the $PATH is persisting or not.

How to Add PHP in Default Path for Plesk / How to Fix -bash: php: command not found for Plesk User

If you have added SSH access to your plesk user using the following tutorial:

and then, tried to run php command like the following:

[elastic-keldysh@pl1 ~]$ php -v
-bash: php: command not found

You might have encountered the above error. This is because plesk do not store the php binary in your PATH variable locations. You may check your existing path variables here:

[elastic-keldysh@pl1 ~]$ echo $PATH
/usr/share/Modules/bin:/usr/local/bin:/usr/bin:/usr/local/sbin:/usr/sbin

Plesk stores it’s php binaries for different versions here:

/opt/plesk/php/

So, for example if you are trying to use PHP 7.4 binary, this would be like the following:

[elastic-keldysh@pl1 php]$ /opt/plesk/php/7.4/bin/php -v
PHP 7.4.10 (cli) (built: Sep  4 2020 03:49:35) ( NTS )
Copyright (c) The PHP Group
Zend Engine v3.4.0, Copyright (c) Zend Technologies
    with the ionCube PHP Loader + ionCube24 v10.4.2, Copyright (c) 2002-2020, by ionCube Ltd.
    with Zend OPcache v7.4.10, Copyright (c), by Zend Technologies

So, to use only php -v, you need to add this bin path to your path variable. You may do that by running the following command:

PATH=$PATH:/opt/plesk/php/7.4/bin/

Now, you may run the following and it will work:

[elastic-keldysh@pl1 php]$ php -v
PHP 7.4.10 (cli) (built: Sep  4 2020 03:49:35) ( NTS )
Copyright (c) The PHP Group
Zend Engine v3.4.0, Copyright (c) Zend Technologies
    with the ionCube PHP Loader + ionCube24 v10.4.2, Copyright (c) 2002-2020, by ionCube Ltd.
    with Zend OPcache v7.4.10, Copyright (c), by Zend Technologies

Now, we need to remember, this will only sustain for the existing session, if we log out and re login, this would be lost. To keep this permanent on each login, we need to put this in the .profile file. You may do this by running the following:

echo "PATH=$PATH:/opt/plesk/php/7.4/bin/" >> .profile

Once done, now you may try to login back again and see php -v is still working:

[elastic-keldysh@pl1 ~]$ exit
logout
[root@pl1 ~]# su - elastic-keldysh
Last login: Thu Oct  1 13:42:13 IST 2020 on pts/0
[elastic-keldysh@pl1 ~]$ php -v
PHP 7.4.10 (cli) (built: Sep  4 2020 03:49:35) ( NTS )
Copyright (c) The PHP Group
Zend Engine v3.4.0, Copyright (c) Zend Technologies
    with the ionCube PHP Loader + ionCube24 v10.4.2, Copyright (c) 2002-2020, by ionCube Ltd.
    with Zend OPcache v7.4.10, Copyright (c), by Zend Technologies
[elastic-keldysh@pl1 ~]$

How To Send Email From an IP without Authentication – Cpanel/WHM

Since antirelayed is removed by the cpanel team from the latest cpanel, the situation might arise to some people, at least to me. I had a server sending mails without authentication, a trusted IP. Now, how to do this with the latest Cpanel/WHM?

Well, Cpanel still keeps the facility called ‘alwaysrelay’. This one was there when antirelayed was there. Antirelayed used to allow relay for an IP without authentication for a specific period of time, while ‘alwaysrelay’ will allow relaying all the time.

All you need to do, is to add the IP in the following file in a new line:

/etc/alwaysrelay

and restart the Exim:

service exim restart

That should be it. Remember, you might encounter the exim report cpaneleximscanner found your email to be spam. In such cases, go to WHM >> Service Configuration >> Exim Configuration Manager >> Set the following option to ‘Off’ : Scan outgoing messages for spam and reject based on the Apache SpamAssassin™ internal spam_score setting

and Save. Now you may check, it should work.

How to Add Openlitespeed Server to Haproxy – Avoid 503 Haproxy Error

For past one month, Openlitespeed has been my favorite piece of web server. Litespeed has always outperformed all the other webservers including Nginx as well in any of my production environment. But I have recently switched to using OLS which is a Opensource version of Litespeed with some limited features. I get LS kind of performance along with no worry for paying. How better could it be?

OLS comes with some weird problem. As OLS is less used, finding a solution for such cases could be difficult. I faced a very similar kind of issue yesterday.

I added a OLS based server to my HAProxy cluster, but the HAProxy can not find the OLS server working. When I try to access the web app hosted under OLS server using local IP masking, I see the website without a problem. That means, OLS is interpreting the Domain with IP relation well. But failing to respond when Haproxy is requesting through IP address.

The problem is, OLS is not configured to respond to ‘default’ requests on ‘127.0.0.1’, ‘localhost’ or the server’s main IP. To find out this, I enabled ‘High’ Debug mode of OLS. To do this, first visit the OLS Webadmin Console, it can be accessed with https://IP:7080

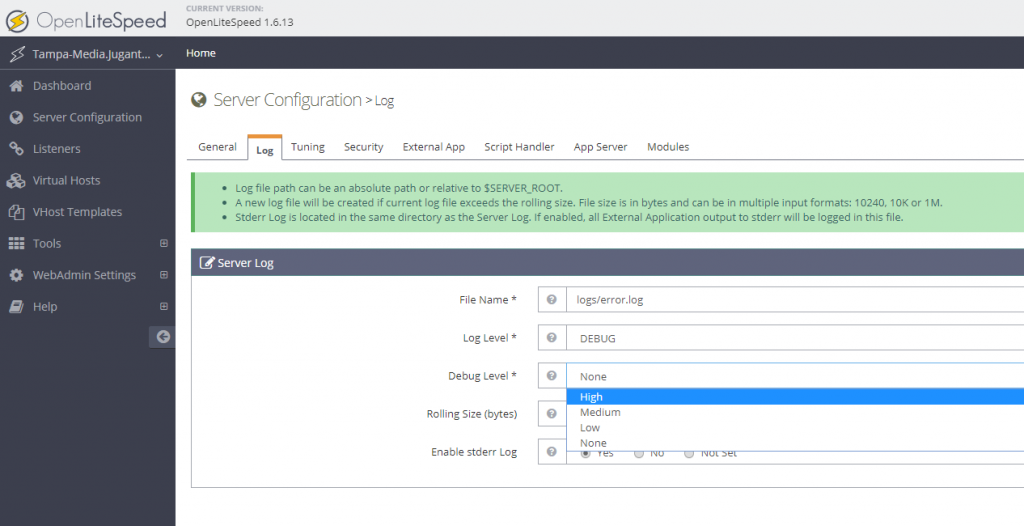
After login, go to Server Configuration >> Log >> Edit Server Log >> Set ‘Debug Level’ to High and Save

Set high debug level in openlitespeed

Once saving is done, you may gracefully restart the OLS

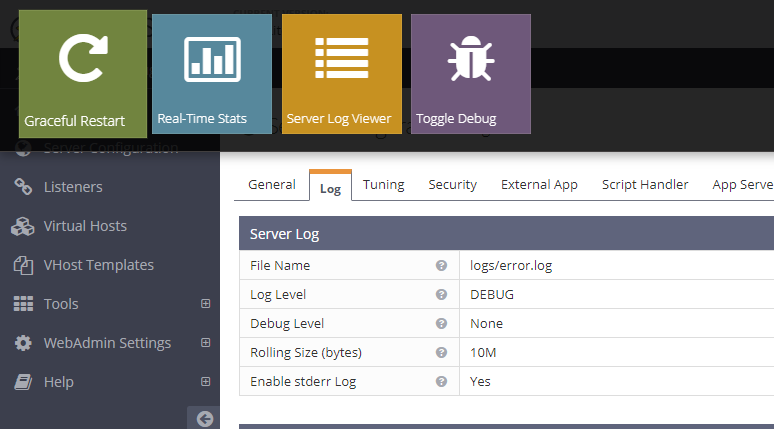
Gracefully restart Openlitespeed

Once this is done, you may now monitor the error.log file located usually under /usr/local/lsws/logs. Now tail the output of error.log while processing requests with Haproxy:

tail -f /usr/local/lsws/logs/error.log

You can see, OLS has returned 404 error for the localhost/ request. That means, Haproxy is requesting the IP with a header ‘localhost/’, and the server should return something with code 200 to make sure the server is in business.

What we need to do, is to make OLS respond to request for basic IP and localhost to 200 with the main site instead of ‘404’ error. To do this, we need to go to Webconsole of OLS again >> Listeners

You will see you have two Listeners, one for Default/Non HTTP and the HTTPS/SSL. In my case, I was using only HAProxy to Origin with no SSL, means 80. I selected the Default.

Open 80 Listener View in Openlitespeed

In the Listener List, you can find your Virtualhost, click on the ‘Edit’ of your Virtualhost

Virtualhost Edit Openlitespeed

Now, you can map the virtualhost. You will see your primary domain as the ‘Virtual Host’, which can’t be changed here. But what you can do is to map this virtualhost to several domains. The trick is to add your server’s IP and the localhost in the ‘domains’ list with comma seperation as following:

localhost mapping to OLS

Once this is saved, restart your OLS and now your HAProxy should be able to read requests and starting forwarding requests to your OLS server.

How to Use Sticky Session for CSRF submission on Highly Scalable Cloud App in Haproxy

HINT: If you are a nginx fan and used it in mass scale, then, you must have done this using ip_hash (Nginx Documentation). It follows the same purpose for Haproxy. Difference and benefits of using Haproxy over Nginx for L7 proxy in a highly scalable and reliable cloud app would be a discussion for another day.

Case Discussion:

Suppose, you have a Cloud app, that is load balanced & scaled between multiple servers using Haproxy, for example:

101.101.101.101
202.202.202.202
303.303.303.303

Now, if your app has a submission form, for example, a poll submission from your users, then, there is an issue in this Haproxy setup.

Let’s say, an User A, requests for the app, and gets the data from the server 101.101.101.101, the CSRF token he gets for the poll submission to his browser, also maintains the app hosted on 101.101.101.101. But when he press the submit button, HAProxy puts him on 202.202.202.202 app, and the app hosted on 202.202.202.202 instantly rejects the token for the session as the session is not registered for that app. For such cases, we need to maintain a ‘Sticky’ session based on the cookie set by the right server. That means, if the cookie is set by 101.101.101.101, HAproxy should obey and give the user 101.101.101.101 until the cookie or the session is reset or regenerated.

How To Do That:

What we need to do, let haproxy write the server id in the cookie, and make the directive ‘server’ to follow the cookie. Please remember, there are couple of other way to achieve this. There is another way of doing this is called ‘IP Affinity’, where you make sticky session based on IP of the user. There is another based on PHP session value. Setting sticky session based on php session should also work. I preferred the cookie based sticky session, just on random selection.

So, to write the server id in the cookie, you need to add the following in the haproxy ‘backend’ directive as following:

backend app-main
balance roundrobin
cookie SERVERID insert indirect nocache

In the cookie directive, you can see, we are taking the HAProxy variable ‘SERVERID’ and inserting that to the cookie attribute. Now, all you need to do, is to configure your balancing IPs to follow the cookie, like the following:

backend app-main
balance roundrobin
cookie SERVERID insert indirect nocache
server nginx1 101.101.101.101 cookie S1
server nginx2 202.202.202.202 cookie S2
server nginx3 303.303.303.303 cookie S3

S1, S2, S3 are just 3 different names of the cookies for the specific servers. After the above is done, you can now restart and see Haproxy is following stickiness based on the session you have.

Just to find out, how to test if you are using laravel, try to regenerate the session based on the session() helper method as following:

session()->regenerate()->csrf_token();

You should be able to see the content loading from different web servers when the session regenerates. But it will persists when the regenerate session method is not called.

Troubleshoot: -bash: fuser: command not found

If you are trying to use a command, fuser, that is used to identify process using lock file or socket file, and having the following error:

-bash: fuser: command not found

that means, your system doesn’t have the psmisc package installed. Usually, killall, fuser type of commands are under this package. CentOS 7 sometimes, do not install the package by default. To install it, run the following:

yum install psmisc -y

Once done, you should be able to use fuser command.

How To: Use SSH Password in a Script

You can obviously use RSA public/private keypair to access servers without password, although, sometimes, it may be desirable to use ssh password on a command line and run a remote command on another server. This can be done using a tool called ‘sshpass’. You can create a simple bash script using sshpass, that can help you monitor and control multiple servers from a single location.

How to use ssh password in script

First install sshpass:

# yum install sshpass -y

Once done, you can use sshpass command as following:

# sshpass -p "SSH_Password" ssh -o StrictHostKeyChecking=no SSH_Username@remote-ssh-server "yourcommand"

Just replace, the password, username, remote-ssh-server and your command with your desired setup, and viola!

Note: If yum says, the following:

No package sshpass* available.

then you would need to install epel repository to install sshpass. To install epel, run the following:

# yum install epel* -y

How To: Restrict a Folder to Your IP Only

Sometimes, for development purposes, you may want to restrict access to the folder, only to your IP, and deny others from accessing that folder. One way to do that is to use htaccess rules. A common rule, could be denying all the users and allowing your IP. To find out, your IP, you may visit the following:

http://ifconfig.co

Note the IP it has reported. Open the folder that you want to protect. Find the .htaccess file under the folder (If no file available, create one) and add the following:

order deny,allow
deny from all
allow from <your IP goes here>

Replace the <your IP goes here> from the snippets with the IP you have noted from ifconfig.co. Now, your folder should be accessible only from your IP.