How To: Add Let’s Encrypt SSL in HAProxy – TLS Termination

HAProxy stays in the middle of origin server and the visitors. Hence, You need a SSL for the Visitors to HAProxy. You can use HAProxy is a secure private network to fetch data from backend without any SSL. But the requests between the visitor and HAProxy has to be encrypted. You can use Let’s Encrypt free signed SSL for this purpose.

First, we need to install ‘certbot’, python based client for Let’s Encrypt SSL. It is available in epel repository. In CentOS, you may do the following to install certbot

$ yum install epel-release
$ yum install certbot

Let’s Encrypt uses a Challenge Response technique to verify the host and issue the SSL. While HAProxy is enabled, and used to set to the origin service, this unfortunately, is not possible. certbot comes with an option called ‘standalone’, where it can work as a http server and resolve the Challenge Response issued by Let’s Encrypt. To do this, first we need to stop the haproxy server. You can do this with the following:

# stop haproxy
service haproxy stop

# get the ssl for your domain.com and www.domain.com
certbot certonly --standalone --preferred-challenges http --http-01-port 80 -d www.domain.com -d domain.com

Once this is done, 4 files are saved under /etc/letsencrypt/live/domain.com/

These should be:

cert.pem (Your certificate)
chain.pem
privatekey.pem (Your private key)
fullchain.pem (cert.pem and chain.pem combined)

Now, for haproxy, we need to combine 3 files, cert.pem, chain.pem and privatekey.pem, we can do that by combining fullchain.pem & privatekey.pem. You need to create a directory under /etc/haproxy/certs and then put the file in there. You can do that as following:

# create the directory
mkdir /etc/haproxy/certs

# Combine two files into one in one line
DOMAIN='domain.com' sudo -E bash -c 'cat /etc/letsencrypt/live/$DOMAIN/fullchain.pem /etc/letsencrypt/live/$DOMAIN/privkey.pem > /etc/haproxy/certs/$DOMAIN.pem'

# replace domain.com with each of your domain.

Now, we have the pem file ready to be used on haproxy frontend. To use, you may first edit the haproxy.cfg file, create a new section for frontend https, and use the certificate. An example is given below

frontend main_https
    bind *:443 ssl crt /etc/haproxy/certs/domain.com.pem
    reqadd X-Forwarded-Proto:\ https
    option http-server-close
    option forwardfor
    default_backend app-main

Once the https section is done, you may now want to force the http section to forward to https, you can do as following:

frontend main
    bind *:80
    redirect scheme https code 301 if !{ ssl_fc }
    option http-server-close
    option forwardfor

You should be all set now using Let’s Encrypt with your Haproxy in the frontend.

How To: Send Email Alert on Different HAProxy Status or Based on HAProxy Stats

HAProxy is a great simple load balancing tool written in Lua. It is extremely efficient as a software load balancer and highly configurable as well. On the contrary, HAProxy lacks programmable automated monitoring tools. It has a directive called ‘mailer’ which has only support above 1.8. Default CentOS 7 repo comes with HAProxy 1.5 and it has no mailer alert support either. Even with 1.8, it doesn’t come with lots of available configuration options neither the tool gets programmable facility.

That is where, I thought to work on to trigger codes from HAProxy stats. This can be done in many ways, in my cases, I did it using per minute crons. If you want it much quicker like every 5 seconds for example, you would have to run this as a daemon, which isn’t like making a rocket, should be easy and short. My entire idea is to allow you understanding how to create programmable 3rd party tools by fetching data from HAProxy socket and trigger monitors.

HAProxy Stats through Unix Socket

First, we need to enable the HAProxy stats that is available through socket. To turn on stats through unix socket, you need put the following line in your global section of haproxy.cfg file:

stats socket /var/lib/haproxy/stats

An example of Global settings section would be like the following:

global
    log         127.0.0.1 local2     #Log configuration

    chroot      /var/lib/haproxy
    pidfile     /var/run/haproxy.pid
    maxconn     40000
    user        haproxy             #Haproxy running under user and group "haproxy"
    group       haproxy
    daemon

    # turn on stats unix socket
    stats socket /var/lib/haproxy/stats

Check how the stats socket section is placed to fit it for your cfg file.

Once this is done, now you can restart the haproxy to start shooting stats through the socket. The output is basically a csv of the HAProxy stats page. So the values going to be in comma seperated format. To understand HAProxy stats page and exploding the values, you can visit the following:

https://www.haproxy.com/blog/exploring-the-haproxy-stats-page/

Now, how to read the unix-socket using bash? There is a tool called ‘socat’ that can be used to read data from unix socket. ‘socat’ means ‘socket cat’, you may read more details about ‘socat’ here:

https://linux.die.net/man/1/socat

If socat is not available on your CentOS yum, you may get it from epel-release.

yum install epel-release
yum install socat

Once ‘socat’ is available in your system, you can use it to redirect the io and show the output as following:

echo "show stat" | socat unix-connect:/var/lib/haproxy/stats stdio

Now as you can see, you can retrieve the whole HAProxy stats in CSV format, you may easily manipulate and operate data using a shell script. I have created a basic shell script to get the status of the HAProxy backends and send an email alert using ‘ssmtp’. Remember, ssmtp is highly configurable mail tool, you can customize smtp authentication as well with ‘ssmtp’. You may use any other tool like Sendmail for example or ‘Curl’ to any email API like Sendgrid, possibility is infinite here. Remember, as the data is instantly available to socket as soon as the HAProxy generates the event, hence, it can be as efficient as HAProxy built in functions like ‘mailer’ is.

#!/bin/bash

cd /root/
rm -f haproxy_stat.txt
echo "show stat" | socat unix-connect:/var/lib/haproxy/stats stdio|grep app-main > /root/test.txt

SEND_EMAIL=0

while IFS= read -r line
do

APP=`echo $line | cut -d"," -f2`
STAT=`echo $line | cut -d"," -f18`
SESSION=`echo $line | cut -d"," -f34`
if [ "$STAT" != "UP" ]; then
SEND_EMAIL=1
MESSAGE+="$APP $STAT $SESSION
"
fi

done < /root/test.txt

if [ $SEND_EMAIL -eq 1 ]; then
echo -e "Subject: Haproxy Instance Down \n\n$MESSAGE" | sudo ssmtp -vvv [email protected]

fi

Data that I am interested in are the status of the backend, name of the backend and the session rate of the backend. So, if the load balancer sees any backend is down, this would trigger the email delivery. You can use this to catch anything in the HAProxy, like a Frontend attack for example, like the delivery optimization of your load balancer etc. As you are now able to retrieve data directly from HAProxy to your own ‘programming’ console, you can program it whatever the way you want to. Hope this helps somebody! For any help, shoot a comment!
How to Add Openlitespeed Server to Haproxy – Avoid 503 Haproxy Error

For past one month, Openlitespeed has been my favorite piece of web server. Litespeed has always outperformed all the other webservers including Nginx as well in any of my production environment. But I have recently switched to using OLS which is a Opensource version of Litespeed with some limited features. I get LS kind of performance along with no worry for paying. How better could it be?

OLS comes with some weird problem. As OLS is less used, finding a solution for such cases could be difficult. I faced a very similar kind of issue yesterday.

I added a OLS based server to my HAProxy cluster, but the HAProxy can not find the OLS server working. When I try to access the web app hosted under OLS server using local IP masking, I see the website without a problem. That means, OLS is interpreting the Domain with IP relation well. But failing to respond when Haproxy is requesting through IP address.

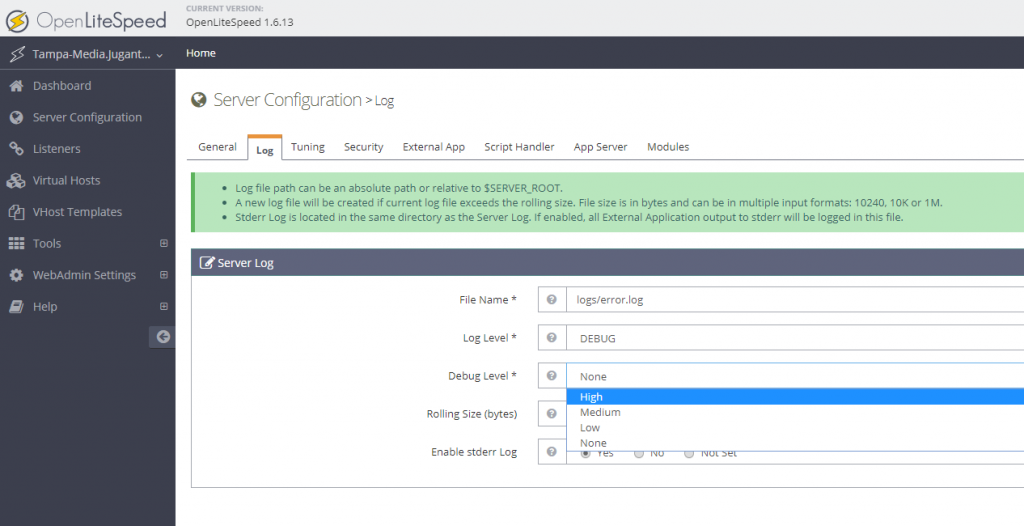
The problem is, OLS is not configured to respond to ‘default’ requests on ‘127.0.0.1’, ‘localhost’ or the server’s main IP. To find out this, I enabled ‘High’ Debug mode of OLS. To do this, first visit the OLS Webadmin Console, it can be accessed with https://IP:7080

After login, go to Server Configuration >> Log >> Edit Server Log >> Set ‘Debug Level’ to High and Save

Set high debug level in openlitespeed

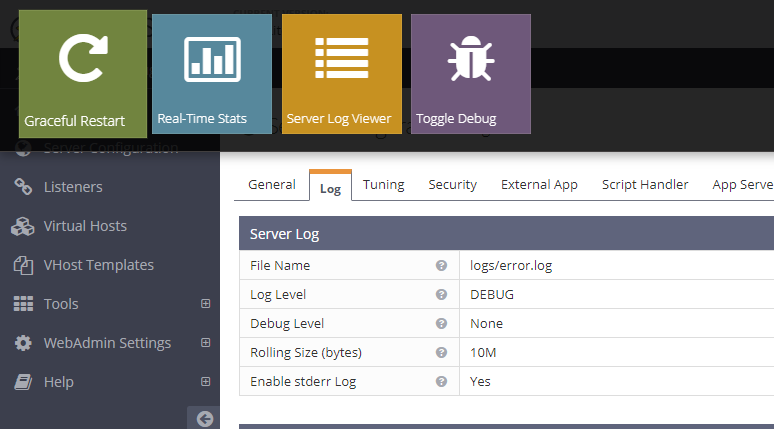
Once saving is done, you may gracefully restart the OLS

Gracefully restart Openlitespeed

Once this is done, you may now monitor the error.log file located usually under /usr/local/lsws/logs. Now tail the output of error.log while processing requests with Haproxy:

tail -f /usr/local/lsws/logs/error.log

You can see, OLS has returned 404 error for the localhost/ request. That means, Haproxy is requesting the IP with a header ‘localhost/’, and the server should return something with code 200 to make sure the server is in business.

What we need to do, is to make OLS respond to request for basic IP and localhost to 200 with the main site instead of ‘404’ error. To do this, we need to go to Webconsole of OLS again >> Listeners

You will see you have two Listeners, one for Default/Non HTTP and the HTTPS/SSL. In my case, I was using only HAProxy to Origin with no SSL, means 80. I selected the Default.

Open 80 Listener View in Openlitespeed

In the Listener List, you can find your Virtualhost, click on the ‘Edit’ of your Virtualhost

Virtualhost Edit Openlitespeed

Now, you can map the virtualhost. You will see your primary domain as the ‘Virtual Host’, which can’t be changed here. But what you can do is to map this virtualhost to several domains. The trick is to add your server’s IP and the localhost in the ‘domains’ list with comma seperation as following:

localhost mapping to OLS

Once this is saved, restart your OLS and now your HAProxy should be able to read requests and starting forwarding requests to your OLS server.

Lost connection after starttls from Hostname (IP) – Virtualmin – Postfix

Problem Definition:

I have some VPS clients using Virtualmin as their LAMP/LEMP stack. After some recent updates to Virtualmin, they started seeing some Postfix errors. The error is the following:

lost connection after STARTTLS from unknown[0.0.0.0]

Virtualmin used to configure postfix to allow ‘Non TLS’ connections to the port 587, which they recently stopped configuring. Now, if you connect to 587 port, you have to follow the TLS, no matter what. My clients didn’t bother to use TLS/SSL before, which caused the error.

Virtualmin comes with Let’s Encrypt. That’s make it easy to solve the problem TLS problem.

Solution Summary:

Here is the basic to solve the problem, first you make virtualmin to install Let’s encrypt SSL for the domain you want to use for SMTP. Virtualmin primarily going to install this for your Apache. Once done, Copy the same certificate to your Postfix, Virtualmin allows you to do it with single click.

Detailed Steps:

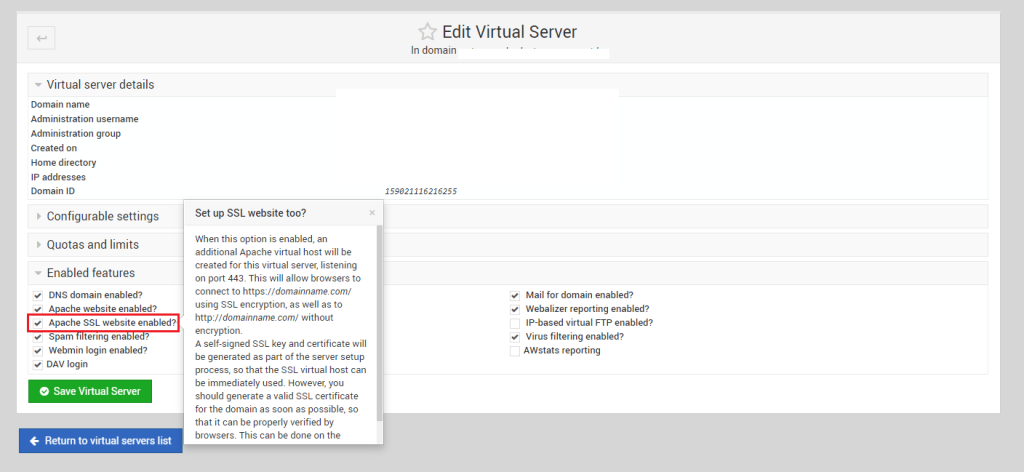
First, login to your Virtualmin at 10000 port, then select the domain you use for the SMTP. Once done, you can go to Edit Virtual Server and expand the option ‘Enabled Features’. From here check the option says ‘Apache SSL Website Enabled?’

Check Apache SSL Website Enabled

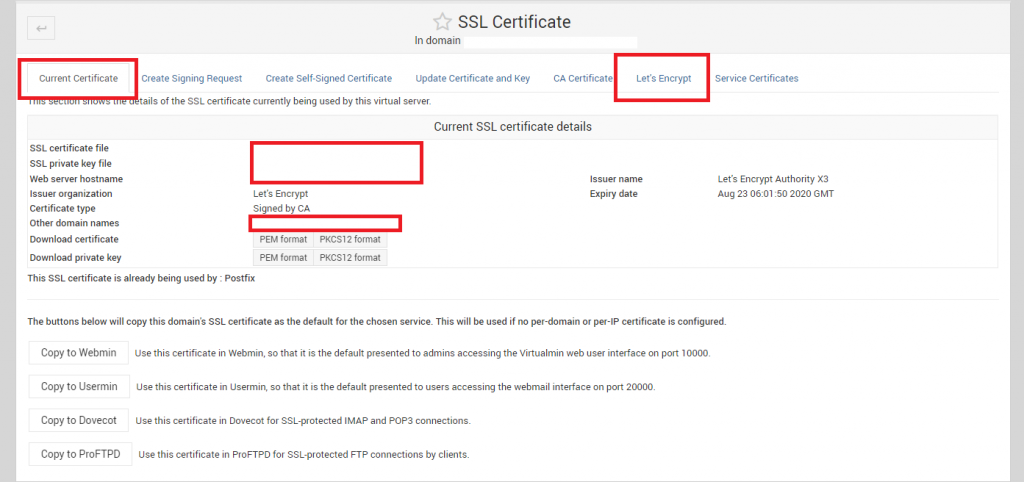
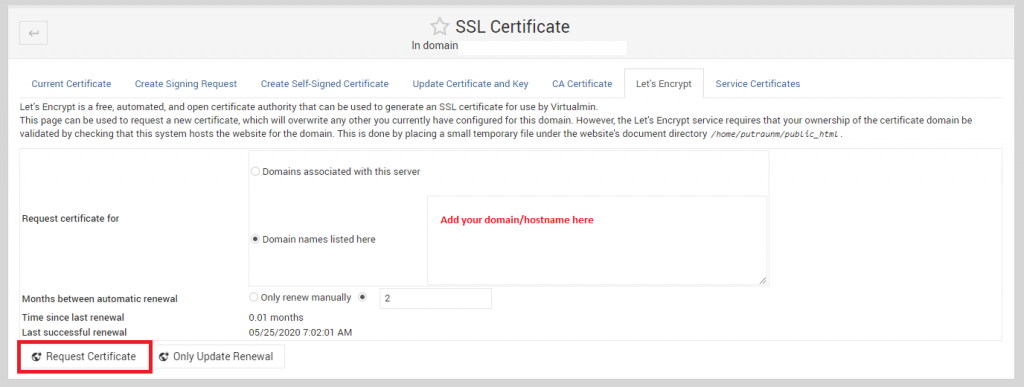
Next, go to Server Configuration >> SSL Certificate, we will get two tabs, ‘Current Certificate’ & ‘Let’s Encrypt’. Both are important. First go to Let’s Encrypt:

Let’s Encrypt Virtualmin

In the Let’s Encrypt tab, select the ‘Domain names listed here‘ and enter the domain that only has valid A Records or loads to the server, otherwise, remember, Let’s Encrypt won’t process for any single exception unlike cpanel or cyberpanel

Let’s Encrypt Virtualmin Add Domains

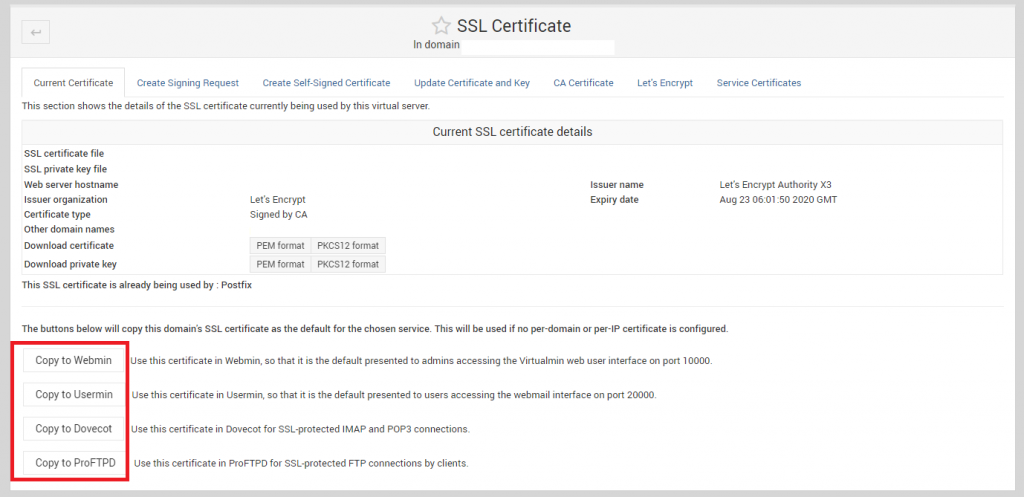
Once done, request the certificate. After the certificate installation is done, go back to ‘Current Certificate’ tab. On the bottom of the tab, there are couple of Copy To ‘Services’ option available. Here you should see the option says ‘Copy to Postfix’. Use that to copy the certificate to Postfix and use it during TLS/SSL transactions.

Copy SSL to Services (Postfix) Virtualmin.

In my case, I have already copied the SSL to Postfix, which is why it is not showing the option ‘Copy To Postfix’. But the option should be above the ProFTPD.

Once done, you may now recheck and the SMTP should work with TLS and 587 port.

How to Use Sticky Session for CSRF submission on Highly Scalable Cloud App in Haproxy

HINT: If you are a nginx fan and used it in mass scale, then, you must have done this using ip_hash (Nginx Documentation). It follows the same purpose for Haproxy. Difference and benefits of using Haproxy over Nginx for L7 proxy in a highly scalable and reliable cloud app would be a discussion for another day.

Case Discussion:

Suppose, you have a Cloud app, that is load balanced & scaled between multiple servers using Haproxy, for example:

101.101.101.101
202.202.202.202
303.303.303.303

Now, if your app has a submission form, for example, a poll submission from your users, then, there is an issue in this Haproxy setup.

Let’s say, an User A, requests for the app, and gets the data from the server 101.101.101.101, the CSRF token he gets for the poll submission to his browser, also maintains the app hosted on 101.101.101.101. But when he press the submit button, HAProxy puts him on 202.202.202.202 app, and the app hosted on 202.202.202.202 instantly rejects the token for the session as the session is not registered for that app. For such cases, we need to maintain a ‘Sticky’ session based on the cookie set by the right server. That means, if the cookie is set by 101.101.101.101, HAproxy should obey and give the user 101.101.101.101 until the cookie or the session is reset or regenerated.

How To Do That:

What we need to do, let haproxy write the server id in the cookie, and make the directive ‘server’ to follow the cookie. Please remember, there are couple of other way to achieve this. There is another way of doing this is called ‘IP Affinity’, where you make sticky session based on IP of the user. There is another based on PHP session value. Setting sticky session based on php session should also work. I preferred the cookie based sticky session, just on random selection.

So, to write the server id in the cookie, you need to add the following in the haproxy ‘backend’ directive as following:

backend app-main
balance roundrobin
cookie SERVERID insert indirect nocache

In the cookie directive, you can see, we are taking the HAProxy variable ‘SERVERID’ and inserting that to the cookie attribute. Now, all you need to do, is to configure your balancing IPs to follow the cookie, like the following:

backend app-main
balance roundrobin
cookie SERVERID insert indirect nocache
server nginx1 101.101.101.101 cookie S1
server nginx2 202.202.202.202 cookie S2
server nginx3 303.303.303.303 cookie S3

S1, S2, S3 are just 3 different names of the cookies for the specific servers. After the above is done, you can now restart and see Haproxy is following stickiness based on the session you have.

Just to find out, how to test if you are using laravel, try to regenerate the session based on the session() helper method as following:

session()->regenerate()->csrf_token();

You should be able to see the content loading from different web servers when the session regenerates. But it will persists when the regenerate session method is not called.

How to Skip WHM Initial Setup Wizard When Stuck After Upcp

If you have recently ran upcp and the WHM initial setup wizard is stuck in a URL like the following:

https://yourhostname.com:2087/cpsess*****/scripts/initial_setup_wizard1

And can not get away with it, here is the easy way to do it. Basically each setup wizard has a skip button and the button goes to initial_setup_wizard1_do, so only adding the _do at the of your initial_setup_wizard1 should do the job, like the following:

https://yourhostname.com:2087/cpsess*****/scripts/initial_setup_wizard1_do/

This should take you to the WHM home by letting you save some of the new WHM features and will not ask again for initial setups.

How To Renew & Deploy Let’s Encrypt SSL on Zimbra Server – 2020

Note: This does not seem to work on 2021. I have written another article on how to do this now: How to manually install/renew let’s encrypt ssl in Zimbra

Ok, there is a reason to put 2020 on the title. Because the process has changed since past. At this moment, I manage a Zimbra server with multiple domains in it, which won’t deploy the ‘other’ domains if not specified. The process is fairly simple, but I am keeping this as a documentation purpose, so that I don’t miss next time.

To renew the certificate for attached domains using certbot is fairly simple, just do:

# certbot renew

Once done, you you want to use the pre-hook and deploy-hook to do the patching and deploying as following using certbot_zimbra.sh

# certbot_zimbra.sh -p
# certbot_zimbra.sh -r -d 'your_domain'

Updated, certbot_zimbra doesn’t take this. ‘-n’ used to be taken as new and ‘-r’ for replacing, now, ‘-r’ is removed. Instead you can use ‘-e’ to specify new domains. So the command for replacement and deployment would be fairly simple as following:

# certbot_zimbra.sh -p
# certbot_zimbra.sh -d -e 'mail.yourdomain.com'
# certbot_zimbra.sh -d -e 'mailapp.yourdomain.com'


… and so on. At this moment, I couldn’t find a way to advise zimbra certbot to follow a list of domains instead of one. But this is probably possible by cracking the certbot.

Quick Tips: An error occurred. Your account may be over its quota or you attempted to upload a folder – Cpanel

An error occurred. Your account may be over its quota or you attempted to
upload a folder.

The error is very obvious. It means the account is over the quota. But what if it isn’t? This error is generic, cpanel throws this, whenever it fails to upload the file, regardless of what error it returns. There is a possibility that your IDS (Intrusion detection system) is discarding the upload, so double checking the IDS log should help you to conclude that. But what if, that is also not the case?

Ok, that can actually still happen. It happens when the customer uses cloudflare and uses cloudflare to login to the cpanel using cpanel proxy and then use it to upload the file. Cloudflare sees the upload going through web and blocks it. So, just double check the domain he uses to login to the cpanel, and check whether it uses some kind of 3rd party web application firewall loaded application or not like Cloudflare. If it does, that could be the case!

How to setup Postfix relay with authentication in CentOS 7

To configure postfix to relay mail using another MTA, you may do the following steps:

postconf -e 'relayhost = smtp.to.relay.com'
postconf -e 'smtp_sasl_auth_enable = yes'
postconf -e 'smtp_sasl_password_maps = hash:/etc/postfix/sasl_passwd'
postconf -e 'smtp_sasl_security_options='

Replace smtp.to.relay.com with the original MTA hostname that you going to use for relaying. Now, create the sasl_passwd file in /etc/postfix with the following inside:

smtp.to.relay.com smtp_username:smtp_password

Now, use postmap to generate postfix hash db:

postmap /etc/postfix/sasl_passwd

You can verify if it’s working with the following:

postmap -q smtp.to.relay.com /etc/postfix/sasl_passwd

This will return the username and password for your smtp relay host.

Now all you need to do is to restart the postfix

service postfix restart

How to Stop Redirecting All Traffic Trough OpenVPN

There are cases, where you might want to use OpenVPN to redirect only a fraction of traffic, but not all. By default, after you connect to OpenVPN, server would push the call 'redirect-gateway' to the client to make the client divert all the traffic through tun network.

This behavior can be override with the following command line argument:

--pull-filter ignore redirect-gateway

You can add it in the openvpn command line as following:

openvpn --pull-filter ignore redirect-gateway --config "your_file.ovpn"

Once this is done, remember that, you have to route the targetted traffic using either the route command or 'ip route' command, otherwise no traffic will route through your openvpn tunnel network.