How to Use Memtest+ to Test Your RAM

If you suspect an issue with your system RAM, you should try to use a tool, that will write data in 100% of your RAM and let you know the errors it could get. One such tool available for linux is ‘Memtest+’

How to install memtest+ in CentOS 7

To install memtest+, run the following command in yum:

yum install memtest86+

Now, this will install memtest+ for you. But memtest+ runs the memory test at boot time. To accomplish that, you need to install memtest+ in grub. Memtest+ comes with a command, that does it for you. Run the following to do this:

memtest-setup

This would install the memtest for grub. But you would still need to remake the grub.cfg file for CentOS 7. To do that, run the following:

grub2-mkconfig -o /boot/grub2/grub.cfg

Now, reboot the server and select memtest from the boot screen. Memtest will automatically complete the process and let you know the result on that screen.

CENTOS 6 : YUM ERROR : ALL MIRROR URLS ARE NOT USING FTP, HTTP[S] OR FILE

If you are still using CentOS 6, and trying to update the system using the following command:

yum update -y

You probably end up with the following:

Loaded plugins: fastestmirror, refresh-packagekit, security
Setting up Update Process
Determining fastest mirrors
YumRepo Error: All mirror URLs are not using ftp, http[s] or file.
Eg. Invalid release/repo/arch combination/
removing mirrorlist with no valid mirrors: /var/cache/yum/x86_64/6/base/mirrorlist.txt
Error: Cannot find a valid baseurl for repo: base

The error is coming up because CentOS 6 has now hit the end of life, and the URLs are moved to centos vault. Now to update the CentOS, you would need to replace the URLs.

How to Fix

To fix the error, you need to replace your CentOS-base.repo file. Open up the following file using nano:

nano /etc/yum.repos.d/CentOS-Base.repo

Now, replace the full code using the following:

[base]
name=CentOS-$releasever - Base
# mirrorlist=http://mirrorlist.centos.org/?release=$releasever&arch=$basearch&repo=os&infra=$infra
# baseurl=http://mirror.centos.org/centos/$releasever/os/$basearch/
baseurl=https://vault.centos.org/6.10/os/$basearch/
gpgcheck=1
gpgkey=file:///etc/pki/rpm-gpg/RPM-GPG-KEY-CentOS-6

# released updates
[updates]
name=CentOS-$releasever - Updates
# mirrorlist=http://mirrorlist.centos.org/?release=$releasever&arch=$basearch&repo=updates&infra=$infra
# baseurl=http://mirror.centos.org/centos/$releasever/updates/$basearch/
baseurl=https://vault.centos.org/6.10/updates/$basearch/
gpgcheck=1
gpgkey=file:///etc/pki/rpm-gpg/RPM-GPG-KEY-CentOS-6

# additional packages that may be useful
[extras]
name=CentOS-$releasever - Extras
# mirrorlist=http://mirrorlist.centos.org/?release=$releasever&arch=$basearch&repo=extras&infra=$infra
# baseurl=http://mirror.centos.org/centos/$releasever/extras/$basearch/
baseurl=https://vault.centos.org/6.10/extras/$basearch/
gpgcheck=1
gpgkey=file:///etc/pki/rpm-gpg/RPM-GPG-KEY-CentOS-6

Notice, how we replaced mirror.centos.org to valut.centos.org in the repo file.

Now, clean the yum, and update

yum clean all
yum update -y

You should be good to go now.

ERROR: Cannot open TUN/TAP dev /dev/net/tun: No such file or directory (errno=2) – LXC/LXD

If you are seeing the above error in LXC, you need to do two things.

  1. Make sure the LXC container is running on privileged mode.
  2. Run the following commands inside the container:
mknod /dev/net/tun c 10 200

Now, you may run the OpenVPN command to start the VPN client:

openvpn --pull-filter ignore redirect-gateway --config ovpn.ovpn

# assumming your vpn config file is ovpn.ovpn

failed to open db file /var/spool/exim/db/ratelimit: permission denied

Cpanel incoming mails are failing, with an error in the exim_mainlog as following:

failed to open db file /var/spool/exim/db/ratelimit: permission denied

The error is appearing due to some permission issues with the exim db or the files are corrupted. These files recreate when the exim restart. Hence, we can do the following:

# delete the db files
rm -rf /var/spool/exim/db/*

# restart exim
service exim restart

# fix permission of exim spool
chown -Rf mailnull.mail /var/spool/exim
chmod 0750 /var/spool/exim

You should be done now.

How to Configure Postfix Relay

Open your main.cf file, in my case, it’s a zimbra main.cf file:

nano /opt/zimbra/common/conf/main.cf

Now change the following settings:

relayhost = [smtp.yourrelayserver.com]:587
smtp_sasl_auth_enable = yes
smtp_sasl_security_options = noanonymous
smtp_sasl_password_maps = static:relayusername:relaypassword
smtp_sasl_mechanism_filter = login

You need to replace 3 things here:

  1. smtp.yourrelayserver.com should be your original relay server.
  2. relayusername should be the relay authentication username.
  3. relaypassword should be the relay authentication password.

Once done, you may now restart your postfix to see the mail is relaying through the new relay you have added.

How to Fix Locale Font Issue with Odoo Qweb Reports

Issue

When looking at the html report in Odoo, locale fonts look ok, but if you download the Qweb report to print in pdf format, it prints gibberish. How to fix that?

Resolution

Odoo uses a templating engine for reporting called ‘Qweb’. Qweb can be used to generate two types of reports. One is HTML and the other is PDF. Odoo primarily uses Qweb engine to generate the HTML code. After that, it uses a tool called ‘wkhtmltopdf’ to convert the report to pdf and make it printable. Now when, we look at the HTML version of the report, fonts are shown based on Unicode supported browsers or the fonts you have installed on your computer. But when you try to convert this to PDF using wkhtmltopdf, that tool has to have exclusive access to those fonts to be able to convert them from HTML to pdf for you. As wkhtmlpdf command runs in the server you have installed Odoo, hence, you would need to install the font package in the server.

In my case, I required to install Bengali fonts. For CentOS, it is available under the lohit package, that contains several indian fonts including bengali. To install bengali font package in CentOS 7, use the following command:

yum install lohit-bengali* -y

Once done, your wkhtmltopdf should be able to read the bengali fonts from your html/qweb templates and able to convert them to PDF for you.

How to find wifi password from saved wifi connection in Windows 10

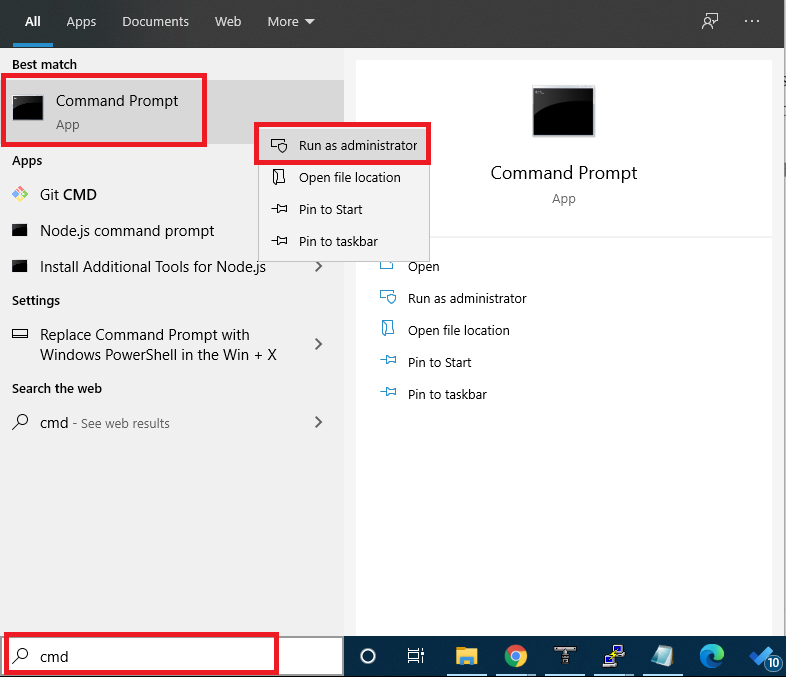
You may get the password from using ‘netsh’ windows command. First go to your windows 10 search box, and type ‘cmd’

Now, from the result, there should be an option called ‘Command Prompt’, right click on it, and ‘Run as administrator’. Now on the black command prompt, type the following:

netsh wlan show profile "your wifi name" key=clear

Replace the part “your wifi name” with your one. So, for example if you connect to a wifi connection that has a name ‘Mellowhost_Portable’, then the command should be like the following:

netsh wlan show profile "Mellowhost_Portable" key=clear

This shall show you the full profile of your wifi details, including the password. Password should be available under the ‘Security Settings’, inside the ‘Key Content’ section.

Hope it helps.

How to Speed Up Software RAID (mdadm) Resync Speed

mdadm is the software raid tools used in Linux system. One key problem with the software raid, is that it resync is utterly slow comparing with the existing drive speed (SSD or NVMe). The resync speed set by mdadm is default for regardless of whatever the drive type you have. To view the default values, you may run the following:

[root@172 ~]# sysctl dev.raid.speed_limit_min
dev.raid.speed_limit_min = 1000
[root@172 ~]# sysctl dev.raid.speed_limit_max
dev.raid.speed_limit_max = 200000

As you see, the minimum value starts from 1000 and can max upto 200K. Although, it can max upto 200K, but as min value is too low, mdadm always tries to keep the value below average to your speed available. To speed up, we would like to maximize these numbers. To change the numbers, you may run something like the following:

sysctl -w dev.raid.speed_limit_min=500000
sysctl -w dev.raid.speed_limit_max=5000000

Once done, you may now check the speed is going up immediately:

[root@172 ~]# cat /proc/mdstat
Personalities : [raid1]
md3 : active raid1 sdb5[1] sda5[0]
      1916378112 blocks super 1.2 [2/2] [UU]
      [===============>.....]  resync = 76.2% (1461787904/1916378112) finish=27.4min speed=276182K/sec
      bitmap: 5/15 pages [20KB], 65536KB chunk

md0 : active raid1 sdb1[1] sda1[0]
      1046528 blocks super 1.2 [2/2] [UU]
      bitmap: 0/1 pages [0KB], 65536KB chunk

md2 : active raid1 sda2[0] sdb2[1]
      78576640 blocks super 1.2 [2/2] [UU]
      bitmap: 1/1 pages [4KB], 65536KB chunk

md1 : active raid1 sdb3[1] sda3[0]
      4189184 blocks super 1.2 [2/2] [UU]

unused devices: <none>

One thing to keep in mind is that, if you try to set the value too high, like we did, this might cause some handsome load on your system. If you see the load is unmanageable, you should focus on decreasing the number to something like 50k-100k for the min value.

Making The Sysctl Value Permanent

As we have established the kernel variable values on runtime, this would go back to default once we restart/reboot the server. If you want to persist the values, you need to put these values to /etc/sysctl.conf file. To make them persist, open the sysctl.conf file:

nano /etc/sysctl.conf

Add the following lines at the end of the file:

dev.raid.speed_limit_min = 500000
dev.raid.speed_limit_max = 5000000

Save the file, and run the following command:

sysctl -p

This should persist your values for those variables after the reboot as well as runtime.
-bash: smartctl: command not found

Error Details

When I try to check the S.M.A.R.T details of my drive, using the following command:

smartctl -a /dev/sda

I get an error:

-bash: smartctl: command not found

What can I do?

Solution

This error is appearing because you do not have the S.M.A.R.T tools installed on your system.

How to Install Smart tools on CentOS 7?

To install smart tools, you can run the following:

yum install smartmontools -y

Once done, you may run the smartctl command again, and it shall work:

[root@172 ~]# smartctl -a /dev/sda
smartctl 7.0 2018-12-30 r4883 [x86_64-linux-3.10.0-1127.el7.x86_64] (local build)
Copyright (C) 2002-18, Bruce Allen, Christian Franke, www.smartmontools.org

=== START OF INFORMATION SECTION ===
Model Family:     Crucial/Micron BX/MX1/2/3/500, M5/600, 1100 SSDs
Device Model:     Micron_1100_MTFDDAK2T0TBN

Server Boots to Grub – OVH Servers – How to Fix

Error Details

After you have completed updating your yum, you saw the kernel got updated, and hence restarted the server to take the new kernel. But you find out that the server has never come online. Once you visit the KVM or Serial Console (SOL) of the system, you could see, your system is booted to ‘grub>’ console instead of booting from disk. How can you fix the system now?

Solution Intro

This specific issue can appear for any linux server, along with many reasons. Although, if you are running an server from OVH and had faced a similar issue, the boat I am going to show you can navigate to destination. Please note, in many other case of similar situation, you might end up fixing the grub with the same solution.

What and How the Problem Happened

OVH has an interesting strategy of booting. They follow everything through network PXE, even if it is not ‘netboot’, but just the local drives. For this to work out, you need PXE to take the latest grub details pushed once a kernel is updated. This is one reason why, OVH also supplies a custom kernel from a cusstom repo. Although, if you are using the stock kernel, you might come up with a situation, where the latest grub hasn’t been pushed to PXE and your system fails to boot from drives. It then puts you in the ‘grub’ of network.

How to Fix the Problem

Now, one thing is clear, after you completed a kernel update, your grub is broken due to the latest machine code is not available to the booting system. You can go and follow a regular grub repair method for Grub 2, to fix the situation. A couple of things to remember, as your system’s grub is failing to load, you have to use an independent rescue kernel to fix this, this could either be from a personal network repository or a rescue disk available from your datacenter’s location, like ovh has one. Another thing to remember, is that, if you are using CentOS 7 or Ubuntu with UEFI system, using mdadm or linux software raid, it is highly likely, your boot efi is placed in a non raid partition. Preferably in the first drive’s first partition. You can always verify this from your fstab file.

So the first job, is to boot your system into the rescue disk/cd/kernel. I assume you have done that with no difficulty. Once done, first mount your partitions. In OVH cases, it loads the mdadm automatically. In my case, it was /dev/md2.

mount /dev/md2 /mnt
# check what partition is used for /boot/efi
nano /mnt/etc/fstab
# in my case, it is /dev/nvme0n1p1 (It is a NVMe SSD, and the first partion is used for efi storage
mount /dev/nvme0n1p1 /mnt/boot/efi

Once we have mounted the partitions successfully, you may now chroot the system. Before chrooting, you want the dev, proc and sys to use the /mnt partitions respectively:

mount --bind /dev /mnt/dev
mount --bind /proc /mnt/proc
mount --bind /sys /mnt/sys

If these all goes well, now we can chroot the system:

chroot /mnt

Now you have successfully changed the root directory of the rescue kernel to the original drive’s root. All you need to do, is to remake the grub config, that will immediately generate the grub.cfg file and sync the machine code:

# we know grub.cfg is available in /boot/grub2/grub.cfg
grub2-mkconfig -o  /boot/grub2/grub.cfg
# once this is finished, we have to make sure, grub is also installed for both disks, for my case, these are /dev/nvme0n1 and /dev/nvme1n1
grub2-install /dev/nvme0n1
grub2-install /dev/nvme1n1

If you see the response is ‘No Error Reported’, then you are good go. You may now reboot your system back to hard disk, and can see your grub is able to load the latest kernel you installed from the original hard disk. Remember, for safety, you should umount all the partition, to avoid any data loss due to OS page cache:

# exit from chroot
exit
# unmount dev, proc, sys, /mnt/boot/efi, /mnt
umount /dev
umount /proc
umount /sys
umount /mnt/boot/efi
umount /mnt

Happy troubleshooting!