-bash: smartctl: command not found

Error Details

When I try to check the S.M.A.R.T details of my drive, using the following command:

smartctl -a /dev/sda

I get an error:

-bash: smartctl: command not found

What can I do?

Solution

This error is appearing because you do not have the S.M.A.R.T tools installed on your system.

How to Install Smart tools on CentOS 7?

To install smart tools, you can run the following:

yum install smartmontools -y

Once done, you may run the smartctl command again, and it shall work:

[root@172 ~]# smartctl -a /dev/sda
smartctl 7.0 2018-12-30 r4883 [x86_64-linux-3.10.0-1127.el7.x86_64] (local build)
Copyright (C) 2002-18, Bruce Allen, Christian Franke, www.smartmontools.org

=== START OF INFORMATION SECTION ===
Model Family:     Crucial/Micron BX/MX1/2/3/500, M5/600, 1100 SSDs
Device Model:     Micron_1100_MTFDDAK2T0TBN

How to Disable Clamd & Spamassasign in Virtualmin

Question

My clamscan is taking a lot of CPU & memory of my vps. I use Virtualmin as the control panel. How can I disable Clamscan and Spamassign from taking excessive cpu and memory?

Solution

If you are receiving an inbound spam attack or an email bounce attack on your VPS, and you use Clamscan and Spamassasign for your incoming mail filtering, it is highly possible that, you will run out of RAM and CPU. To solve the problem, you need to disable Clamscan and Spamassign for at least the time you are dealing with the attack or have developed a way to deal the attack. To disable Clamd and Spamassasign, you may follow the following steps

How to Disable Clamd and Spamassasign

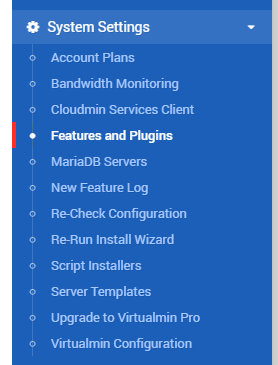
First login to your virtualmin 10000 port, and go to System Settings >> Features and Plugins

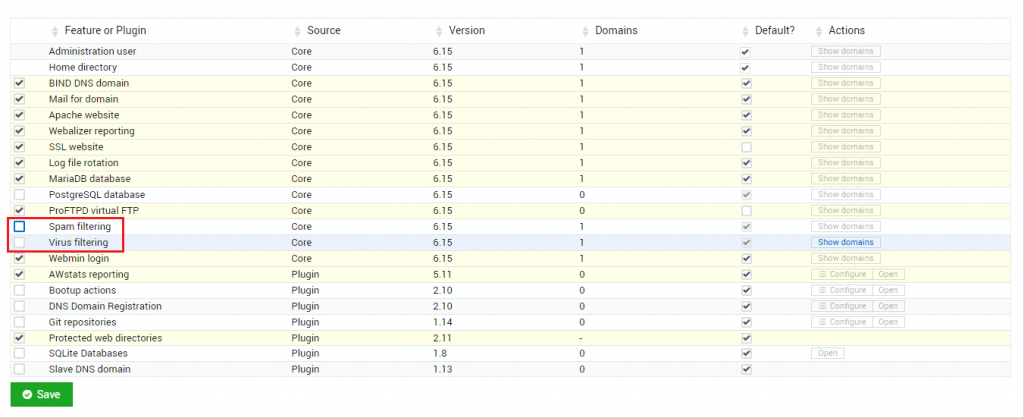
Now uncheck the options ‘Spam filtering’ and ‘Virus filtering’ option and save it

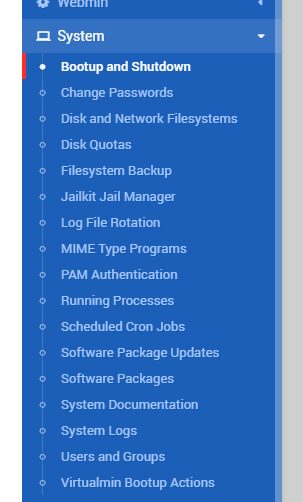
Now go to your Webmin tab >> Under the System >> Bootup and Shutdown

Now select the services with the name ‘clam’ and ‘spamassassin.service’, then click on ‘Disable now and on boot’ option. Once saved, also make sure they are saying ‘No’ in running. If not, select them again and go to the bottom of the page, and press ‘Stop’ to shut them down immediately.

How to Restart Virtualmin / Webmin

Question

How to restart Virtualmin control panel?

Solution

If you are using virtualmin as a control panel, you use 10000 port to login to your control panel. It shall look like the following:

https://your.hostname.com:10000

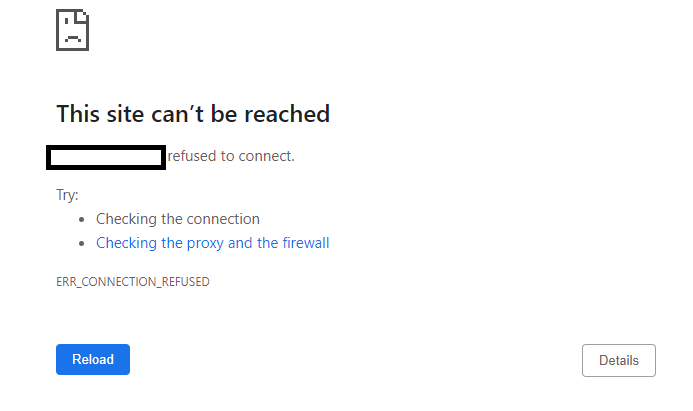
Now, if your browser says something like the following:

It means your webmin is either down or crashed.

Restart Virtualmin or Restart Webmin

To solve this, you may start the webmin by logging to your SSH and running the following command:

service webmin start
or
/etc/init.d/webmin start

In case, you need to double sure to stop the service, you may do the following:

service webmin stop
or
/etc/init.d/webmin stop

Once you done, stopping, make sure to start it with the following:

service webmin start
or
/etc/init.d/webmin start

Once the webmin starts successfully, you may access your virtulmin control panel on port 10000, either with your hostname or the IP, like the following:

https://your.hostname.com:10000
or
https://11.11.11.11:10000
(replace 11.11.11.11 with your server IP)

How to Change memory_limit in Virtualmin

Question

I want to change the memory_limit of a virtual host in virtualmin. How can I do that?

Solution

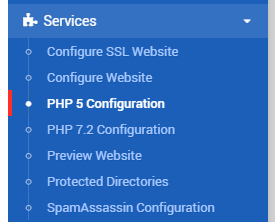
First, login to Virtualmin on port 10000, now, select the virtual host from the dropdown under Virtualmin tab. Now under the services, there are PHP 5 Configuration and PHP 7 Configuration

Click on the version you want to change configuration for. It will show you a list of options to change php variables.

Now there is ‘Resource Limit’, that contains the options like maximum execution time, or memory limit for PHP.

Now, change the ‘Maximum Memory Allocation’ option to something that you want to change memory_limit of php in virtualmin

Server Boots to Grub – OVH Servers – How to Fix

Error Details

After you have completed updating your yum, you saw the kernel got updated, and hence restarted the server to take the new kernel. But you find out that the server has never come online. Once you visit the KVM or Serial Console (SOL) of the system, you could see, your system is booted to ‘grub>’ console instead of booting from disk. How can you fix the system now?

Solution Intro

This specific issue can appear for any linux server, along with many reasons. Although, if you are running an server from OVH and had faced a similar issue, the boat I am going to show you can navigate to destination. Please note, in many other case of similar situation, you might end up fixing the grub with the same solution.

What and How the Problem Happened

OVH has an interesting strategy of booting. They follow everything through network PXE, even if it is not ‘netboot’, but just the local drives. For this to work out, you need PXE to take the latest grub details pushed once a kernel is updated. This is one reason why, OVH also supplies a custom kernel from a cusstom repo. Although, if you are using the stock kernel, you might come up with a situation, where the latest grub hasn’t been pushed to PXE and your system fails to boot from drives. It then puts you in the ‘grub’ of network.

How to Fix the Problem

Now, one thing is clear, after you completed a kernel update, your grub is broken due to the latest machine code is not available to the booting system. You can go and follow a regular grub repair method for Grub 2, to fix the situation. A couple of things to remember, as your system’s grub is failing to load, you have to use an independent rescue kernel to fix this, this could either be from a personal network repository or a rescue disk available from your datacenter’s location, like ovh has one. Another thing to remember, is that, if you are using CentOS 7 or Ubuntu with UEFI system, using mdadm or linux software raid, it is highly likely, your boot efi is placed in a non raid partition. Preferably in the first drive’s first partition. You can always verify this from your fstab file.

So the first job, is to boot your system into the rescue disk/cd/kernel. I assume you have done that with no difficulty. Once done, first mount your partitions. In OVH cases, it loads the mdadm automatically. In my case, it was /dev/md2.

mount /dev/md2 /mnt
# check what partition is used for /boot/efi
nano /mnt/etc/fstab
# in my case, it is /dev/nvme0n1p1 (It is a NVMe SSD, and the first partion is used for efi storage
mount /dev/nvme0n1p1 /mnt/boot/efi

Once we have mounted the partitions successfully, you may now chroot the system. Before chrooting, you want the dev, proc and sys to use the /mnt partitions respectively:

mount --bind /dev /mnt/dev
mount --bind /proc /mnt/proc
mount --bind /sys /mnt/sys

If these all goes well, now we can chroot the system:

chroot /mnt

Now you have successfully changed the root directory of the rescue kernel to the original drive’s root. All you need to do, is to remake the grub config, that will immediately generate the grub.cfg file and sync the machine code:

# we know grub.cfg is available in /boot/grub2/grub.cfg
grub2-mkconfig -o  /boot/grub2/grub.cfg
# once this is finished, we have to make sure, grub is also installed for both disks, for my case, these are /dev/nvme0n1 and /dev/nvme1n1
grub2-install /dev/nvme0n1
grub2-install /dev/nvme1n1

If you see the response is ‘No Error Reported’, then you are good go. You may now reboot your system back to hard disk, and can see your grub is able to load the latest kernel you installed from the original hard disk. Remember, for safety, you should umount all the partition, to avoid any data loss due to OS page cache:

# exit from chroot
exit
# unmount dev, proc, sys, /mnt/boot/efi, /mnt
umount /dev
umount /proc
umount /sys
umount /mnt/boot/efi
umount /mnt

Happy troubleshooting!

How to run composer with different PHP versions in Cpanel?

Question:

When we try to run a composer command, like update, we usually do the following:

composer update

Cpanel has multiple PHP binaries, but in this case, we are unable to select a specific PHP binary to use, instead we have to run it with the default one, how to run composer update with a different php binary in cpanel?

Solution

composer binary file, is a phar file. PHAR is necessarily a PHP Archive and usually automatically detect the running php. But as it is essentially written in php, you may explicitly run it with a different php binary, if you want. To run composer with different php binary, first, you need to find the location of composer. You may do so, using the following:

root@mirage [~]# which composer
/opt/cpanel/composer/bin/composer

Cpanel different php binaries are available under the following kind of directory:

/opt/cpanel/ea-phpXX/usr/bin/php

XX is the version number of PHP. So for example if you need to use PHP 7.4, you would need to run using the following:

/opt/cpanel/ea-php74/usr/bin/php

Now, to run composer update along with PHP 7.4 binary, you may do something like the following:

/opt/cpanel/ea-php74/usr/bin/php /opt/cpanel/composer/bin/composer update

First, make sure you are in the directory where you want to install laravel, for example, something like the following:

cd /home/username/public_html

Then, you may run the above command:

/opt/cpanel/ea-php74/usr/bin/php /opt/cpanel/composer/bin/composer update
or in case, you want to to install
/opt/cpanel/ea-php74/usr/bin/php /opt/cpanel/composer/bin/composer install
or may be, you wan to run update with no-scripts
/opt/cpanel/ea-php74/usr/bin/php /opt/cpanel/composer/bin/composer update --no-scripts

Uncaught ErrorException: require(/home/username/public_html/vendor/composer/../../app/Helpers/helper.php): failed to open stream: No such file or directory in /home/username/public_html/vendor/composer/autoload_real.php:71

Error Details

While trying to run any of the following with Laravel composer installer, you see an error similar to the following:

Uncaught ErrorException: require(/home/username/public_html/vendor/composer/../../app/Helpers/helper.php): failed to open stream: No such file or directory in /home/username/public_html/vendor/composer/autoload_real.php:71

How to fix this?

Solution

The error is appearing, most likely you forgot to add the ‘app’ directory of laravel in your root directory. Make sure, you have the ‘app’ directory in your root directory, then run any of the following:

If this is the first time, you need all laravel packages, run:

composer install

If this is not the first time, you may run the following:

composer update

Good luck.

How to Backup PostgreSQL Database from Command Line

Question

How to Backup PostgreSQL Database from Command Line

Solution

Postgresql comes with two utilities called ‘pg_dump and ‘pgsql’. These can be used to backup and restore database.

To backup postgresql database using command line, you can use this:

pg_dump database_name > database_name.sql

This would take the backup and store it in .sql file.

To restore postgresql (.sql) file to a database using command line, you can use this:

pgsql database_name < database_name.sql

Error: Package: 1:ea-php74-php-cli-7.4.15-1.el7.cloudlinux.x86_64 (cl-ea4) – Requires: ea-openssl11 = 1:1.1.1h

Error Details

The error appears when you try to run easyapache or try to install PHP 7.4 on Cloudlinux 7.9, it puts you on the following error:

Error: Package: 1:ea-php74-php-cli-7.4.15-1.el7.cloudlinux.x86_64 (cl-ea4)
Requires: ea-openssl11 = 1:1.1.1h
Installed: 1:ea-openssl11-1.1.1i-1.el7.cloudlinux.x86_64 (@cl-ea4)
ea-openssl11 = 1:1.1.1i-1.el7.cloudlinux
Available: 1:ea-openssl11-1.1.1d-1.el7.cloudlinux.x86_64 (cl-ea4)
ea-openssl11 = 1:1.1.1d-1.el7.cloudlinux
Available: 1:ea-openssl11-1.1.1f-1.el7.cloudlinux.x86_64 (cl-ea4)
ea-openssl11 = 1:1.1.1f-1.el7.cloudlinux
Available: 1:ea-openssl11-1.1.1g-1.el7.cloudlinux.x86_64 (cl-ea4)
ea-openssl11 = 1:1.1.1g-1.el7.cloudlinux
Available: 1:ea-openssl11-1.1.1h-1.el7.cloudlinux.x86_64 (cl-ea4)
ea-openssl11 = 1:1.1.1h-1.el7.cloudlinux

Error Fix:

It is trying to look into a sub-sub version of openssl, which is 1h for PHP 7.4, but 1i is installed by default which is not an exact match with 1h, hence the error is appearing. To fix the problem, you can not just run yum update on openssl and fix this as you technically already have the latest version. To work with this, you need to first uninstall the ea-openssl rpm and install the require version. You may do this in the following way:

[root@stack4 yum.repos.d]# rpm -qa|grep ea-openssl
ea-openssl11-devel-1.1.1i-1.el7.cloudlinux.x86_64
ea-openssl-1.0.2u-1.el7.cloudlinux.x86_64
ea-openssl11-1.1.1i-1.el7.cloudlinux.x86_64
[root@stack4 yum.repos.d]# yum install ea-openssl11-1.1.1h-1.el7.cloudlinux.x86_64
Loaded plugins: fastestmirror, rhnplugin, universal-hooks
This system is receiving updates from CLN.
Loading mirror speeds from cached hostfile
 * cpanel-plugins: 185.125.185.32
 * cloudlinux-x86_64-server-7: xmlrpc.cln.cloudlinux.com
Package matching 1:ea-openssl11-1.1.1h-1.el7.cloudlinux.x86_64 already installed. Checking for update.
Nothing to do

Fix it with the following:

[root@stack4 yum.repos.d]# rpm -e --nodeps ea-openssl11-1.1.1i-1.el7.cloudlinux.x86_64
[root@stack4 yum.repos.d]# yum install ea-openssl11-1.1.1h-1.el7.cloudlinux.x86_64

Remember to use rpm uninstaller instead of yum remove, as yum also removes the dependencies, but with rpm you can skip the dependency uninstallation and patch it the above way.

How to Fix: Facebook\WebDriver\Exception\UnknownErrorException: unknown error: cannot find Chrome binary – Laravel Dusk

When run the following command in your Laravel Automation Tool Dusk:

php artisan dusk

You get something like the following error:

[elastic-keldysh@pl1 blog]$ php artisan dusk
PHPUnit 9.3.11 by Sebastian Bergmann and contributors.

E                                                                   1 / 1 (100%)

Time: 00:00.339, Memory: 18.00 MB

There was 1 error:

1) Tests\Browser\ExampleTest::testBasicExample
Facebook\WebDriver\Exception\UnknownErrorException: unknown error: cannot find Chrome binary

/var/www/vhosts/elastic-keldysh.139-99-24-82.plesk.page/blog/vendor/php-webdriver/webdriver/lib/Exception/WebDriverException.php:139
/var/www/vhosts/elastic-keldysh.139-99-24-82.plesk.page/blog/vendor/php-webdriver/webdriver/lib/Remote/HttpCommandExecutor.php:370
/var/www/vhosts/elastic-keldysh.139-99-24-82.plesk.page/blog/vendor/php-webdriver/webdriver/lib/Remote/RemoteWebDriver.php:136
/var/www/vhosts/elastic-keldysh.139-99-24-82.plesk.page/blog/tests/DuskTestCase.php:40
/var/www/vhosts/elastic-keldysh.139-99-24-82.plesk.page/blog/vendor/laravel/dusk/src/Concerns/ProvidesBrowser.php:200
/var/www/vhosts/elastic-keldysh.139-99-24-82.plesk.page/blog/vendor/laravel/framework/src/Illuminate/Support/helpers.php:234
/var/www/vhosts/elastic-keldysh.139-99-24-82.plesk.page/blog/vendor/laravel/dusk/src/Concerns/ProvidesBrowser.php:201
/var/www/vhosts/elastic-keldysh.139-99-24-82.plesk.page/blog/vendor/laravel/dusk/src/Concerns/ProvidesBrowser.php:95
/var/www/vhosts/elastic-keldysh.139-99-24-82.plesk.page/blog/vendor/laravel/dusk/src/Concerns/ProvidesBrowser.php:65
/var/www/vhosts/elastic-keldysh.139-99-24-82.plesk.page/blog/tests/Browser/ExampleTest.php:21

ERRORS!
Tests: 1, Assertions: 0, Errors: 1.

The error actually appears because you do not have Chrome browser installed on your system. Now, exit from your user shell, and drop back to the root shell. From the root shell, if you are using CentOS 7, you may run the following:

First Download the Latest Chrome RPM:

wget https://dl.google.com/linux/direct/google-chrome-stable_current_x86_64.rpm

Run it with YUM:

yum install ./google-chrome-stable_current_*.rpm

If you are on CentOS 8, you may use dnf installer as following:

dnf localinstall google-chrome-stable_current_x86_64.rpm

Once the installation is done, you may now go back to the user shell and run laravel dusk:

[root@pl1 lib64]# su - elastic-keldysh
Last login: Thu Oct  1 15:39:18 IST 2020 on pts/0
[elastic-keldysh@pl1 ~]$ php artisan dusk
Could not open input file: artisan
[elastic-keldysh@pl1 ~]$ cd blog
[elastic-keldysh@pl1 blog]$ php artisan dusk
PHPUnit 9.3.11 by Sebastian Bergmann and contributors.

R                                                                   1 / 1 (100%)

Time: 00:02.367, Memory: 18.00 MB

There was 1 risky test:

1) Tests\Browser\ExampleTest::testBasicExample
This test did not perform any assertions

/var/www/vhosts/elastic-keldysh.139-99-24-82.plesk.page/blog/tests/Browser/ExampleTest.php:16

OK, but incomplete, skipped, or risky tests!
Tests: 1, Assertions: 0, Risky: 1.

It shall work now. Hope this helps.