Can You Use Elasticsearch as a Primary Database?

Well, this is an interesting topic. Earlier today, I answered the same question in a Elasticsearch Community Group in Facebook, thought to keep this documented as well.

Primarily, if you are aware of how Elasticsearch is storing data (The document like), you might think, it is a full fledged NoSQL database, but you need to know, it is not. If you have looked at several NoSQL databases, you might already be thinking, there is probably no standard definition of NoSQL databases, which is partially true, again, there still is definition of database management systems, where it doesn’t fit. Does that mean, we can’t use ES as the primary data store? No, that’s doesn’t mean that. You certainly can, but there are use cases. Let’s look at couple of points before we conclude.

Database Transactions

ES has no transaction. Even the algorithm that ES implements, Lucene Search, which has transaction in the original design, but ES doesn’t have any transaction. When there is no transaction, the first thing you need to remember, it has no rollback facility. That also means, every operation is atomic by design, and there is no way to cancel, abort or revert them. This also means, you have no locking standard in the system. If you are doing parallel writes, you need to be very careful about the writes here because ES is not giving you any guarantee to parallel writes.

ES Caching Strategy

Elasticsearch is a ‘near real’ time search engine. It is not a ‘real’ time search engine. It has a caching standard, that refreshes every 1 second. This is ‘by design’ of Elasticsearch. So, what’s the problem with it? The problem is, you may get tricked by the ES cache if you are immediately asking for a read for a quick write operation and it is within 1 second. But as most of the cases, ES is not written much often (Since most of the people do not use it as primary storage), most of the people thinks it is real time. But it is not. It’s cache can trick you in intense cases, where writes won’t be immediately available to you for read.

User Management

ES user management is no where near to a full fledged DBMS, only because ES doesn’t need to. They have never announced themselves as a NoSQL DBMS, hence they do not require to add the functionality in full square. They only implements the facilities that ES Ecosystems require.

So … ?

So, what does all these mean to you? If you have an extremely large read featured application, where updates are very rarely or occassionaly done, then you can definitely go with ES as your primary document storage engine. But if you have a write oriented application, requires complex user management or parallel threads require write access, then you better be choosing a standard DBMS for your business and use ES as secondary data store for your analytics and searches.
How To: Manually Add Support of SSL for WWW on Cyberpanel

hmm, it’s a weird topic to write blog on. Because Cyberpanel comes with a built in Certbot, and can automatically detects www and without www to install SSL for. Then why am I writing this up? All because I found a VPS client today facing the issue. Even though, Cyberpanel was telling me that the SSL is issued, it was only issued for non-www domain, but the www domain left behind. Let’s see how can we resolve this.

First problem

First problem came up when I tried to discover the Cyberpanel certbot binaries.

[root@server-sg /]# find . -name "certbot"
./usr/local/CyberCP/bin/certbot
./usr/local/CyberCP/lib/python3.6/site-packages/certbot
./usr/local/CyberPanel/bin/certbot
./usr/local/CyberPanel/lib/python3.6/site-packages/certbot

[root@server-sg live]# /usr/local/CyberCP/bin/certbot --version
certbot 0.21.1
[root@server-sg live]# /usr/local/CyberPanel/bin/certbot --version
certbot 0.21.1

Both of the certbot I could find from Cyberpanel was very old, Certbot has 1.4 version in the Epel which has support for Acme 2 challenge, while the one that Cyberpanel is using doesn’t. I hence decided to install a certbot for our case:

yum install epel-release
yum install certbot

These should be it for the latest version of certbot to start working in your Cyberpanel host. Once done, you may now generate the SSL using the following:

certbot certonly  --webroot -w /home/yourdomain.com/public_html -d yourdomain.com -d www.yourdomain.com

Remember to replace yourdomain.com with the actual one that is having problem with. Cyberpanel creates the home directory with the primary domain, so the remember to give the correct document root for the value of attribute ‘-w’.

Once this id done, certbot should automatically verify the challenge and get the issued license for you. Lets encrypt license are usually stored at the following directory:

/etc/letsencrypt/live/yourdomain.com/

Files are:
/etc/letsencrypt/live/yourdomain.com/privatekey.pem
/etc/letsencrypt/live/yourdomain.com/fullchain.pem

If you had already created the SSL using Cyberpanel (which you must have done if you viewing this post), then remember, certbot will place the SSLs in /etc/letsencrypt/live/yourdomain.com-001/ folder. The name of the folder would be shown at the time you complete issuing SSL with certbot.

There are couple of ways you may use the SSL now. Either you may replace the old directory with the new, or just change the settings in either the vhost conf or the openlitespeed SSL settings. I find the easiest way is just to replace the old directory with the new. Something like this should work:

mv /etc/letsencrypt/live/yourdomain.com /etc/letsencrypt/live/old_yourdomain.com
mv /etc/letsencrypt/live/yourdomain.com-001 /etc/letsencrypt/live/yourdomain.com

Once this is done, remember to restart your openlitespeed:

service lsws restart

Now your https on the WWW should work without any problem. If not, try clearing your browser cache and retry.

How to: Use WINMTR to Diagnose Network Issues

MTR is a great tool to understand if there is a routing issue. There are many times, customer says the website/web server is slow or not being able to access the network etc. After some basic checks, if no solution is concluded, it is important to get a MTR report from the client. As most of the users use Windows, it is common to use WinMTR.

To run WINMTR, you need to first download it from here:

https://sourceforge.net/projects/winmtr/

or here

https://winmtr.en.uptodown.com/windows

Once the app is downloaded, double clicking it will open it. WinMTR is a portable executable binary. It doesn’t require installation.

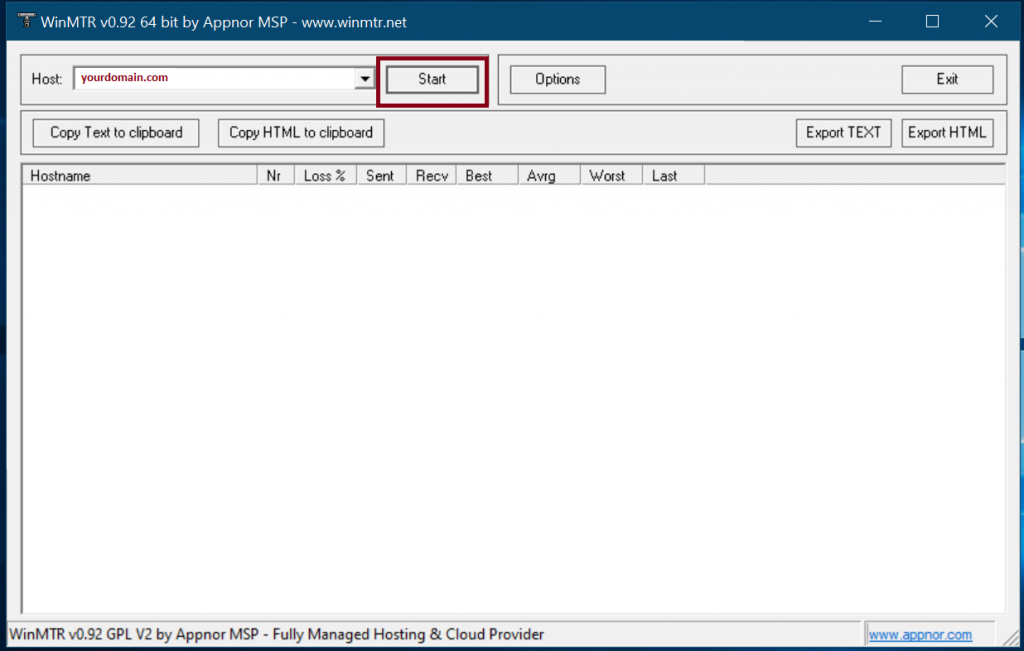
Once opened, you can enter the ‘domain name’ that is having trouble in the ‘Host’ section and press start.

Start winMTR by entering your domain in the Host section

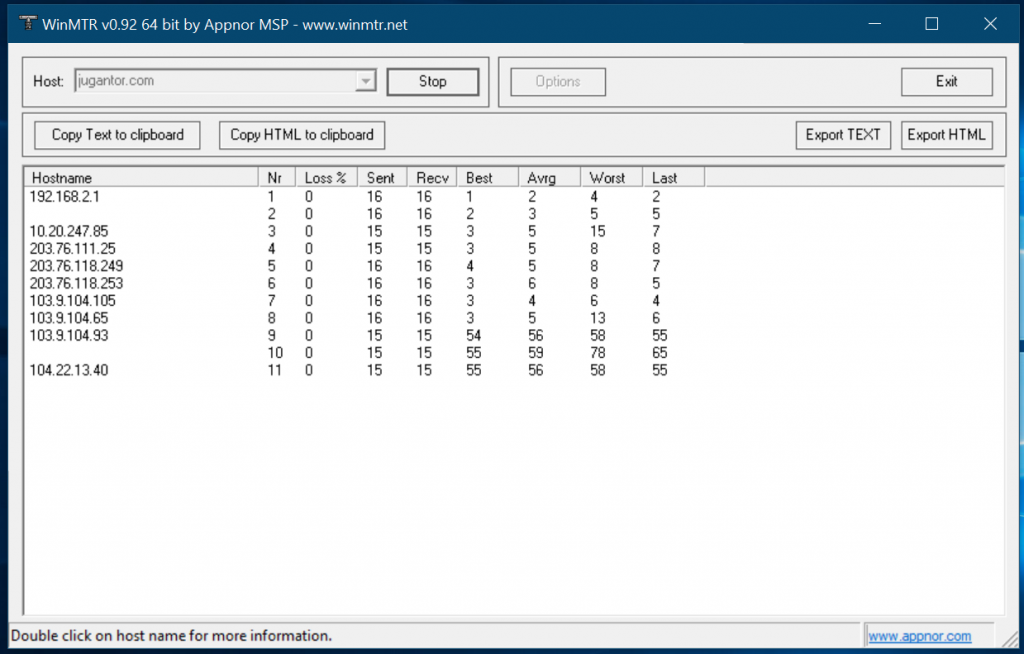
Once you start, it will start reaching the domain you entered and hit each of the node it passes for routing, with giving the amount of drops each node is hitting

WintMTR running – (I have hidden two hops for privacy)

If you are seeing drops of anything above 2-5%, that node is problematic. If the node is dropping a lot, but the next node isn’t dropping enough, then the node is set to transparently hiding the packet responses for security, then that node is not problematic. So if your packet isn’t reaching the destination and it is dropping somehwere or looping in a node, that means, the problem is within that node. Now you can locate the node and see where does it belong. If it belongs to within your territory, then the issue is within your ISP or IIG. But if it is outside your territory but at the end of the tail, then the issue is with the Host.

In most case, we ask for running the MTR for 5 minutes and then export to TEXT and send it over for us to analyse to customers. You can export the report by stopping the MTR and clicking ‘Export TEXT’ available in the winMTR window.

How to Add Openlitespeed Server to Haproxy – Avoid 503 Haproxy Error

For past one month, Openlitespeed has been my favorite piece of web server. Litespeed has always outperformed all the other webservers including Nginx as well in any of my production environment. But I have recently switched to using OLS which is a Opensource version of Litespeed with some limited features. I get LS kind of performance along with no worry for paying. How better could it be?

OLS comes with some weird problem. As OLS is less used, finding a solution for such cases could be difficult. I faced a very similar kind of issue yesterday.

I added a OLS based server to my HAProxy cluster, but the HAProxy can not find the OLS server working. When I try to access the web app hosted under OLS server using local IP masking, I see the website without a problem. That means, OLS is interpreting the Domain with IP relation well. But failing to respond when Haproxy is requesting through IP address.

The problem is, OLS is not configured to respond to ‘default’ requests on ‘127.0.0.1’, ‘localhost’ or the server’s main IP. To find out this, I enabled ‘High’ Debug mode of OLS. To do this, first visit the OLS Webadmin Console, it can be accessed with https://IP:7080

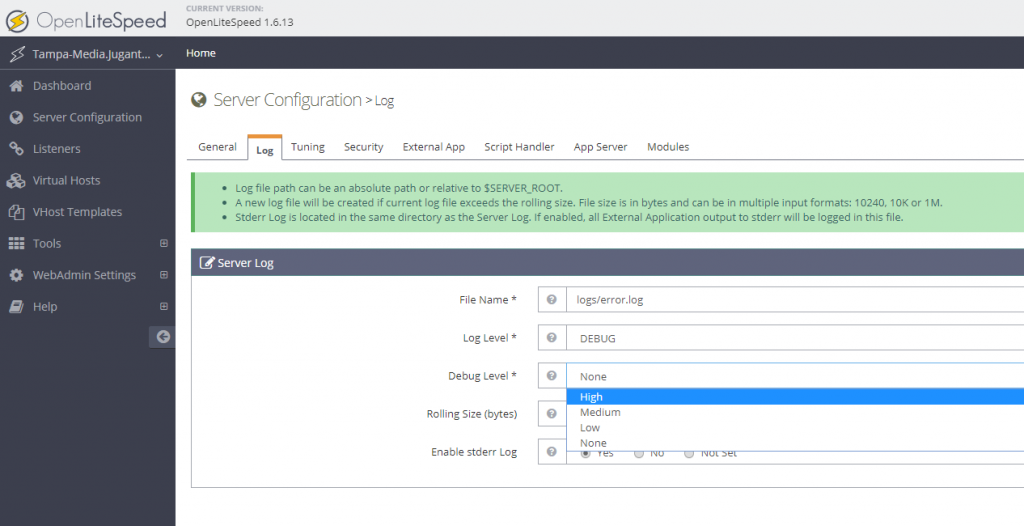
After login, go to Server Configuration >> Log >> Edit Server Log >> Set ‘Debug Level’ to High and Save

Set high debug level in openlitespeed

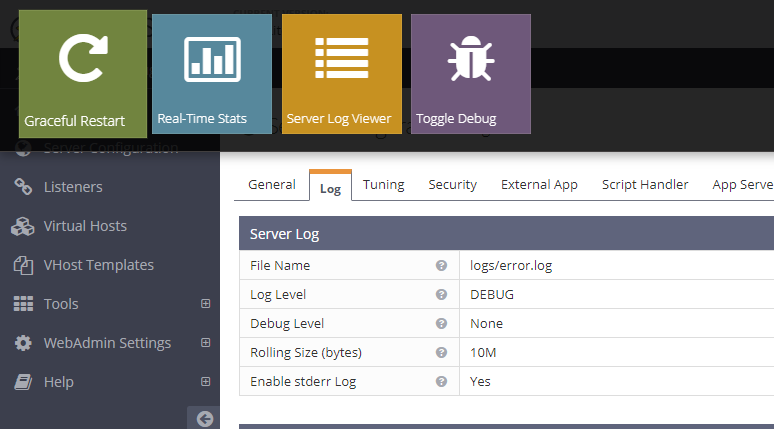
Once saving is done, you may gracefully restart the OLS

Gracefully restart Openlitespeed

Once this is done, you may now monitor the error.log file located usually under /usr/local/lsws/logs. Now tail the output of error.log while processing requests with Haproxy:

tail -f /usr/local/lsws/logs/error.log

You can see, OLS has returned 404 error for the localhost/ request. That means, Haproxy is requesting the IP with a header ‘localhost/’, and the server should return something with code 200 to make sure the server is in business.

What we need to do, is to make OLS respond to request for basic IP and localhost to 200 with the main site instead of ‘404’ error. To do this, we need to go to Webconsole of OLS again >> Listeners

You will see you have two Listeners, one for Default/Non HTTP and the HTTPS/SSL. In my case, I was using only HAProxy to Origin with no SSL, means 80. I selected the Default.

Open 80 Listener View in Openlitespeed

In the Listener List, you can find your Virtualhost, click on the ‘Edit’ of your Virtualhost

Virtualhost Edit Openlitespeed

Now, you can map the virtualhost. You will see your primary domain as the ‘Virtual Host’, which can’t be changed here. But what you can do is to map this virtualhost to several domains. The trick is to add your server’s IP and the localhost in the ‘domains’ list with comma seperation as following:

localhost mapping to OLS

Once this is saved, restart your OLS and now your HAProxy should be able to read requests and starting forwarding requests to your OLS server.

How to Make Cloudflare Work with HAProxy for TLS Termination

Remember:
This is a part of dirty hack series. This is not the only way you can achieve what we want to achieve. But this is only used when you can trust the connections between your HAProxy and the Origin servers. Otherwise, you should not use this technique.

One common problem with using HAProxy and Cloudflare is that, the SSL that Cloudflare gives us, it gets terminated at HAProxy on L7 load balancer. For such cases, Cloudflare can not verify the Origin server and drops the connection. For such cases, your HAProxy will not work. What would you do for such cases? There are two ways to do this.

First one is, Cloudflare gives you a origin certificate, that you can install at HAProxy. I won’t dig into deep into this in this blog post.

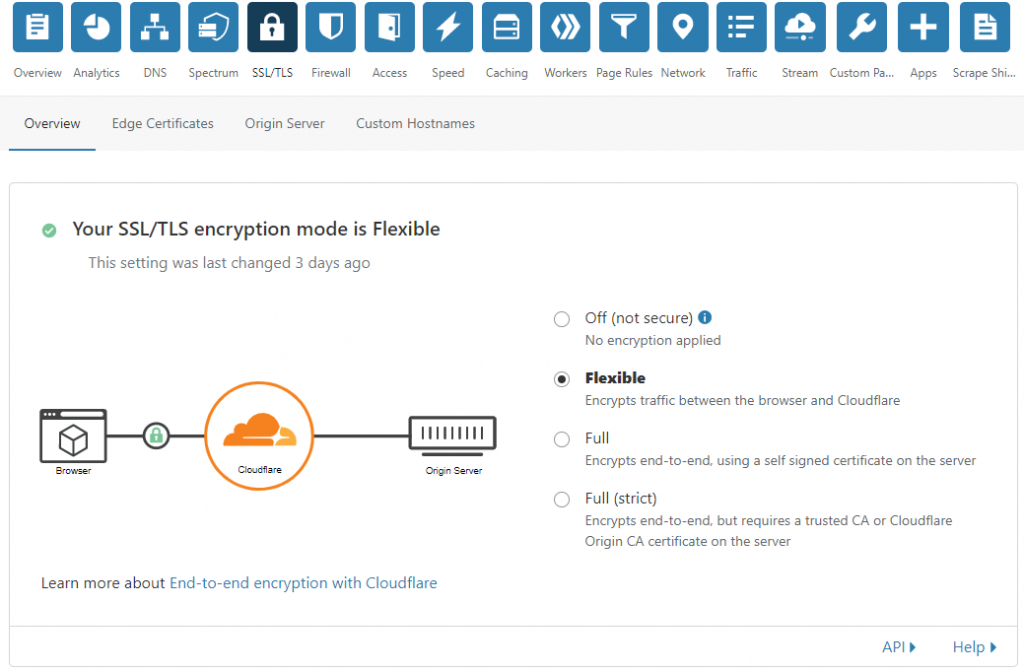
But if you can trust your connections between HAProxy and backend Origin servers, as well as the connections between Cloudflare and HAproxy, you can choose the second one. For this case, Cloudflare allows you to Encrypt only the connections between the Visitors and Cloudflare. It won’t matter what you are doing behind the Cloudflare. This option is called ‘Flexible’ option, that you can select from your Cloudflare >> SSL/TLS tab.

Fix TLS Termination by HAProxy with Flexible Encryption Mode of Cloudflare

Once you set this to Flexible, this should start working ASAP. Remember, this is not essentially the best way to do this, but the quickest way only if load balancing is more important to you instead the data integrity.

How to Add a Zimbra User to Allow Distribution List Creation

NB: This is going to be another documentation purpose post.

A distribution list allow you to create a mailing list. So for example if you have a CRM with a member of 100, you want to add them to a list, so that you do not need to email each of them distinctively when required, instead, you keep a list with an email like [email protected] and allow somebody to shoot at that email, which would make sure all the CRM members get the email. In Zimbra, there is a feature called ‘Distribution List’. By default this is only permitted to admin user to create. But in case, you want to permit a user to create distribution list, you would need to use ‘zimprov’ command. Here is the reference:

# su - zimbra
# zmprov grantRight domain yourzimbradomain.com usr [email protected] createDistList

Fairly simple!