How to Add PHP in Default Path for Plesk / How to Fix -bash: php: command not found for Plesk User

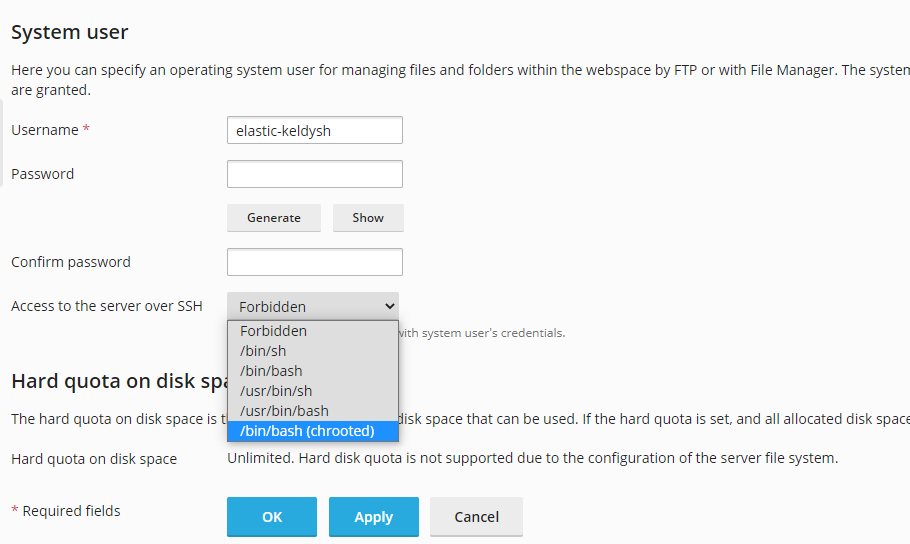
If you have added SSH access to your plesk user using the following tutorial:

and then, tried to run php command like the following:

[elastic-keldysh@pl1 ~]$ php -v
-bash: php: command not found

You might have encountered the above error. This is because plesk do not store the php binary in your PATH variable locations. You may check your existing path variables here:

[elastic-keldysh@pl1 ~]$ echo $PATH
/usr/share/Modules/bin:/usr/local/bin:/usr/bin:/usr/local/sbin:/usr/sbin

Plesk stores it’s php binaries for different versions here:

/opt/plesk/php/

So, for example if you are trying to use PHP 7.4 binary, this would be like the following:

[elastic-keldysh@pl1 php]$ /opt/plesk/php/7.4/bin/php -v
PHP 7.4.10 (cli) (built: Sep  4 2020 03:49:35) ( NTS )
Copyright (c) The PHP Group
Zend Engine v3.4.0, Copyright (c) Zend Technologies
    with the ionCube PHP Loader + ionCube24 v10.4.2, Copyright (c) 2002-2020, by ionCube Ltd.
    with Zend OPcache v7.4.10, Copyright (c), by Zend Technologies

So, to use only php -v, you need to add this bin path to your path variable. You may do that by running the following command:

PATH=$PATH:/opt/plesk/php/7.4/bin/

Now, you may run the following and it will work:

[elastic-keldysh@pl1 php]$ php -v
PHP 7.4.10 (cli) (built: Sep  4 2020 03:49:35) ( NTS )
Copyright (c) The PHP Group
Zend Engine v3.4.0, Copyright (c) Zend Technologies
    with the ionCube PHP Loader + ionCube24 v10.4.2, Copyright (c) 2002-2020, by ionCube Ltd.
    with Zend OPcache v7.4.10, Copyright (c), by Zend Technologies

Now, we need to remember, this will only sustain for the existing session, if we log out and re login, this would be lost. To keep this permanent on each login, we need to put this in the .profile file. You may do this by running the following:

echo "PATH=$PATH:/opt/plesk/php/7.4/bin/" >> .profile

Once done, now you may try to login back again and see php -v is still working:

[elastic-keldysh@pl1 ~]$ exit
logout
[root@pl1 ~]# su - elastic-keldysh
Last login: Thu Oct  1 13:42:13 IST 2020 on pts/0
[elastic-keldysh@pl1 ~]$ php -v
PHP 7.4.10 (cli) (built: Sep  4 2020 03:49:35) ( NTS )
Copyright (c) The PHP Group
Zend Engine v3.4.0, Copyright (c) Zend Technologies
    with the ionCube PHP Loader + ionCube24 v10.4.2, Copyright (c) 2002-2020, by ionCube Ltd.
    with Zend OPcache v7.4.10, Copyright (c), by Zend Technologies
[elastic-keldysh@pl1 ~]$

How to Enable SSH in Plesk User Domain

After you have created the domain from Plesk panel, go to Websites & Domains List, click on your domain to view details of your domain settings.

Now click on FTP access, and from the List click on the main username. In the FTP details for the user page, you will see an option says ‘Access to the server over SSH’ with a drop down that primarily says ‘Forbidden’. You may select the kind of SSH, you would like to give to your user. If you are familiar with the ‘jailshell’ in Cpanel, then it is the option that says ‘/bin/bash (chrooted)’, or you may select /bin/bash to give them normal shell.

Now, you may press ‘Apply’ to set SSH access to the user.

When should you use REST over ORM/DBAL to do Database Operations

Some Background Study

Let’s say, you are architecting a scalable software. Obviously, you would utilize some kind of persistent data storage for your production. If you are developing some kind of transactional software like an ERP/Ecommerce, you are probably more focused into a relational database software like MySQL or MSSQL or PostgreSQL.

Now, one common difficulty for every software architect while working with relational databases, is the ‘Object Relational Impedance Mismatch’ problem. The idea is very straightforward. You design and model your software or programming concept based on Objects, while you store your data in relational tables. Now, how do you map them? As these are different data structures, mapping and utilizing them, is a programming difficulty here.

What is ORM?

In the software world, ORM (Object Relational Mapper) is a form of tool, that exist to resolve the problem. It basically is mapping your relational data into object. That allows you to think your software and data both are stored and operated in Objects. As data is not really stored in an Object, hence, ORM creates an abstraction layer to realize the difference to your software. Using ORM for software design is very useful from architectural point of view, because it takes and returns the same kind of data structure, that you use to design/model your software. It becomes easy to perceive the architecture.

How does DBAL fits here?

As ORM creates an abstraction layer for it’s purpose, it can also be called ‘Database Abstraction Layer’. This is merely conceptual. Now, one purpose of DBAL over ORM, is that DBAL creates the abstraction to keep your software independent from database software alone (Most ORM does the same or helps to achieve the same). So, if you use any of MySQL / MSSQL / Oracle SQL / PostgreSQL or any other SQL based DB engine, it will operate on the same syntax and keep your software compatible out of the box.

So, it’s great, then what’s the problem?

It is obviously conceptually great. But there are cases, when it is better not to use ORM/DBAL. One of the architectural sense of creating abstraction layer in software engineering is that, it creates imperative codes for your mapping. Now, what’s the problem with Imperative codes? If you are unware, Imperative programming refers to the style of programming where we are mainly focused on ‘HOW’ to do something. SQL or relational databases are essentially declarative style of programming, who are focused on ‘WHAT’ to do. For example, when we say ‘select * from users’, it directly gives you the data exists in the users table. We do not care about how does it do it, we only care about the results.

There obviously a catch of declarative code is that, it also creates some kind of abstraction, which uses imperative approach, but it’s underline. For example a Loop in Imperative C is obviously much faster than a loop in Imperative Python (Note: Python can be used in declarative way). But if your software’s imperative code is converting a declarative approach to an imperative piece, then sadly it’s going to be slow, sluggish and less able to scale. ORM or DBAL unfortunately suffers the same. ORM creates an abstraction layer or a slow imperative layer to run declarative SQL. Other cons on using ORM is that, it can duplicate or hobble database structure on your business logic as you are no longer thinking declarative, rather imperative while using ORM.

So where does REST fits in?

To have quicker, simpler and futuristic development, no developer is going to plugin RAW SQL codes in their software. An alternative is to use a declarative REST based api, that uses declarative approach for your database with minimal imperative codes. You can run and consume them as a service with the database software alone. Functional programming is closely related to declarative programming, hence for maximizing performance, you might want to choose a REST api tool that is written in some kind of functional programming language or done in a functional way like with Haskell.

Many database software already started giving HTTP as service protocol with the database software alone, that works in declarative approaches. MySQL comes with a MySQL Router API. PostgreSQL has a solid pREST written in Haskell available in Github. As C# can be written in declarative approach same like Python, there are numerous declarative REST tools written in C# for MSSQL/SQL.

Conclusion

Consuming Declarative API is more like a frontend topic these days since Javascript is taking more functional and declarative futures. React wants you to write codes in declarative approaches, and provides more tools in coming releases with declarative helpers. It is still an odd idea to utilize declarative programming to solve a long existing problem with Object Relational Impedance Mismatch. But then, in the era of millions of users, a declarative database access tool, can cut down a huge amount of cost for infrastructure.

How to Copy a Disk Over SSH?

First, let’s see why do we need to copy a disk over SSH. One is of course for backup. For example if you have a VM on a LVM partition. You want to keep a copy of the block level backups, you prefer to create a snapshot of the lvm partition and then copy the disk as an image to your backup server. The other being quite the same, but for different purpose. What if you want to migrate a VM that you have created on an LVM partition, and then you want to migrate it as a raw file to another server? Or a LVM partition to another server? For those cases, the technique is pretty awesome.

Copy The Disk to a RAW Image

First, let’s learn how can copy a disk as raw image.

For example, you are sitting in your backup server. And you want to copy a disk or lvm partition or a partition of a disk, from a remote server to your backup server. And you want to keep the copy of the image, then you may run dd command as following from your backup server:

ssh [email protected] "dd if=/dev/vg0/v1092-kdkdksjuekksq" | dd of=/backup/v1092.raw

In our case, 10.10.10.10 is the IP of the server, that partition/disk currently reside. We are trying to copy a LVM partition namely: /dev/vg0/v1092-kdkdksjuekksq, just replace this one with the one your desired lvm partition. You may also do this for a disk like /dev/sda, the command would be like the following then:

ssh [email protected] "dd if=/dev/sda" | dd of=/backup/v1092.raw

Now as you have copied the disk/partition, you may look at what the partition holds by checking the data inside it. To know, how to mount a raw disk image, you may check the following:

How-to-Mount-raw-VM-disk-images-KVMorXenorVMW

Copy The Disk To Another Remote Disk over SSH

You may either copy the disk directly to a secondary disk you have on the backup/migrated server or dump the image that you copied to another disk/partition of same size or bigger. To copy directly a partition /dev/sda from another server, to a backup server with the secondary disk /dev/sdb, you may do the following:

ssh [email protected] "dd if=/dev/sda" | dd of=/dev/sdb

This would backup /dev/sda from 10.10.10.10 and restore to /dev/sdb drive you have on the server that ran the command.

To just dump the image file, that copied earlier on the other example to /dev/sdb, you may do the following:

dd if=/backup/v1092.raw of=/dev/sdb

Hope this helps.

How to Enable Query Logging in MySQL/MariaDB

For example, you manage a high traffic website, that utilizes an abstraction layer like an ORM to manage MySQL queries. Now, as a DevOps/System Admin, it becomes difficult for you to get a stat of which MySQL query being overused in the scenario. For these cases, one way, you may get some idea on what being overused, is called ‘MySQL General Logs’. Remember, it is very much different than the MySQL Slow Query Logging. It is not essential to have a slow query in the system to determine if your mysql is boggling. It is very much possible, there are queries, that take very small amount of time, but starves your CPU by executing many times and performs the same operation. Once you are able to identify them, you may utilize any Hashmap based caching strategy like Memcache or Redis or Simple file cache to reduce your load down on MySQL instance or cluster.

First, we create a query logging file and set the right permission:

touch /var/log/mysql_query.log
chown mysql:mysql /var/log/mysql_query.log

Once the file creation is done, now we can enable general log either by using mysql shell, if you would like to avoid restarting your mysql instance or in my.cnf file to keep the change permanent. A point to note, you should not do query logging all the time, as it decreases MySQL performance by 15-25%, which might hurt your overall production performance, plus the size of log will cumulatively increase if you have a server that performs over a thousand or more queries per second.

# Type in your shell prompt
mysql

# this will open your mysql shell, you may run mysql commands as below:

mysql > SET global general_log = 1;
mysql > SET global log_output = '/var/log/mysql_query.log';

This should immediately advise mysql to push the logs to /var/log/mysql_query.log.

Now, if you observe the file, you may see the queries are coming up so quickly that you may hardly find anything out from it. The file has no output until you aggregate the result. If you have a large file, a better way to aggregate result by using Lotstash and Elasticsearch. We won’t do that here, that would be a topic for another blog post. We would instead use, some basic shell aggregation to see if we can determine anything useful from this. You may use the following tool, that list the last 10000 lines, then sort, and group the unique lines with the count and order by ascending to put the most frequent query at the end of the line:

tail -10000 /var/log/mysql_query.log | sort | uniq -c | sort -n

This will help you by giving the top most used query in last 10K queries. If the number is more than 5%, you need to pay attention to that. If it is the same query, that means, you may use a Hashmap based caching technique to reduce database boggling and improve performance.

Hope this helps.

How to reset root password in CentOS 7

Resetting admin password in CentOS 7 is different than of CentOS 6, as CentOS 7 utilized Grub 2 and has a different procedure to access Single User Mode. First, boot your system in Single User Mode to reset the root password by following the below tutorial:

Once done, now, you may first chroot the system:

chroot /sysroot

Now, you may reset the password using the following:

passwd root

You should be done. If you are using SELinux, then you need to relabel accordingly:

touch /.autorelabel

Then, exit chroot and reboot the system:

exit && reboot

You should be done now.

How to boot CentOS 7 in Single User Mode

Booting CentOS 7 in single user mode is total different than of CentOS 6 as it uses a different version of Grub. We will go step by step to boot into single user mode in CentOS 7.

  1. First, boot the screen and press an arrow key while the timer comes on this screen to stop the timer

    CentOS 7 Boot Screen

  2. Press ‘e’ on the selected default CentOS version. That will take you to the following screen

    CentOS 7 Boot Edit Screen

  3. These are grub commands that the bootloader is using to boot you to the system. Arrow down in this window to the line, that starts with linux16. Now take the right arrow on the keyboard to take your cursor to the word that says ‘ro’ as shown in the image

    Linux16 Command Boot

  4. Now replace ro with rw init=/sysroot/bin/sh as shown below

    CentOS 7 Boot Sysroot

  5. Now press Ctrl + x to start Single User Mode

    Boot in Single User Mode CentOS 7

You should be done now, you are on the single user mode console. If you would like to use the main system, you may chroot as the following:

chroot /sysroot

Now, if you are trying to reset the root password, after booting into the single user mode, you may follow the following to reset the root password:

How To Get Disk Serial Number in Megaraid

Question:

We can use smartctl to get the disk serial ID in case of disk replacement or crashes, with the following:

smartctl -a /dev/sdX

Where X is the device identifier like, for the first disk, this would be sda, second sdb etc. But in case the devices are behind the RAID, this command returns an error:

[root@tampa-lb ~]# smartctl -a /dev/sda
smartctl 7.0 2018-12-30 r4883 [x86_64-linux-3.10.0-1127.el7.x86_64] (local build)
Copyright (C) 2002-18, Bruce Allen, Christian Franke, www.smartmontools.org

Smartctl open device: /dev/sda failed: DELL or MegaRaid controller, please try adding '-d megaraid,N'

How to make this work?

Answer:

To get the serial numbers behind the LSI MegaRAID, you would first need to find out the device ID using LSI Megaraid tools. A quick way to install LSI Megaraid tool is available here:

How to: Install LSI Command Line Tool

One you have installed the LSI Megaraid command line tools, now you may use the following command to identify your device:

/opt/MegaRAID/MegaCli/MegaCli64 -PDList -aAll | egrep 'Slot\ Number|Device\ Id|Inquiry\ Data|Raw|Firmware\ state' | sed 's/Slot/\nSlot/g'

This would output something like the following:

Slot Number: 1
Device Id: 11
Raw Size: 447.130 GB [0x37e436b0 Sectors]
Firmware state: Online, Spun Up
Inquiry Data: 50026B72822A7D3A    KINGSTON SEDC500R480G                   SCEKJ2.3

In this server, it has one disk, but you may have multiple disk with different ‘Firemware state’ and ‘Device Id’. To use smartmontools, you need to pick the ‘Device Id’, mentioned here, which is 11. Now you can run the following command to get the device details using smartctl:

smartctl -d megaraid,N -a /dev/sdX

Here, N is the device ID, and X is the device name, you may get the device name using df -h command or fdisk -l. For our case, this command would be like the following:

smartctl -d megaraid,11 -a /dev/sda

This would print a lot of information about your device, but if you are looking to identify the Serial Number only, you may run the following:

~ smartctl -d megaraid,11 -a /dev/sda|grep Serial
Serial Number:    50026B72822A7D3A

One thing to note, we can also get Serial number from the MegaCli tools Inquiry data, you may have already noticed:

[root@tampa-lb ~]# /opt/MegaRAID/MegaCli/MegaCli64 -PDList -aAll | grep 'Inquiry Data'
Inquiry Data: 50026B72822A7D3A    KINGSTON SEDC500R480G                   SCEKJ2.3

Here, the first parameter in the return is the same as smartctl returns as Serial number, it’s because it’s the serial number that megacli gets/identifies as well.

How to Access Redis over TLS/SSL

If you are trying to purchase Managed Redis Database, from companies like digitalocean, then, you would get access to those Redis servers, only over TLS/SSL support. Unfortunately, by default redis-cli does not ship with TLS support, hence, you need to either use Tunnel to access redis instance through redis-cli or use different tool for your purpose.

Access Your Redis Instance using Python

If you are developing your application using python, and using a managed redis database, then, you would have to make the redis connection over TLS/SSL. This can be done by setting the ‘SSL’ to True, in the Redis constructor. Here is an example:

import redis

r = redis.Redis(host='db-redis-sfo2-89862-do-user-4233327-0.b.db.ondigitalocean.com', port=25061, password='abcdhjnmjtxeupp', decode_responses=True, ssl=True)

As you can see, I have set the ssl to True at the end, to set the connection over TLS/SSL.

Access Your Redis from Command Line using Redli

If you want to have access to your redis instance through a command line tool, then using redli is my first line choice. Configuring stunnel with redis-cli is also possible, but it would be another topic of discussion here.

Let’s see, how can we install redli:

Redli is a tool developed by IBM with TLS/SSL support. It is written in Golang. You may download a version for Linux from the IBMCloud Github repo and start using it:

~ wget https://github.com/IBM-Cloud/redli/releases/download/v0.4.4/redli_0.4.4_linux_amd64.tar.gz
~ tar -xvzf redli_0.4.4_linux_amd64.tar.gz
~ cp redli /usr/bin/
~ chmod +x /usr/bin/redli

Now, you may use redli to connect to your Redis database with TLS enabled as following:

redli --tls -h db-redis-sfo2-89862-do-user-4233327-0.b.db.ondigitalocean.com -p 25061 -a abcdhjnmjtxeupp

See how ‘–tls’ is enabled to access redis over TLS here. Hope this helps.

How to Uninstall Let’s Encrypt from Cpanel / WHM

To uninstall the Cpanel / WHM plugin for Let’s Encrypt, login to your SSH for root and run the following:

/usr/local/cpanel/scripts/uninstall_lets_encrypt_autossl_provider

It might take sometime, once completed, it should remove let’s encrypt as a provider from your AutoSSL plugin.